How to Permanently Delete Movies on Mac?
The deleted files on Mac can be recovered by data recovery software. If you want to permanently delete movies on Mac, just try Mac file shredder. It will securely shred the movie videos so that they cannot be recovered by any method. DoYourData Super Eraser for Mac is a reliable Mac file shredder. It offers certified data erasure standards to help in permanently deleting files, wiping hard drive on Mac.
![]() Updated by Shirly Chen on March 12, 2025
Updated by Shirly Chen on March 12, 2025
Quick Navigation:
- Method 1: Use Finder and Trash
- Method 2: Use Terminal to Delete Movie Files Safely
- Method 3: Use the Disk Utility
- Method 4: Use Mac File Shredder
- Conclusion
Managing your movie collection on a Mac can quickly become a storage nightmare, especially when high-definition files devour precious space. Have you ever found yourself desperately needing to free up gigabytes, only to wonder if dragging files to the Trash does the job? You're not alone.
Understanding how to permanently delete movies from your Mac is not just about hitting delete - it's about ensuring those files are irrecoverable, protecting your privacy, and optimizing your system's performance. Whether you're a movie enthusiast looking to declutter or someone aiming to keep their Mac running smoothly, this guide is for you.
Discover foolproof methods and handy tools that guarantee your movie files are gone, making space for what truly matters. Ready to transform your Mac's storage management? Let's get started!
Method 1: Use Finder and Trash
On your Mac, it's easy to get rid of movies using the Finder and Trash. To make sure you get rid of the files properly, follow these easy steps:
1. Locate the Movie File
You can use the Dock or press Command + Space and type "Finder" to open Finder. Find the place where your movie file is saved. It could be in the Movies folder or a folder you made just for this purpose.
2. Move to Trash
To get rid of a movie file, click on it. A menu will appear if you right-click (or control-click) on the file. Choose "Move to Trash" from that menu. You can also drag the file straight to the Trash button in the Dock.
3. Empty the Trash
Right-click the Trash button in the Dock after putting the file there. "Empty Trash" can be chosen from the menu that appears. Confirm the move to delete the file from your Mac when asked. In this step, the place where the file used to be will be marked as free for new data.

4. Verify
Make sure the movie file is not in the Trash by checking there. Check your storage to see how much room has been freed up.
Note: The deleted movies are not lost for good and can be recovered by data recovery software even you have emptied the trash.
Method 2: Use Terminal to Delete Movie Files Safely
You can use Terminal to delete movie files on your Mac in a safer way. To make sure your files can't be recovered, do these things:
Step 1: Open Terminal
Go to Applications, then Utilities, and Terminal. You can also type "Terminal" and press Enter after pressing Command + Space.
Step 2: Navigate to the File Location
Change directories with the cd command to get to where your movie file is. Do this if your file is in the Movies folder: cd ~/Movies.
Step 3: Use the rm Command with Secure Deletion
After typing rm -P, write down the path to the movie file. rm -P samplemovie.mp4 is an example. With the -P option, the file is overwritten three times with random data before it is erased.
Step 4: Verify File Deletion
After running the command, use ls to see what's in the directory and ensure the movie file is gone. For example, use ls to make sure the file was deleted.
Method 3: Use the Disk Utility
Disk Utility is a safe way to remove files and make room on your Mac. Here's how to use it to make sure you can't get back deleted movie files:
Step 1: Start-up Disk Utility
Click on Applications, Utilities, and Disk Utility to find it. You can also key in "Disk Utility" by pressing Command + Space and then Enter.
Step 2: Select the Drive
Choose the drive where your movie file was saved from the list on the left side of Disk Utility. It is usually your main drive, which will look like "Macintosh HD."
Step 3: Choose Erase Free Space
Go to the top and click on the "Erase" tab. You can choose "Erase Free Space" from the list.
Step 4: Select Security Options
Pick out "Security Options" from the menu. Pick the amount of safety you want:
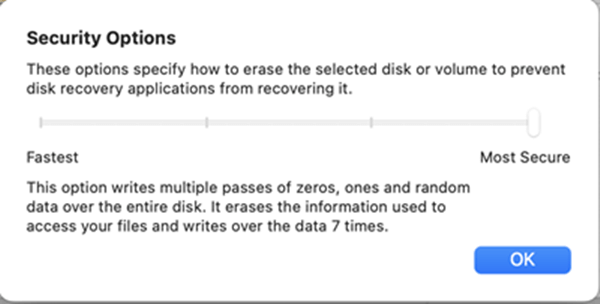
Fastest: A single pass of zero data (quick but less safe).
3-Pass: Three passes of random data(more secure).
7-Pass: Seven passes of random data (as safe as possible, but it takes the most time).
Step 5: Erase Free Space
After making your password choice, click "OK" to confirm it. Press "Erase Free Space" to begin.
Step 6: Wait for Completion
The time it takes may depend on the level of security you choose and the free room you have. Disk Utility will let you know when it's done.
Method 4: Use Mac File Shredder
The third-party file shredding tool - DoYourData Super Eraser for Mac is very strong and can safely and forever delete files from your Mac. Here's how to delete your movie files with DoYourData Super Eraser for Mac, step by step:
Step 1. Download and install DoYourData Super Eraser for Mac on your Mac.
Step 2. Open DoYourData Super Eraser for Mac, click Add to add the movie files.
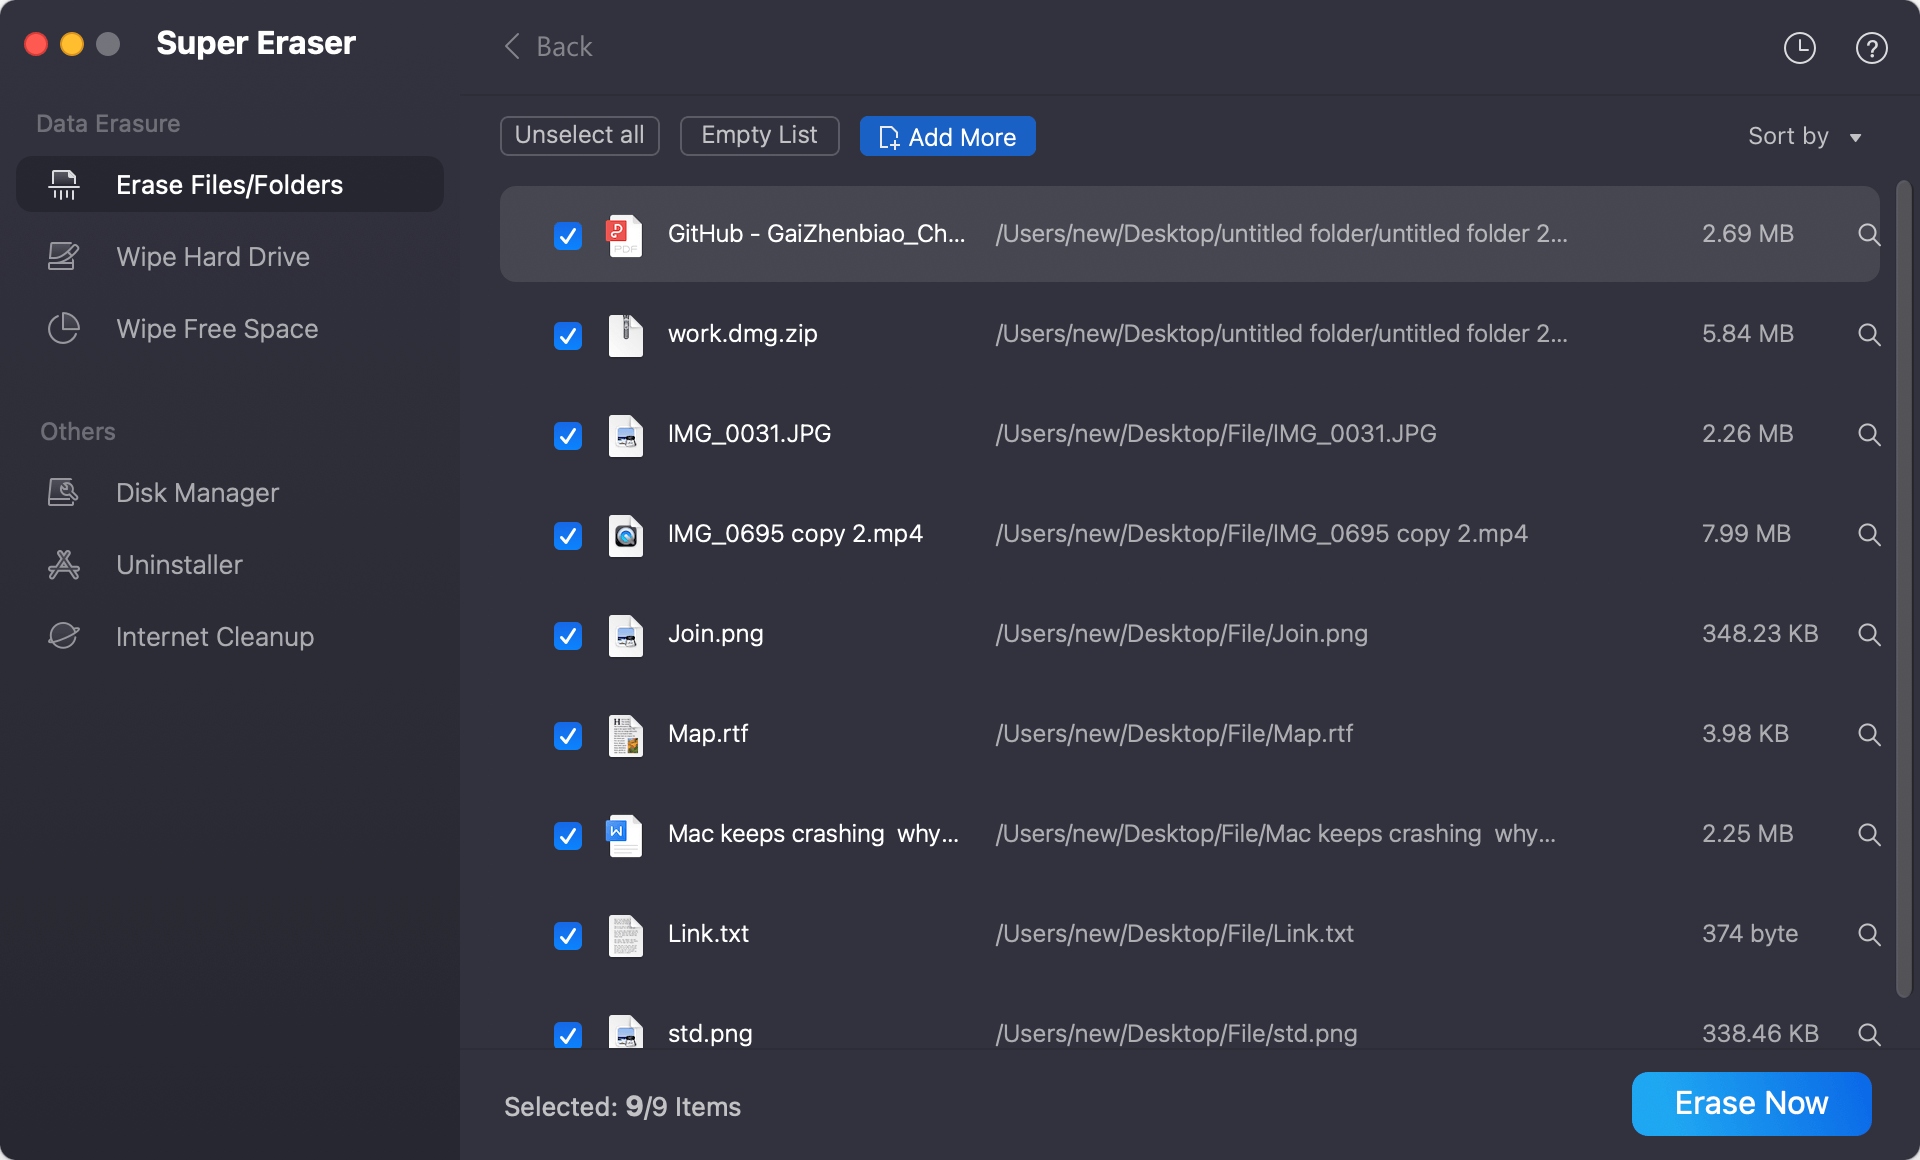
Step 3. Click on Erase Now button. DoYourData Super Eraser for Mac lets you delete data with different levels of security, such as one-pass overwrite, three-pass overwrite (DOD standard), and seven-pass overwrite. Pick the amount of safety that works best for you. Deleting files with higher security settings takes longer, but they delete more completely.
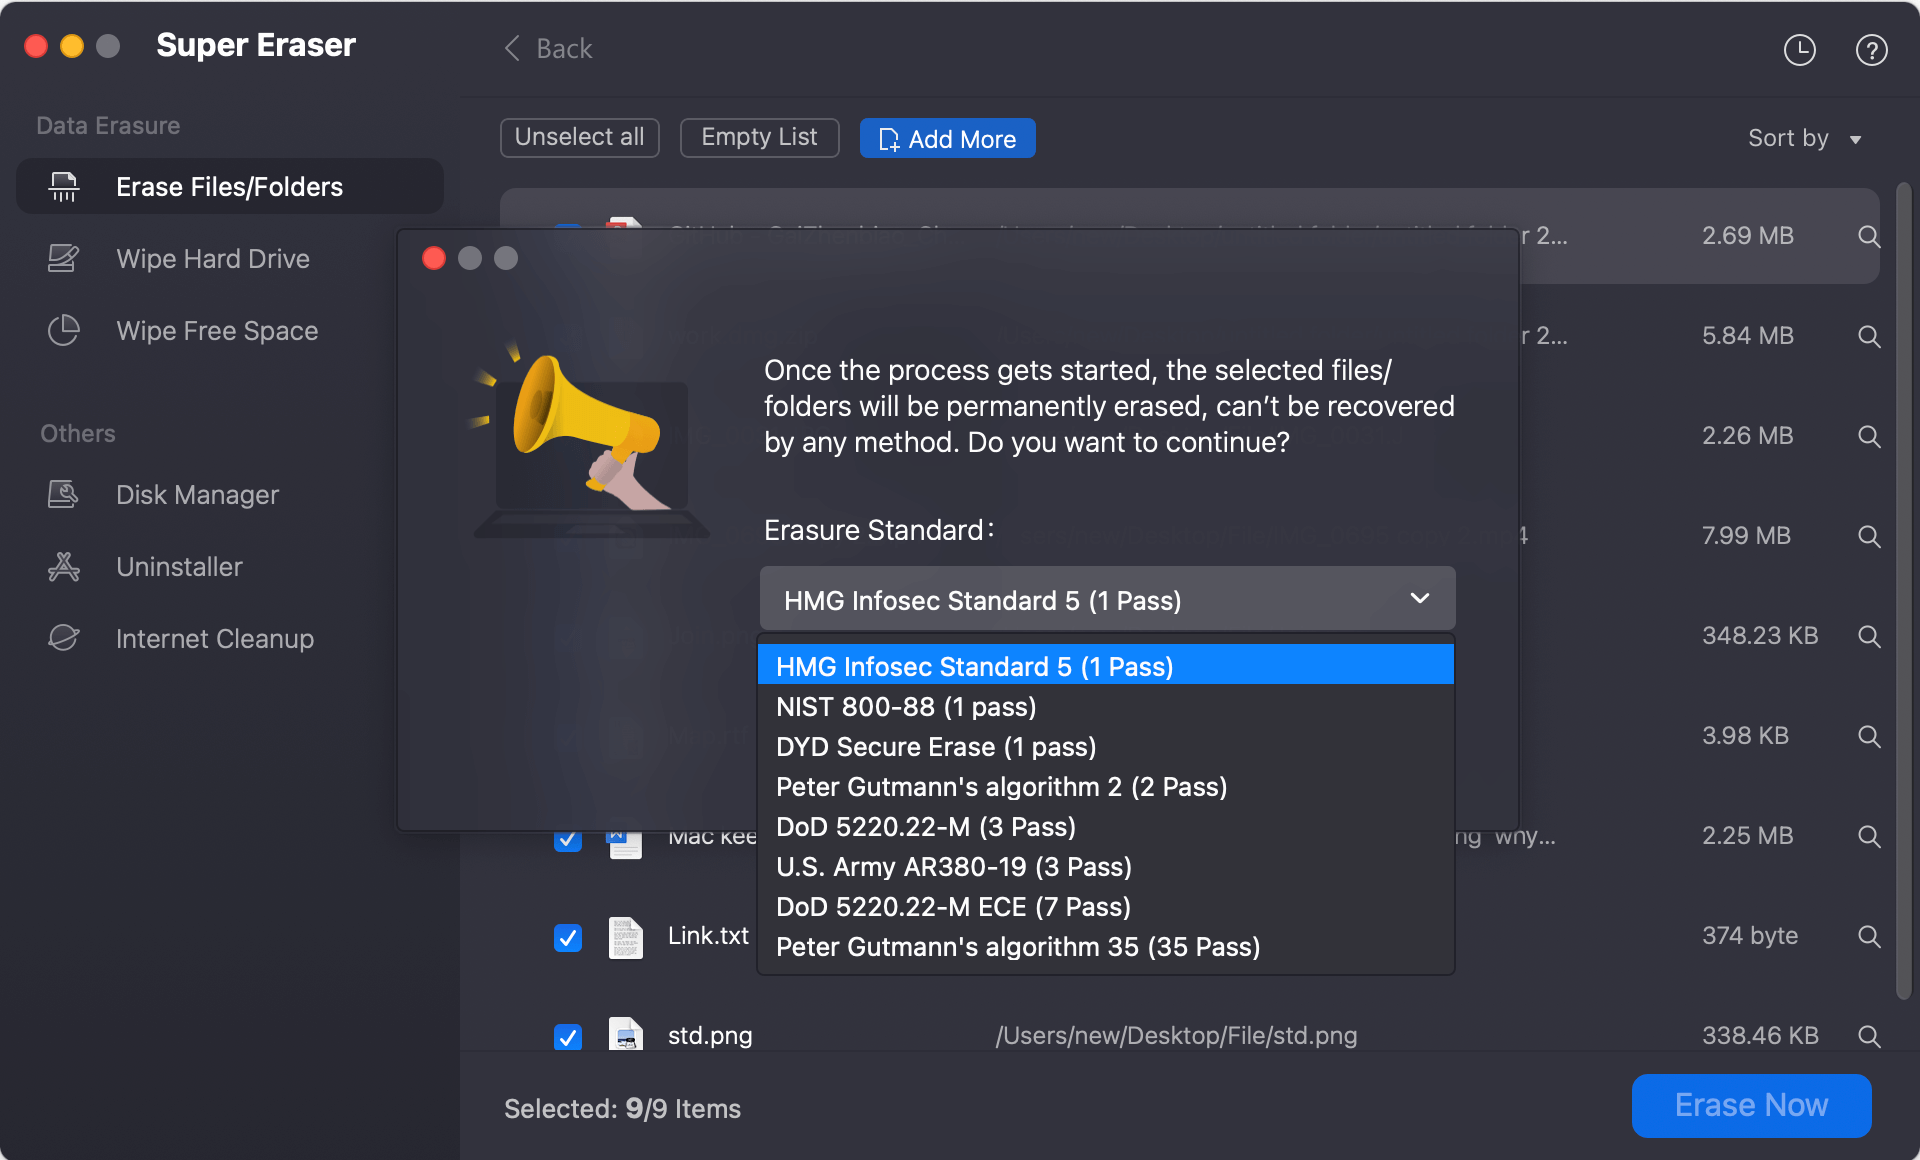
After you've chosen the erasure standard, click "Continue" to start the process.
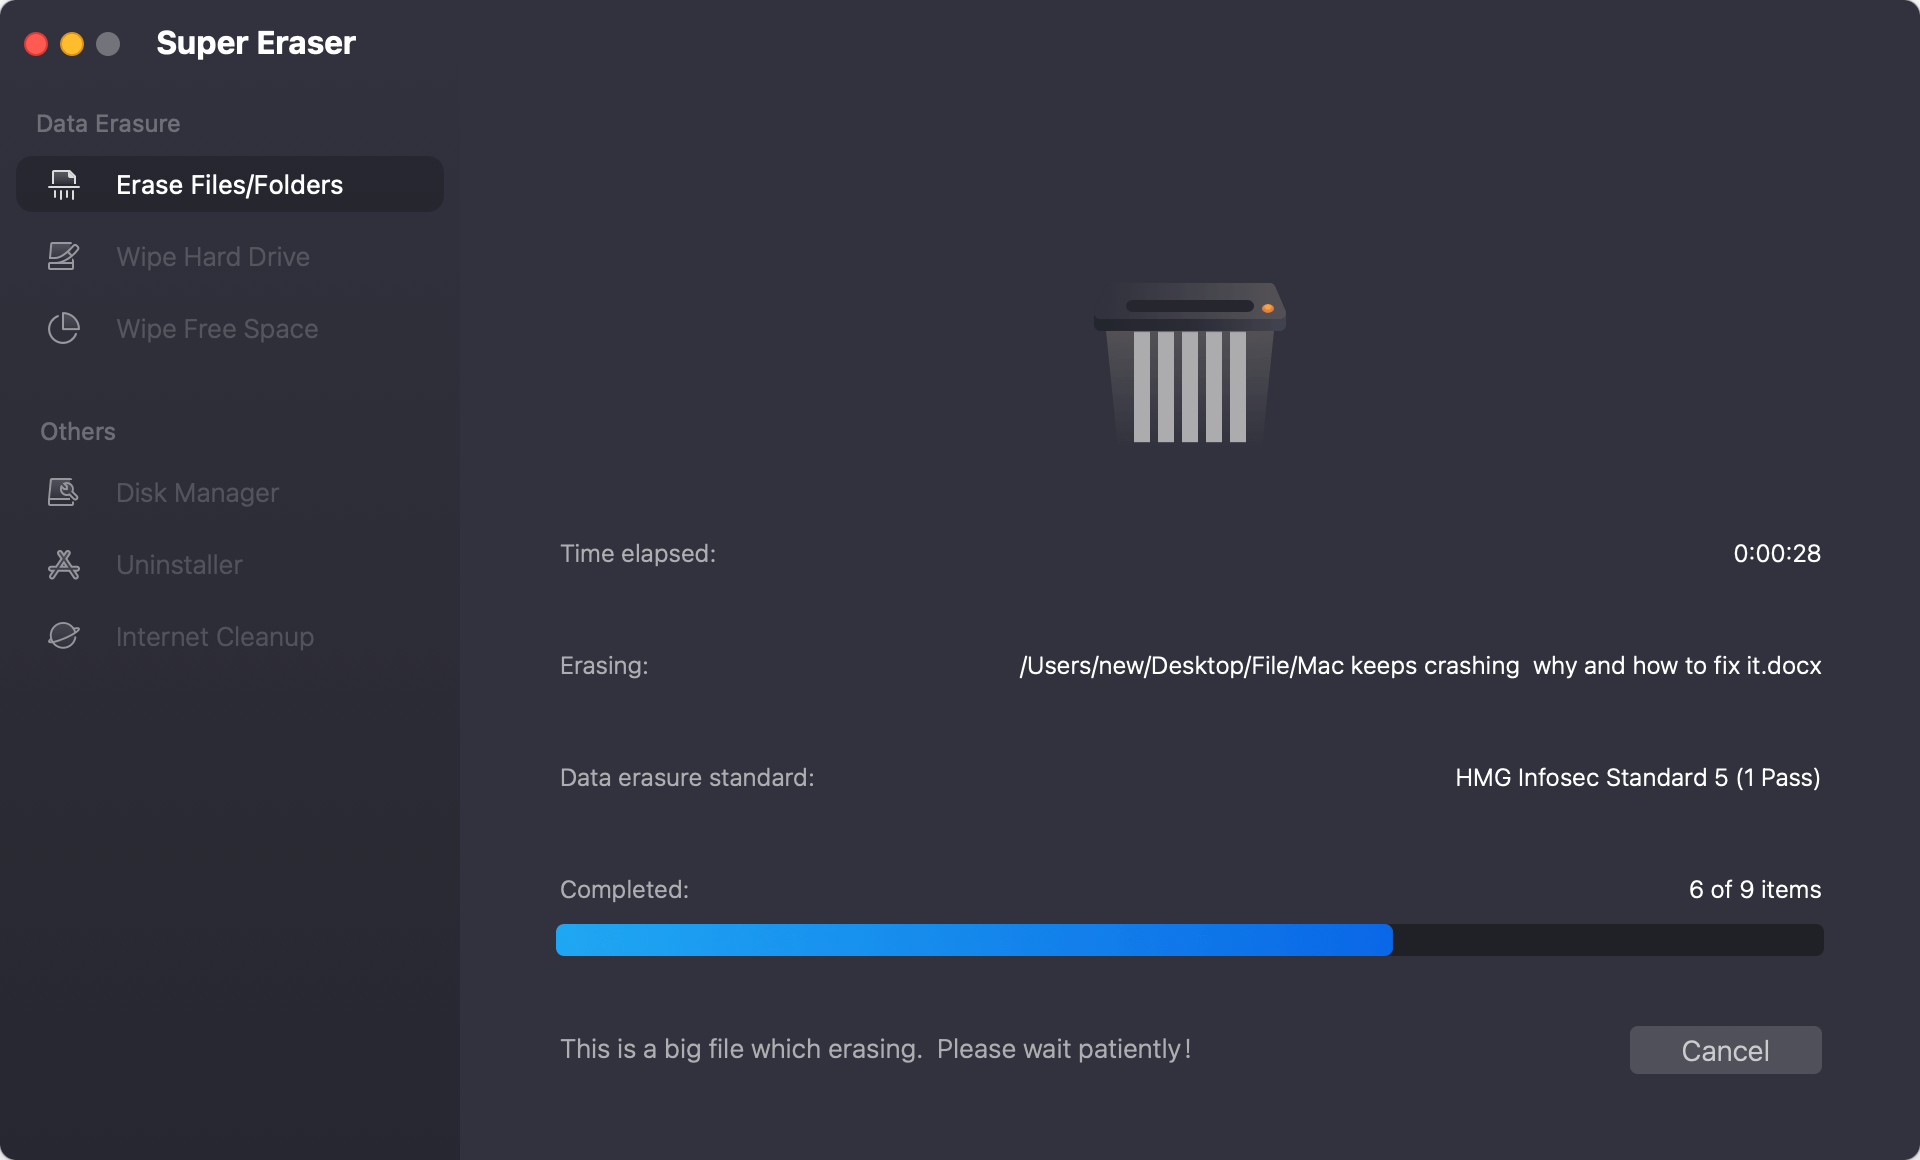
The process could take a while, depending on how many files you want to delete and the amount of security you choose. DoYourData Super Eraser for Mac will let you know when the process is complete.
Note: Once the process gets finished, the erased movie files are lost for good, cannot be recovered by any data recovery method.
Conclusion:
Managing and safely deleting movie files on your Mac is important for keeping your data safe and maximizing your storage space. You can safely delete your files with Finder and Trash, Terminal commands, Disk Utility, or third-party tools like Super Eraser.
Getting rid of old files regularly makes more room on your Mac and speeds it up. You can safely clean up your system and keep your info safe by following the steps in this guide. Are you ready to free up space on your Mac and keep it running smoothly? Get rid of those movies right away!

DoYourData Super Eraser for Mac
DoYourData Super Eraser for Mac is a 100% safe, powerful and easy-to-use data erasure program. It offers certified data erasure standards including Peter Gutmann, U.S. Army AR380-19, DoD 5220.22-M ECE to permanently erase data from Macs and external devices, making data recovery be impossible.
Written & Updated by Shirly Chen
Shirly Chen has been writing data recovery, data erasure articles for DoYourData over 4 years. She has been working as a professional website content writer & editor for quite a long time. She also writes articles about disk clone, Mac optimization, disk backup, etc.