How to Wipe Digital Camera on Mac?
Learn how to securely wipe your digital camera on a Mac. Protect your privacy and ensure your data is unrecoverable before selling or donating your device. DoYourData Super Eraser for Mac is a powerful disk wipe program for Mac. It can help you securely wipe your digital camera and permanently erase all images, videos, documents from it.
![]() Updated by Shirly Chen on September 15, 2024
Updated by Shirly Chen on September 15, 2024
Quick Navigation:
- Why It's Important to Wipe Your Digital Camera?
- How to Wipe a Digital Camera on a Mac?
- Tips to Wipe Your Digital Camera on Mac
- Conclusion
- FAQs About Wiping Digital Camera on Mac
In the digital age, cameras have changed from simple tools for getting pictures to complicated recorders of our personal and professional lives. Yes, your digital camera has important and sometimes private information on it. Whether you're a serious shooter or love taking pictures of memories, it is true.
To protect your privacy, ensure your data is safely erased before you sell, give, or use your camera for something else. Deleting files is insufficient; you must use detailed methods to stop data recovery.
This guide will show you how to properly wipe your digital camera on a Mac, from backing up your important photos to safely deleting data. If you follow these steps, your personal information will be safe, and your camera will be ready for its next trip.
Why It's Important to Wipe Your Digital Camera?
Many reasons make wiping your digital camera essential. Some of them are listed below:
Protecting Personal Data
Digital cameras often store a lot of personal information, such as photos, videos, and sometimes even information about where the camera was taken. If you don't properly erase this personal information, you could give or sell your camera and let others see it.
Preventing Data Recovery
You can't be sure that files are gone by deleting them from your camera's memory card. Data recovery software can often return deleted files, meaning data could be stolen or used incorrectly. Overwriting the data with a proper wipe ensures no one can quickly recover it.
Maintaining Security
If you have a smart camera, it may also record other private data, such as Wi-Fi passwords or settings. By wiping the device, you can be sure that all of this private data is gone, protecting you from possible security breaches.
Preparing for Resale or Donation
Wiping your camera clean makes it look new and free of personal information if you want to sell or give it away. It can also help your camera's selling value since people usually want to buy clean and ready-to-use things.
How to Wipe a Digital Camera on a Mac?
If you use trusted software to wipe your digital camera's memory card, your data will be completely erased and can't be recovered.
Method 1. Wipe Digital Camera with DoYourData Super Eraser for Mac
DoYourData Super Eraser for Mac is one of the best Mac disk wipe programs. It can help you securely and permanently wipe data on Mac or format external HDD/SSD, USB flash drive, digital camera, memory card, etc.
DoYourData Super Eraser for Mac
- Securely and easily wipe digital camera on Mac.
- Certified data erasure standard including NIST 800-88, Peter Gutmann's algorithm, DoD 5220.22-M, etc.
- 100% safe and easy-to-use disk wipe software.
Follow the steps below to wipe a digital camera on Mac with DoYourData Super Eraser for Mac:
Step 1. Download and install DoYourData Super Eraser for Mac on your Mac and connect your digital camera to the same Mac. (Note: Once the data is erased by DoYourData Super Eraser for Mac, the data is lost for good, cannot be recovered by any method. Before wiping your digital camera with DoYourData Super Eraser for Mac, you should make a backup of your photos and videos. You can copy or cut the photos & videos from the digital camera and paste them to your Mac.)
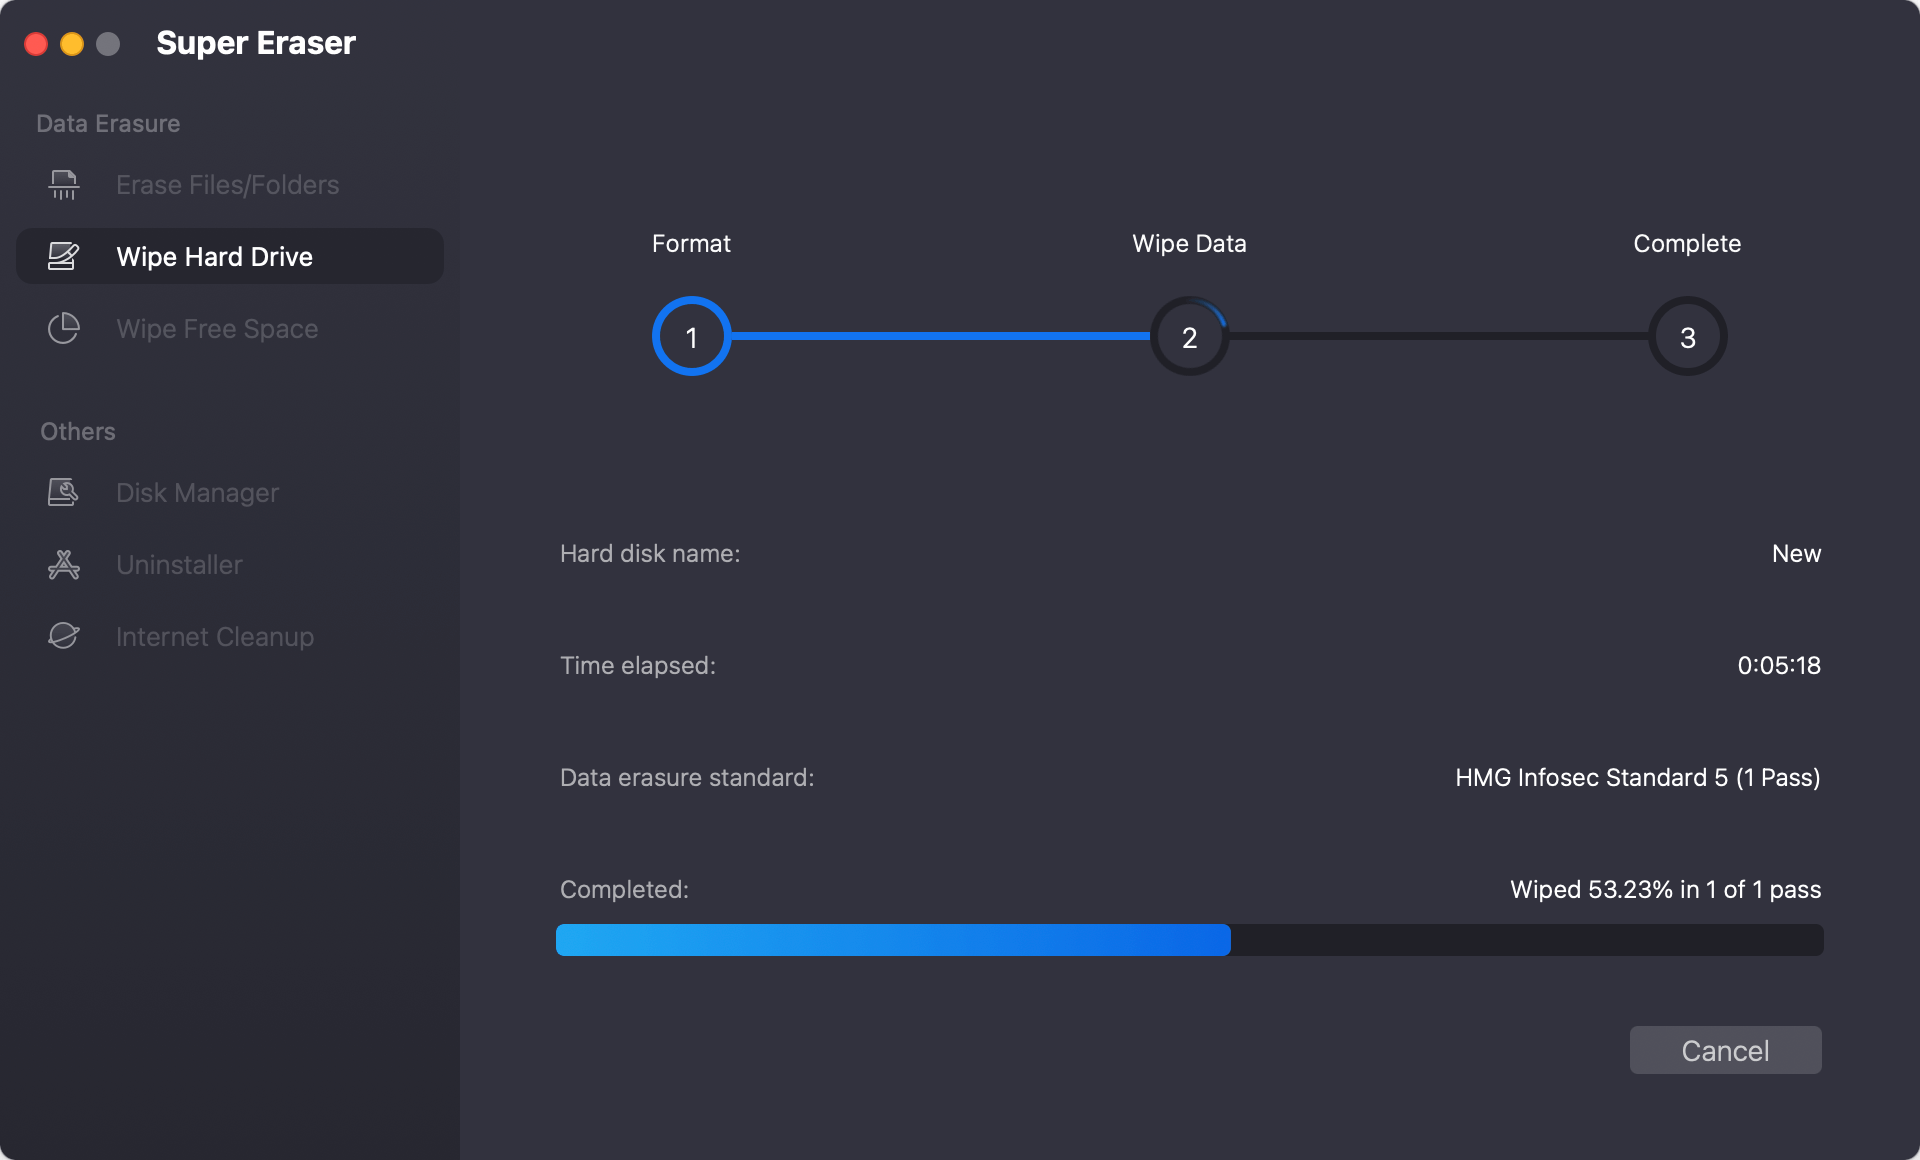
Step 2. Open DoYourData Super Eraser for Mac, choose Wipe Hard Drive mode. Then select the digital camera or memory card, click on Wipe Now button.

Step 3. Select a wanted data erasure standard, click on Continue button.

Step 4. It will format and wipe your digital camera. Once the process gets finished, all data (including existing data, deleted/formatted/lost data, hidden data) stored on the digital camera/memory card is lost for good, cannot be recovered by any method.
Method 2. Erase Digital Camera on Mac with Permanent Eraser
Permanent Eraser is a free tool for Mac users that lets them delete data safely. To use a Permanent Eraser to delete everything from your digital camera's memory card, follow these steps:
Step 1. Download and Install Software.
Start your web browser and go to the website to see Permanent Eraser. Click on the link to get the most up-to-date version of Permanent Eraser. The download should begin on its own. When the download is done, open the file you got. Drag the Permanent Eraser icon into the Applications folder to set up the software.
Step 2. Prepare Your Memory Card.
Ensure the camera is off before removing the memory card to keep the data from getting lost. Take care when taking the memory card out of your camera. Connect the card to your Mac using either the card reader that comes with your Mac or a separate card reader.
Step 3. Backup Your Data.
Before you wipe the card, ensure you have a copy of any important data.
Open Finder
Start Finder and look for your memory card in the "Devices" or "Locations" area.
Copy Data to Your Mac
Pick out the folders and files you want to keep. You can drag and drop them into a folder on your Mac or a USB drive.
Step 4. Use Software to Wipe the Memory Card.
Open Permanent Eraser
You can open Permanent Eraser from the Applications area.
Select the Memory Card
To access your memory card in Finder, drag and drop the memory card icon onto the Permanent Eraser button.
Confirm the Erasure
Using Permanent Eraser will ask you to confirm that you want to safely delete everything from the memory card. Check the work. It will start the process of safe deleting.
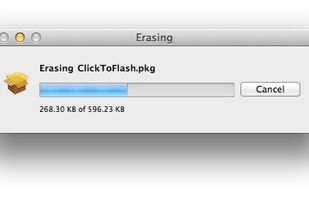
Wait for the Process to Complete
The permanent Eraser will erase the data on the memory card more than once, making it impossible to recover. How long this takes will depend on the size of the memory card and the amount of information on it.
Eject the Memory Card
To properly remove the memory card during the process, right-click on its icon in Finder and choose "Eject."
Step 5. Verify the Wipe.
Reinsert the Memory Card
You can return the memory card to the camera or leave it hooked to your Mac.
Check for Residual Data
Open Finder and go to the memory card to ensure no more groups or files are on it.
Use Data Recovery Software
You can use data recovery tools such as Do Your Data Recovery for Mac to check the memory card and ensure no data can be recovered. It will give you extra peace of mind.
Step 6. Reset Your Camera
Navigate to Camera Settings
Start up your camera and go to the settings menu.
Select Factory Reset
Find a button that says "Reset" or "Restore Factory Settings." To finish the reset, follow the steps shown on the screen.
Tips to Wipe Your Digital Camera on Mac
- Before you wipe, ensure you have a copy of any important photos or videos you don't want to lose forever.
- Use dependable software that is made to delete data safely.
- Ensure your camera is fully charged or plugged into a power source to keep the process going smoothly.
- If your camera has a built-in format feature, read the user instructions to determine how to wipe it correctly.
- Use data recovery tools to ensure you can't recover any files after you delete them.
- Before you sell or give away your camera, perform a complete reset to ensure all its settings and other data are erased.
- To get rid of old memory cards, destroy them physically or use safe deletion software to erase their data.
Conclusion:
Wiping your digital camera on a Mac is necessary to protect your privacy and ensure your data can't be recovered. Following this guide, you can delete all your files from your camera's memory card without risk. Every step is meant to protect your privacy, from making a copy of your data to deleting everything and then checking the wipe with data recovery software.
Resetting your camera to its original settings ensures no data is left behind. If you follow these steps, you can be sure that your personal information is safe when you sell, give, or use your camera for something else. Wiping your digital camera clean before the next time you use it will protect your memories and keep your secrets safe.
FAQs About Wiping Digital Camera on Mac
1. Should I wipe my digital camera before selling or donating?
Yes, the deleted or formatted data is not lost for good and can be recovered by data recovery software. It is strongly recommended to wipe your digital camera before you sell or donate it so that no body can recover your personal information.
2. How to wipe a digital camera on Mac?
DoYourData Super Eraser for Mac is a powerful and easy-to-use Mac disk wipe program. It can help you securely and permanently erase all data from your digital camera:
- Download and install DoYourData Super Eraser for Mac.
- Open DoYourData Super Eraser for Mac, choose Wipe Hard Drive mode.
- Select the digital camera, click on Wipe Now button.
- Wipe the digital camera and erase all data from it.
3. What is the best digital camera data eraser for Mac?
Here is the list of top 5 digital camera erasure tools for macOS or OS X:
- DoYourData Super Eraser for Mac
- Permanent Eraser
- AweEraser for Mac
- DBAN
- Donemax Data Eraser for Mac

DoYourData Super Eraser for Mac
DoYourData Super Eraser for Mac is a 100% safe, powerful and easy-to-use data erasure program. It offers certified data erasure standards including Peter Gutmann, U.S. Army AR380-19, DoD 5220.22-M ECE to permanently erase data from Macs and external devices, making data recovery be impossible.
Written & Updated by Shirly Chen
Shirly Chen has been writing data recovery, data erasure articles for DoYourData over 4 years. She has been working as a professional website content writer & editor for quite a long time. She also writes articles about disk clone, Mac optimization, disk backup, etc.