Recover Deleted or Unsaved Excel Files on Mac
![]() Updated by Justin Kenny on 2020-09-10
Updated by Justin Kenny on 2020-09-10

Imagine typing a long file of Excel, entering massive rows of data, and then, losing that file for some certain reasons; doesn’t that sound scary? Yes, because it is scary. You can lose all your hard work done in a moment if your Mac suddenly shuts down because of low battery or for some other reason. Moreover, one can also forget to save a file in case Auto-save isn’t selected in Excel. Hence, it can be really worrisome if that happens. Fortunately, there are some steps that you can try before totally giving up or re-entering your precious data. In this article, we will discuss some methods to recover deleted or unsaved Excel files on Mac, so, stay tuned.
1. Recover deleted Excel files from Mac trash
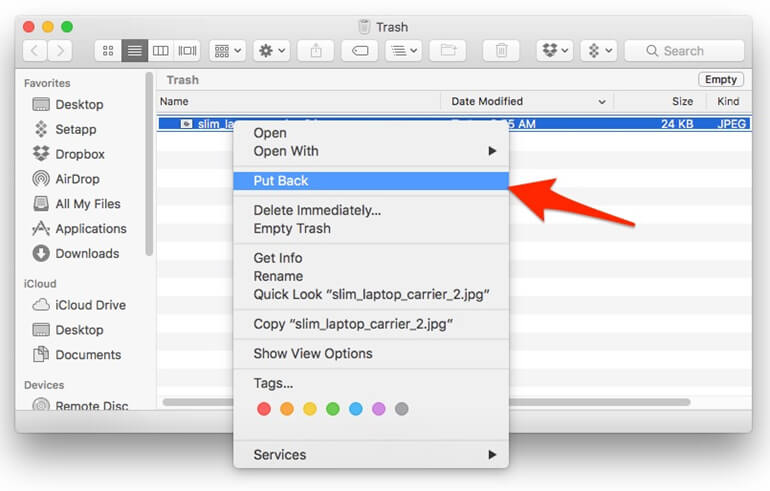
Like any other thing, we will recommend you to check your Trash bin first, in case you might have accidentally deleted your Excel file. To do that, head towards Trash bin and look out for your file. If you can find it in there, right-click on it and select the ‘Put Back’ option to put it back from where it was deleted. Your file will be back at its original spot.
In case, the file is not to be found in the Trash may be because you have emptied your Trash bin too, then the only option you can try next is the usage of 3rd party utility apps that let you scan and check out for your lost Excel files. We will get to that later in this article.
2. Recover an unsaved Excel file on Mac
Method 1. Through TemporaryItems Folder.
If your file was left unsaved and you lost it, then you can try the TemporaryItems folder scheme. To access that folder, open Terminal from Applications/Utilities. Then type ‘open $TMPDIR’ in the terminal and press ‘Return’. This will open the TemporaryItems folder for you where you can find your lost Excel file. The file name usually appears like ‘Word Work File’. So in this case, it will be something named ‘Excel Work File’. If you find your file, then save it to some safe location on your Mac.

Method 2. Using AutoRecover feature.
AutoRecover is an option that helps you recover your Excel file in case you think you have lost it. All you have to do for this is to open Finder and input the following path/s in the search box:
/Users/Library/Containers/com.microsoft.Excel/Data/Library/Preferences/AutoRecovery
/Users/username/Library/Application Support/Microsoft/Office/Office X AutoRecovery
The first path is for 2016 Excel and the second one is for older versions. For this method to work, AutoRecover has to be turned on in your Excel program.
Method 3. Check your recent files in Excel.
If you cannot find your Excel file for some reason, then you can take a look at your recent Excel files where you may find the target. Simply open Excel, open ‘File’, then ‘Open Recent’, and click on ‘More’. If you are lucky to find your file through this method, then do not forget to save it this time on your Mac.
3. 3rd Party Apps for the restoration of Deleted Excel Files
If nothing seems to be going your way in your quest for finding the lost/deleted Excel file, then you can give some 3rd party apps a try. As our article covers the methods to recover deleted or unsaved Excel files on Mac, therefore, in this section, we will discuss multiple software that let you run a scan for your deleted/lost Excel file/s. Please bear in mind that these software are given in a random order, without giving any priority to any of them.
Do Your Data Recovery for Mac is a utility developed by DoYourData that claims to recover your lost Excel files. The main features that this tool offers are:
- Recovery of deleted, formatted, Trash Emptied Excel files.
- Can work on different Mac devices such as iMac, Mac Mini, MacBook, and Mac Pro.
- Has support for a plethora of file types such as documents, videos, emails, etc.
- They also assert that Do Your Data Recovery for Mac can recover your data without overwriting the original data and is safe to use.
Here, follow the steps below to recover deleted or lost Excel files.
Step 1. Just download and install Do Your Data Recovery for Mac on your Mac computer. Then open it from Launchpad.
Step 2. Run Do Your Data Recovery for Mac, then select the hard drive where you delete or lose your Excel files.

Step 3. Click on Scan button to scan the hard drive to find deleted or lost Excel files.
Step 4. Once the scan is completed, you can preview all recoverable Excel files. Then select the wanted Excel files and save them.

Do Your Data Recovery for Mac offers two recovery modes: quick recovery and advanced recovery. If you can’t find all lost Excel files after quick scan, just try advanced recovery mode to deeply scan the hard drive and find much more lost Excel files. Do Your Data Recovery for Mac also can help you recover deleted/unsaved Pages, Word documents, and other files from Mac hard drive.
Conclusion
Finally, we will advise you to check the Auto-save option in Excel whether it is turned on or not as it will save your time from all the stuff that you may have to go through otherwise. This was it from this article which mentioned some steps to recover deleted or unsaved Excel files on the Mac system. We hope, it helps you to some degree.
Written & Updated by Justin Kenny
Justin Kenny is a writer & editor of DoYourData. He joined DoYourData in 2016 and focuses on writing articles about Windows data recovery, Mac data recovery, external device data recovery, hard drive clone, data erasure, Mac cleanup, computer issue fixes, etc. He is a super fan of Apple devices and is big on testing new digital device and system utility software.