Best disk backup software for MacBook Air.
Imaging or cloning your Mac effectively with the best Mac backup software. Read more >>

Quick Navigation:
The MacBook Air is one of Apple's most popular laptops, renowned for its sleek design, long battery life, and efficient performance. However, like any electronic device, it's not immune to data loss. Despite any reason like water damage, losing important files on a MacBook Air can be a frustrating and stressful experience. This article provides a comprehensive guide to MacBook Air data recovery, covering common causes of data loss, preventive measures, and step-by-step recovery methods.
Understanding the types of data loss is crucial for selecting the right recovery method. Here are the most common scenarios:
Understanding the root cause of data loss can help determine the most effective recovery strategy.
If you experience data loss on your MacBook Air, taking immediate action can significantly improve your chances of successful recovery. Here are the steps to follow:
By following these initial steps, you can mitigate further data loss and prepare for recovery efforts.
There are various ways you can use to recover lost files, ranging from basic troubleshooting to advanced recovery software. Here's a step-by-step guide:
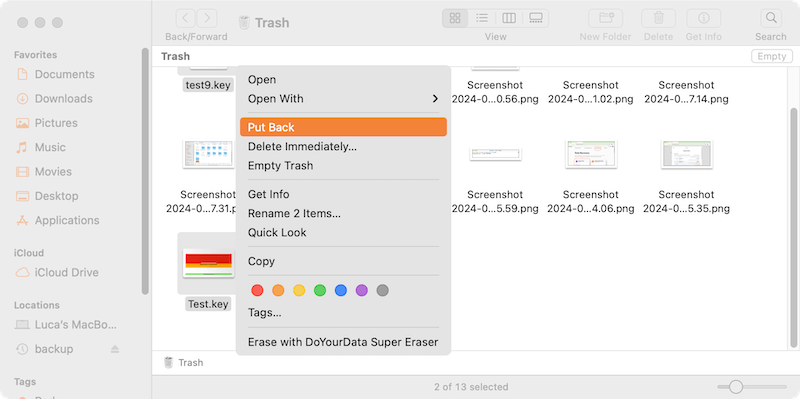
The first thing you should do when you realize a file is missing is to check the Trash Bin. Files that are deleted are often moved to the Trash, where they remain until you empty it. If you find your files there, simply drag them back to their original location or right-click and select "Put Back."

If you have been using Time Machine to back up your MacBook Air, recovering lost data is straightforward. Connect your Time Machine backup drive to your Mac, open the folder where the lost files were located, and click the Time Machine icon in the menu bar, choose Browse Time Machine Backups (or Enter Time Machine).

Use the timeline on the right side of the screen to browse through backups and find the version of the file you want to restore. Click "Restore" to recover the file.

If you have enabled iCloud Drive, your files may be stored in the cloud, allowing you to recover them even if they were deleted from your MacBook Air. Open Finder, go to "iCloud Drive," and search for the missing file. If you find it, you can download it back to your Mac.

For users comfortable with the command line, the Terminal app offers a way to attempt recovery. Open Terminal and type the following command: cd .Trash
Press Enter, then type: ls -al ~/.Trash. This command will list all the deleted files in the Trash.
If you can find the wanted file listed, you can use the command to restore it: mv filename DestinationPath
Replace "FileName" with the name of your lost file and "destination path" with the folder where you want to save it. Press Enter again. This method might not always work, especially if the file has been permanently deleted or overwritten, but it's worth trying.

There are several reliable options available to recover data from MacBook Air. These tools can scan your MacBook Air's drive for lost or deleted files and help you recover them. Here we will use Do Your Data Recovery for Mac as an example.
The software is professional for MacBook Air data recovery. It supports recovering deleted, formatted, or lost data in any other situations. The software can work with the latest macOS Tahoe now.
After data loss happen, first stop using the drive. Download and install the software immediately on your MacBook Air. Follow the steps to get back the lost files:
Step 1. Run the Mac data recovery software from launchpad. The software will show you all the storage devices connected to the MacBook Air. Choose the one where you lost files.

Step 2. Click the Scan button and the software will deeply scan the selected drive. It will search for any possible lost data from the drive. It may take some time depending on the size of the drive and performance of the MacBook Air.

Step 3. After the scanning process is completed, you will see all the found files. Preview and check the files first. Then choose the wanted files and click the Recover button to save them to another drive.

If your MacBook Air has suffered severe hardware damage or if you're unable to recover the data using software, it may be time to seek professional help. Data recovery specialists have the tools and expertise to recover data from physically damaged drives. While this option can be expensive, it's often the last resort for retrieving valuable data.
During the data recovery process, it's essential to avoid certain mistakes that could further complicate the situation or reduce the chances of successful recovery.
1. Continuing to use the MacBook Air:
If you suspect data loss, stop using the MacBook Air immediately. Continued use can overwrite the lost data, making it much harder to recover. Avoid saving new files or installing software on the affected drive.
2. Attempting DIY repairs on a physically damaged device:
If your MacBook Air has suffered physical damage, avoid attempting DIY repairs, especially if you're not experienced with electronics. Opening the device or tampering with the internal components can cause further damage and reduce the chances of successful data recovery.
3. Ignoring warning signs of hardware failure:
If you notice unusual noises (such as clicking sounds) from the hard drive, frequent crashes, or slow performance, these could be signs of impending hardware failure. Back up your data immediately and consider seeking professional assistance before the drive fails completely.
4. Overwriting recovered files:
When recovering files, make sure to save them to a different drive or partition. Saving recovered files to the same location from which they were lost can result in overwriting other lost data, reducing the chances of recovering additional files.
5. Using unverified recovery software:
There are many data recovery tools available online, but not all of them are reliable or safe. Using unverified or poorly-reviewed software can lead to further data corruption or even introduce malware to your MacBook Air. Always use reputable software from trusted sources, like Do Your Data recovery for Mac.
In cases where standard recovery methods fail, advanced techniques may be necessary. These techniques are usually performed by professionals and involve specialized tools and equipment.
1. Disk imaging:
Disk imaging is the process of creating an exact copy of a hard drive or SSD, sector by sector. This technique is useful when a drive is failing, as it allows data recovery to be attempted on the image rather than the original drive, reducing the risk of further damage.
2. Clean-room recovery:
Clean-room recovery is a specialized process used to recover data from physically damaged drives. It involves opening the drive in a controlled, dust-free environment (clean-room) and using advanced tools to repair and extract data from the damaged components. This technique is often used when the drive's read/write heads or platters are damaged.
3. Firmware repair:
In some cases, data loss can be caused by firmware corruption. Firmware is the software that controls the hardware of a drive. If the firmware becomes corrupted, the drive may become inaccessible. Professional data recovery services can repair or reprogram the firmware to restore access to the data.
4. Logical data recovery:
Logical data recovery involves recovering data from a drive that is physically intact but has suffered software corruption, such as a corrupted file system or partition table. This technique often involves repairing or rebuilding the corrupted file system to regain access to the lost data.
Experiencing data loss can be a painful reminder of the importance of regular backups. After successfully recovering your data (or in the unfortunate event that recovery is not possible), it's crucial to implement a robust backup strategy to prevent future data loss.
1. Implement a 3-2-1 backup strategy:
The 3-2-1 backup strategy is a widely recommended approach that involves:
Best disk backup software for MacBook Air.
Imaging or cloning your Mac effectively with the best Mac backup software. Read more >>
2. Schedule regular backups:
Set up your MacBook Air to perform automatic backups at regular intervals. Time Machine, for example, can be configured to back up your data hourly, daily, or weekly. Regular backups ensure that you always have a recent copy of your files in case of unexpected data loss.
3. Test your backups:
It's not enough to simply create backups; you also need to ensure they are reliable. Periodically test your backups by restoring a few files to verify that they are complete and functional. This practice can save you from discovering that your backups are corrupted or incomplete when you need them most.
4. Educate yourself on data security:
Stay informed about the latest data security threats and best practices. Understanding how to protect your data from malware, phishing attacks, and other cyber threats can reduce the risk of data loss.
Data loss on a MacBook Air can happen to anyone, but with the right knowledge and tools, you can recover lost files and prevent future incidents. By understanding the causes of data loss, taking preventive measures, and following the appropriate recovery steps, you can safeguard your important files and minimize the impact of unexpected data loss. Remember, regular backups are your best defense against data loss, so make them a priority in your digital life. If all else fails, professional data recovery services are available to help you retrieve your valuable data.

Do Your Data Recovery for Mac
Do Your Data Recovery for Mac, one of the best Mac data recovery software, can help you easily and completely recover deleted, formatted or lost files from Mac HDD/SSD, external HDD/SDD, USB drive, memory card, digital camera, or other storage devices.
