“Hi, yesterday, I was editing a PowerPoint document on my Mac. However, the application crashed without no reason. I didn’t save the PowerPoint document. Is there any way to restore the unsaved PowerPoint document?” - Mark
If you have lost an important MS PowerPoint document and are looking to try some solution, then you are probably in the right place. A malfunction such as forced shut down of your Mac can result in a lost PPT presentation and could cost you dear. Unintentional deletion of the same can also prove to be fatal for you as you may have to go through the whole process of making another presentation. The good news is that there are some ways that you can try to recover your precious presentations if you don’t want to let go of things that easily. In this article, we will discuss some methods to help you recover unsaved or deleted PowerPoint documents on Mac. So without further delay, let us dive straight into it.
Part 1. Did you check your Trash Can
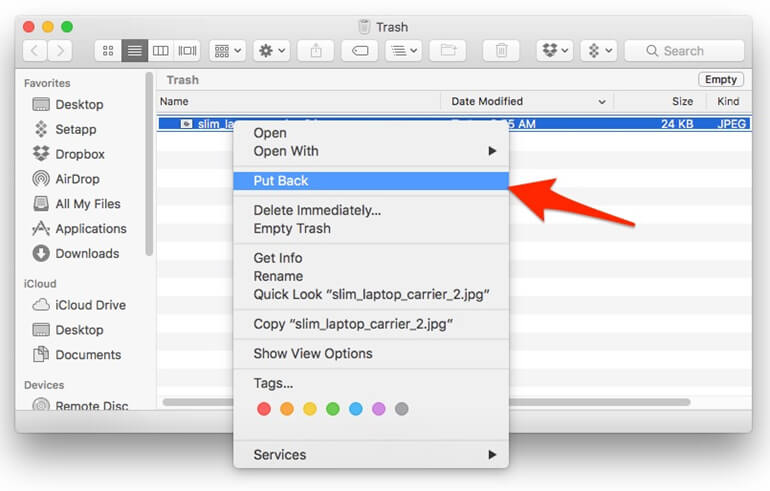
You may be surprised to know that sometimes things that you are looking on your Mac may be looming around in the trash can of your Mac. The same is possible with your lost PowerPoint document as you may have unwillingly deleted your important document. So, go to the trash can of your computer, look closely and check whether you can find your lost PPT file there. If yes, then right-click on it and click on the ‘Put Back’ button to restore it to your Mac. Did you recover your document with this method? Yes? Great!

If this procedure didn’t work for you, then its time to dig a bit deeper in your Mac and try some other methods that will be covered in this article one by one.
Part 2. Don’t hesitate to check on your Temp Folder
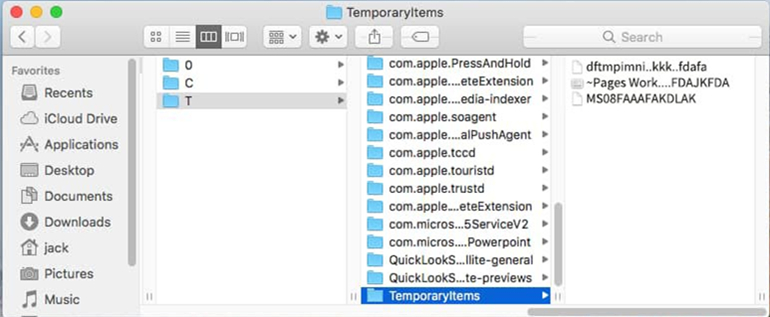
Temporary Items folder may not always contain the desired files but it is worth checking for. This folder on your Mac actually saves some temporary files in it. Although, it can be a rare occurrence for your PPT doc to end up in a place such as this but again, there is no harm in checking it. So to access Temporary Items folder, open Terminal of your Mac and type ‘open $TMPDIR’ and press ‘Enter/Return’. This will open the required folder in front of you. Save your file if you find it there.

Part 3. AutoRecovery Feature may just save you from Hassle
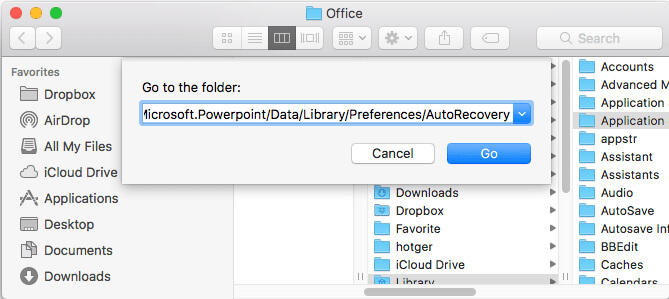
AutoRecovery is a native feature to Microsoft Office products such as PowerPoint, Excel, etc. If your PowerPoint app crashed or Computer shut down all of a sudden, then opening the PPT app after the incident should present that apparently unsaved PPT doc in front of you IF that AutoRecovery feature is working. In case you are not sure whether it’s turned ON or OFF, then open ‘Preferences’ from the menu, click ‘Save’. Here, you will be able to see if AutoRecover is enabled or not. You can also change the frequency of the Automatic save time which by default sits around 10 minutes or something.
/Users/

Part 4. External Apps to Scan the lost files on the Mac
There are some 3rd party applications that offer help in searching for the lost files on your Mac. What these apps do is that they run a custom scan on the Mac and affirm to show a list of deleted or lost files on the Mac. Below are given a number of such apps in random order of placement.
Do Your Data Recovery for Mac
People running Do Your Data Recovery for Mac assure that this software can help with the recovery of lost files on the Mac. It can take different file systems such as NTFS, FAT32, ExFat, etc. and search for your files. Moreover, it can recover data from storage devices such as SSDs, Memory Cards, USB Drives, etc.
To try Do Your Data Recovery for Mac, firstly, you will have to download and install it on your Mac. Then, launch the app and select the storage drive from which you want to recover the data. After that, click on ‘Search for lost data’ and check your target file/s in the scan. If you find your files there, then select them and click on ‘Recover all’.
AnyRecover
The second name in this random list is AnyRecover software that alleges to recover 1000+ file types on the Mac including PowerPoint, videos, emails, and many more. It also supports a number of devices such as MacBook, iMac, MacBook Air, etc. How it works? Let us find out.
Firstly, install AnyRecover on your Mac. Open it, select the target path where you want to search for the lost file, and hit the ‘Start’ button. From here, you will be presented by a list of scan results where you may find your valuable document. Click on that document and select ‘Recover’ to recover it.
TogetherShare Data Recovery
The last name in this list of methods and tools to recover unsaved or deleted PowerPoint documents on Mac is TogetherShare data recovery tool for Mac. Like previous software, it can also recover documents, videos, and emails apart from recovering PowerPoint presentations.
To start scanning, first, download and install the software. Launch the program and uncheck the files types that you do not want to search for. Click on the ‘Start’ button and select the storage drive where you want to perform the scan. After that, hit ‘Scan’. After the scan, if you see your target file, select it and click on the ‘Recover’ button. There you have it!
Part 5. Recover deleted or lost PowerPoint documents on Mac
Do Your Data Recovery for Mac is a powerful yet easy-to-use data recovery software. It supports to recover any types of lost files including PowerPoint documents from Mac hard drive, USB flash drive, memory card, external hard drive, etc.
Step 1. Download Do Your Data Recovery for Mac on your Mac computer. Then open it from Launchpad.
Step 2. Just choose the hard drive where you delete or lose your PowerPoint documents.

Step 3. Click on Scan button to scan the hard drive to find deleted or lost PowerPoint documents.

Step 4. Once the scan is completed, you can preview all recoverable PowerPoint documents. Then select the wanted PowerPoint documents and save them.

Do Your Data Recovery for Mac offers two data recovery modes: quick recovery and advanced recovery. It can help you recover deleted PowerPoint documents from emptied trash, and recover lost PowerPoint documents from erased Mac hard drive or inaccessible hard drive. When you can’t find lost PowerPoint documents after quick scan, just try advanced recovery mode to find more lost PowerPoint documents.
Final Thoughts
While it is very common to lose one’s important documents in the daily computer tasks, precautions can always be set to prevent or minimize events such as this. For example, one can manually use the shortcut frequently ‘Ctrl+S’ to save the progress of their document while typing important data in that file. Moreover, you can also set the frequency of AutoRecover feature of PowerPoint to 1 minute so that your document remains safe from an unexpected intrusion even though you have not saved it manually.
With that being said, we hope that this article would help you to some degree in finding your precious PPTs while we covered in it some material to recover unsaved or deleted PowerPoint documents on Mac. Stay home, Stay safe.