Quick Navigation:
- Common Reasons for Lost Files in OS X
- Method 1: Using Finder to Locate Lost Files
- Method 2: Using Spotlight to Search for Files
- Method 3: Recovering Files with the Time Machine
- Method 4. Recover Lost Data with Data Recovery Software
- Conclusion
- FAQs About Finding Lost Files in OS X
It can be annoying and stressful to lose files on your Mac, whether you accidentally delete them, have software problems, or lose them somewhere you didn't plan to. OS X, now called macOS, has many strong tools that can help you quickly and easily recover lost files.
Many built-in tools, like Finder and Spotlight, and more complicated ones, like Time Machine, can help you find or recover your lost data in OS X. Additionally, if these steps don't work, restoring software from a third party can often assist.
This complete guide will show you how to do everything and give you all the information you need to find your files and get them back. Most lost files can be found and restored if you know what to do. It will give you peace of mind and keep your important data safe.
Common Reasons for Lost Files in OS X
Before we discuss how to recover lost files, it's important to understand why they might have been lost in the first place. Figuring out what caused it can help you choose the best improvement approach.
🗑 Accidental deletion - Deleting files by mistake is one of the most common ways they get lost. When dragging it to the Trash, you accidentally deleted a file or pressed Command + Delete.
🪲 Software glitches or bugs- Files can get lost when the system crashes or an application problem happens. These problems could be caused by bugs in the operating system or software from a third party.
⚠️ Hard drive issues - If the hard drive gets damaged or fails, you might not be able to access your files or lose them. Make regular backups to prevent your information from getting lost when your hardware breaks.
🔐 User accounts and permissions - Sometimes, files might not show up if you're logged into a different account or don't have the right permissions to see them.
🧑💻 Unintentional file movement - You could accidentally move files to a different folder or external drive on your Mac, making them hard to find.
Method 1: Using Finder to Locate Lost Files
Finder is OS X's main file manager, and it is often the first place you should check when trying to find lost files.
Step 1: Search with Finder
- To open a new Finder window, click the Finder icon in the Dock.
- The Finder window has a search bar in the upper right corner. You can type the file's name or use keywords near the file.
![find lost files in OS X]()
- You can sort the search results by the date they were last changed or by the type of file (for example, Documents, Images, or Applications). If you have many files on your Mac, this can reduce the search.
Step 2: Check the Trash
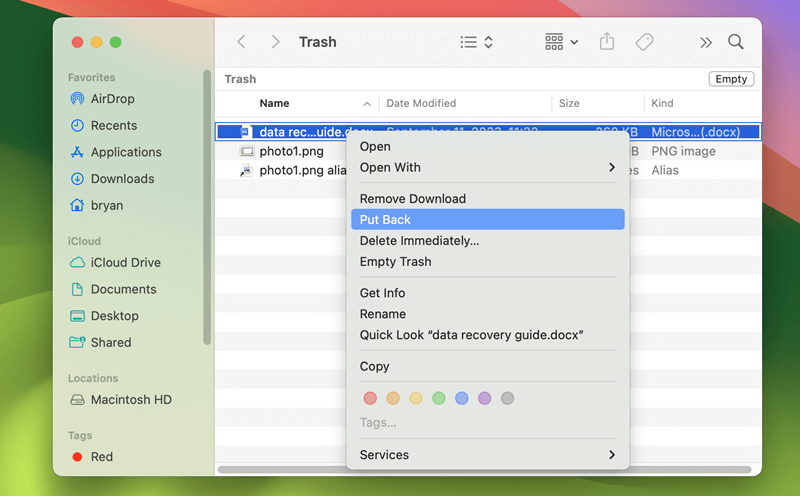
The file might still be in the Trash if you accidentally removed it.
- Click on the Trash button in the Dock.
- To find the file, use the search bar in the Trash window or look through the list of things that have been dumped.
- If you find the file, right-click on it and choose "Put Back" to put it back where it was.
![find lost files in OS X]()
Step 3: Check recently used files
The "Recents" folder might help you find the file if you recently used it.
- Tap the Finder button in the Dock to open it.
- On the Finder's left, click Recents. This folder shows the most recent things you opened or changed.
![find lost files in OS X]()
- You can use the search bar or scroll via the list to find your file.
Method 2: Using Spotlight to Search for Files
OS X's Spotlight is a strong search tool that can help you find emails, files, apps, and more.
Step 1: Activate Spotlight search
- To open Spotlight, click on the magnifying glass icon at the top right corner of the menu bar or press Command + Space keys.
- In the search bar, type the file name or the type of file you want to find.
Step 2: Review search results
- Spotlight will show you a list of files, emails, web results, and other things connected to your search. Please move your mouse over a file to see where it is on your Mac.
- If you see the file you want, click on it to start it right away.
Step 3: Use advanced search features
You can use advanced search tools in Spotlight to narrow down your search.
- To find only certain types of files, put terms like "kind:pdf" or "kind:image" after the file name or keyword.
![find lost files in OS X]()
- You can also use date operators like today or this week to find files that were changed within a certain time.
Method 3: Recovering Files with the Time Machine
Time Machine is the backup program that comes with OS X, and it's great for getting back lost files.
Step 1: Open Time Machine
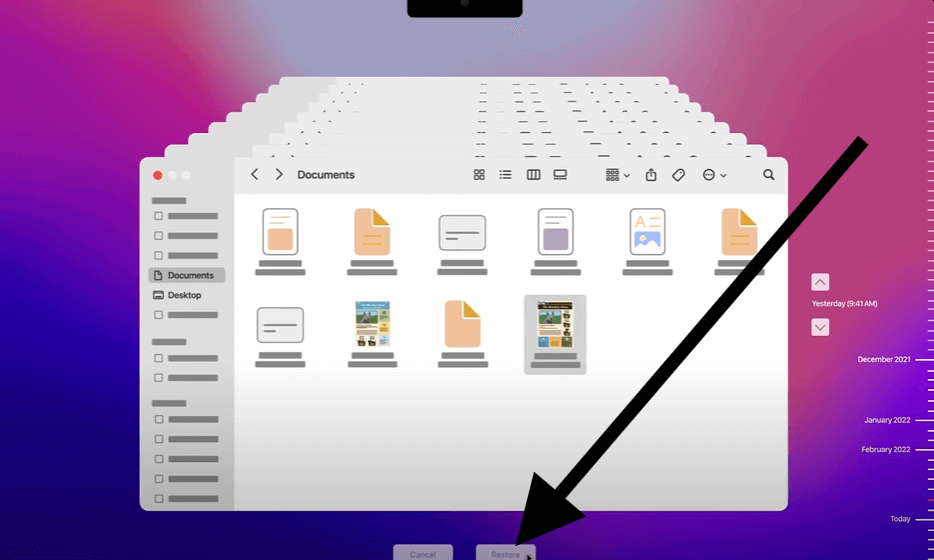
Click the Time Machine button In the menu bar. You can also open Time Machine from the Applications folder. The timeline on the right side of the Time Machine window lets you choose a backup date that starts with a date you know the file existed.
Step 2: Locate the lost file
After picking a backup date, you can use Finder to see your files as they were on that date. If browsing doesn't help you find the file, use the search bar in the Time Machine window to find it.
Step 3: Restore the file
To restore the file, find it, click on it, and then click the Restore button. The file will be restored to its original state on your Mac.

Method 4. Recover Lost Data with Data Recovery Software
Should you have no backup for the missing files and also cannot find the lost data with all the above methods, don't be desperate. There is still another solutions to get back the missing files. Professional data recovery software can recover the lost data in any case.
If you deleted files or lost files on OS X or macOS due to any reason, we suggest you download and have a try with the software Do Your Data Recovery for Mac, an excellent application to recover data effectively on Mac.
Do Your Data Recovery for Mac
- Excellent data recovery tool for OS X and macOS.
- Recover deleted, format, or lost data in any scenarios.
- Data recovery for any data on hard drive, SSD, SD card, pen drive, etc.
The software can recover any type of data from different storage devices, like USB flash drive, memory stick, internal or external drives on Mac. If you unfortunately lose data on Mac OS X or macOS machines, the software can easily help you retrieve the data.
With easy understanding interface, it's simple for users to handle this DIY data recovery software for Mac. Here is a short tutorial to outline how to use this software step by step:
Step 1. Downloading and installing the software on the Mac first. Then run the software from launchpad. If you are trying to recover data from an external device, ensure to connect it to your Mac properly.
Step 2. The software will show you all the connected devices on your Mac. Please check and ensure to choose the correct drive where you lost the files.

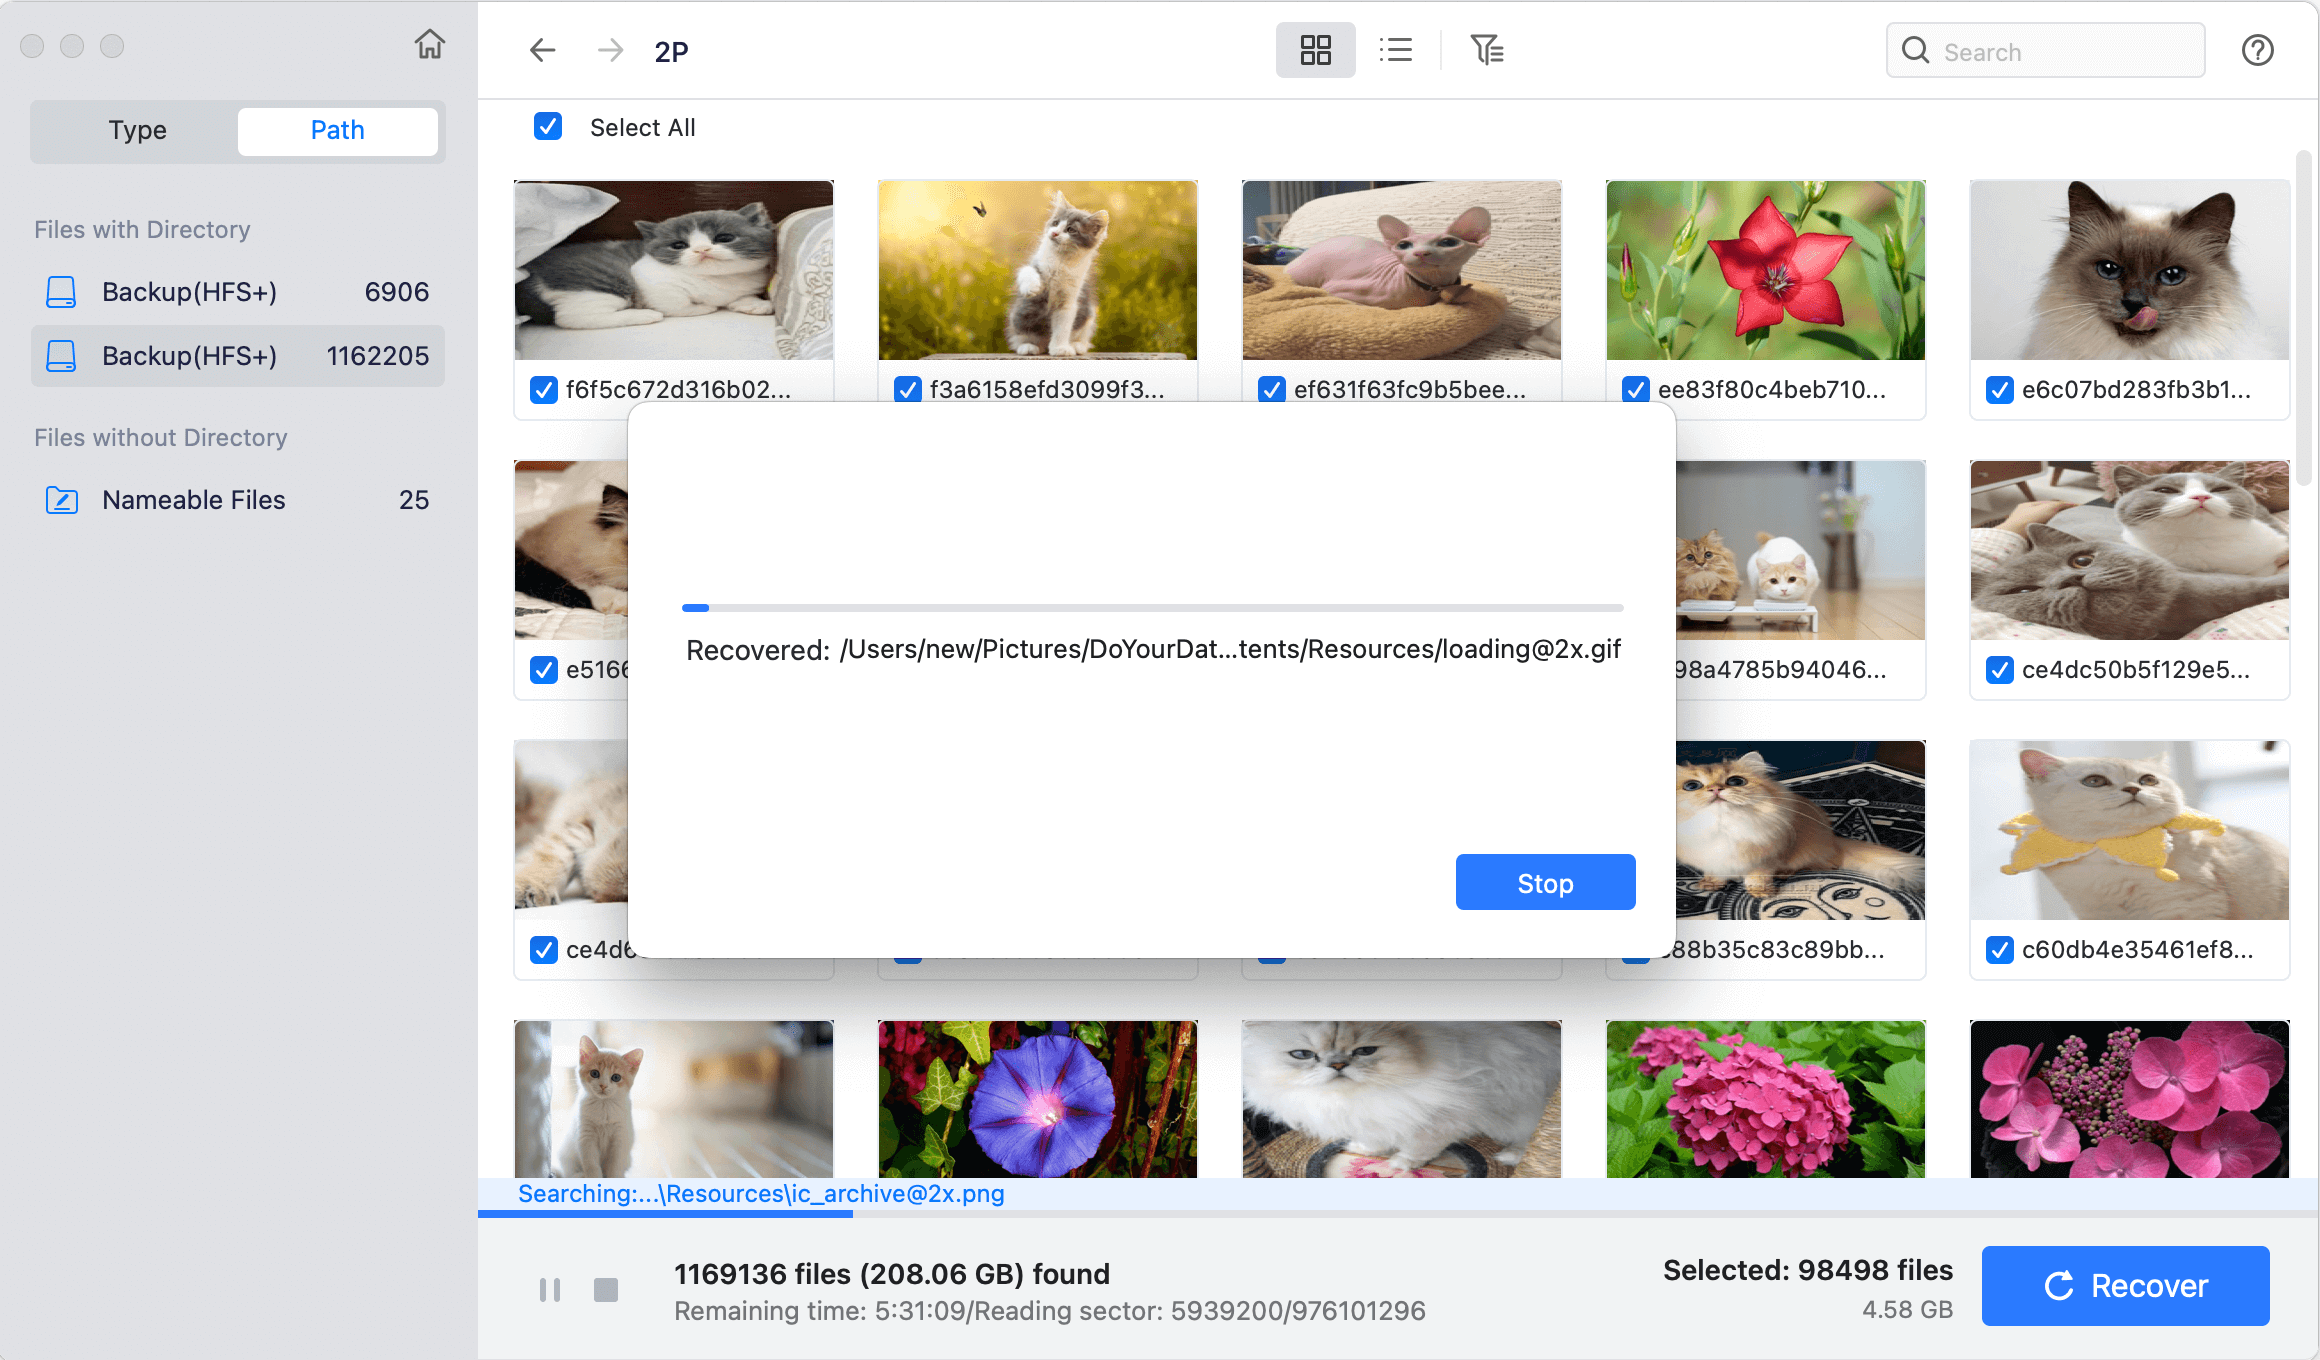
Step 3. Click the Scan button and the software will start to scan the drive. It will search for the missing files by deeply scanning the selected drive.

Step 4. It will take some time to finish the scan. After the scan is finished, all the found files will be list. You can check and preview to locate the missing files.

Step 5. After you find all the wanted files, select them and then click the Recover button to save the files to another drive.

Conclusion:
Finding lost things on your Mac doesn't have to be hard. Most files can be quickly and easily restored with the right tools and know-how. With macOS, you can ensure your data is safe and easily accessible in several ways. You can start with a simple Finder search, use Spotlight for a more complete scan, or rely on Time Machine to get back backed-up files.
Data recovery tools are also available from outside sources if these don't work. Knowing what causes most file losses and how to use your Mac's built-in tools can lower the chance of losing important data forever. It will give you peace of mind and keep your digital life safe and organized.
FAQs About Finding Lost Files in OS X
1. What are the common issues that will cause data loss in OS X?
There are many issues that may lead to file missing in OS X or macOS, like the following scenarios:
- Accidental deleting files.
- Unintentionally move files to another folder.
- Softer or OS bugs might cause data loss.
- File system or hardware issues related to hard drive.
- Permissions and account problem for Mac user.
- Volume damage or loss.
2. How to search and find missing files in OS X?
You can try the following methods to find the misplaced or missing files.
- First, search in Finder, Trash, or recently used files.
- Second, search with the Spotlight tool.
- If you have Time Machine or other backups, you can restore from the backups.
- At last, try to recover missing files with Mac data recovery software.
3. How to recover lost data with data recovery software?
Here are the simple steps to recover lost data with data recovery tool in Mac OS X:
- Download and install the software on Mac first.
- Run the software and select the drive where you lost file.
- Scan the drive to find the missing files.
- Preview and check the files to locate the lost data.
- Recover and save the wanted files to another drive.
4. How to prevent missing files in OS X?
To prevent data loss in the future in Mac OS X, here are some tips:
Be careful when deleting, moving files on Mac.
Ensure to eject external drives before unplugging them.
Check and monitor the hard drive health regularly.
Back up data regularly with Time Machine or other third-party backup tool.

Do Your Data Recovery for Mac
Do Your Data Recovery for Mac, one of the best Mac data recovery software, can help you easily and completely recover deleted, formatted or lost files from Mac HDD/SSD, external HDD/SDD, USB drive, memory card, digital camera, or other storage devices.


