Quick Navigation:
- Understanding NTFS and macOS File Systems
- Top 4 Methods to Enable Read-Write Access to NTFS Drives on macOS Sonoma
- Potential Issues and Troubleshooting
- Security and Performance Considerations
- Conclusion
In today's world of interconnected devices, it's common to encounter multiple operating systems and file systems. For macOS users, dealing with NTFS (New Technology File System) drives can be a bit tricky. NTFS is a file system developed by Microsoft and is widely used on Windows computers. On the other hand, macOS primarily uses HFS+ (Mac OS Extended) and APFS (Apple File System). This disparity can create challenges when transferring files between macOS and Windows systems, particularly when it comes to NTFS drives.

With the release of macOS Sonoma, many users are wondering whether it is possible to read and write to NTFS drives on macOS Sonoma natively or if they need to rely on third-party solutions. This article delves into the current state of NTFS support in macOS Sonoma and explores various methods to manage NTFS drives.
Understanding NTFS and macOS File Systems
Before diving into the specifics of macOS Sonoma's NTFS support, it's helpful to understand the basics of NTFS and how it compares to macOS file systems.
🔘 NTFS:
- Developed by Microsoft and introduced with Windows NT 3.1.
- Supports large volumes and files, file permissions, and encryption.
- Used predominantly on Windows operating systems.
🔘 macOS File Systems:
- HFS+ (Mac OS Extended): The previous standard for macOS, supporting features like journaling and metadata.
- APFS (Apple File System): The current standard for macOS, introduced with macOS High Sierra. APFS supports encryption, space sharing, and improved performance.
🔘 NTFS Support in macOS Sonoma
macOS has historically provided limited support for NTFS. The built-in support in macOS allows for read-only access to NTFS drives, but writing to these drives requires additional steps. This has been a significant inconvenience for users who need to frequently transfer files between Windows and macOS systems.
macOS Sonoma does not fundamentally alter this scenario. As of now, macOS Sonoma retains the read-only capability for NTFS drives out of the box. This means that while you can view and copy files from NTFS drives, writing data to these drives requires additional tools or modifications.
Top 4 Methods to Enable Read-Write Access to NTFS Drives on macOS Sonoma
Since macOS Sonoma does not natively support write access to NTFS drives, users need to rely on third-party solutions or workarounds. Below are several methods to enable read-write access on macOS Sonoma:
🔘 Method 1: Using Third-Party Software
To overcome the limitations of macOS Sonoma's native NTFS support, several third-party tools offer full read-write capabilities. These tools provide a way to seamlessly interact with NTFS drives, allowing users to perform read and write operations without restrictions. Below, we explore and recommend the most popular third-party solution:
DoYourData NTFS for Mac is a widely used tool that provides full read-write access to NTFS drives on macOS. It offers a range of features designed to make working with NTFS drives as seamless as possible.
⚙️ Features and Benefits:
- Full Read-Write Access: DoYourData NTFS for Mac enables users to read from and write to NTFS drives without limitations.
- High Performance: The tool is optimized for speed and reliability, ensuring smooth data transfer and file operations.
- Easy Installation: The installation process is straightforward, and the tool integrates seamlessly with macOS, providing a user-friendly experience.
- Compatibility: DoYourData NTFS supports macOS updates and ensures compatibility with the latest versions of the operating system.
- Disk Management: The software can also mount/unmount drives, or format the drive in different file systems, including NTFS.
Installation and Configuration Guide:
Step 1. Download and Install: Download the installer, and follow the on-screen instructions to complete the installation.
DoYourData NTFS for Mac
- Best NTFS driver for macOS Sonoma.
- Enable NTFS write access fast on Mac.
- Ensure fast data transfer speed of the NTFS drive.
Step 2. Enable NTFS Write Access: After installation, run the software and connect your NTFS drive. Select the NTFS drive in the software and click on the Enable Writable button to enable NTFS write access on macOS Sonoma.

Step 3. Access NTFS Drives: Once installed, NTFS drives should be accessible with full read-write capabilities.
For users who prefer not to use third-party software, there are manual methods and workarounds to enable NTFS write support on macOS. These methods involve using command-line tools and configurations but come with risks and limitations.
🔘 Method 2: Using Command Line Tools
Another manual workaround involves modifying the macOS system to allow NTFS write access, but this method is risky and can potentially cause system instability or data loss.
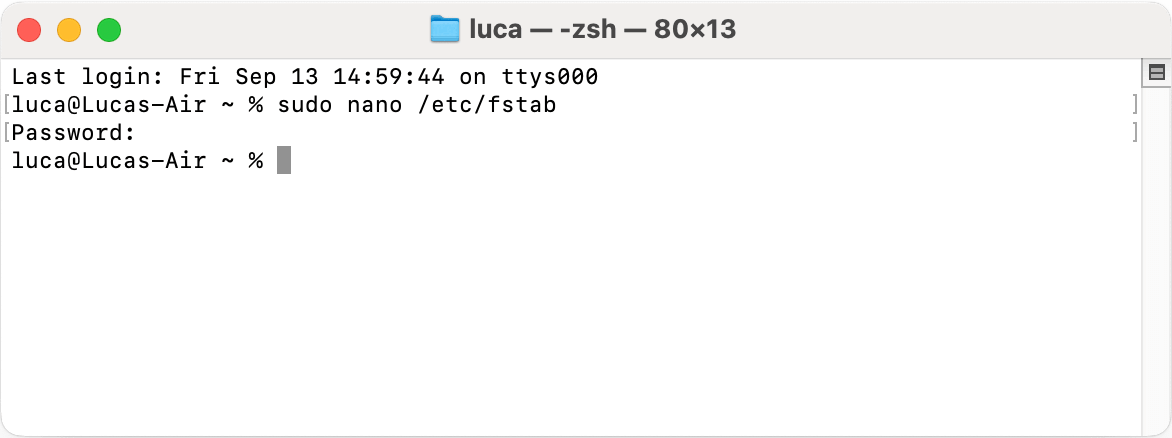
macOS includes a command-line utility Terminal that can be used to enable write access to NTFS drives. This method requires some technical knowledge and can be complex for novice users. Use Terminal to adjust system settings, allowing NTFS drives to be mounted with read-write permissions.
Step-by-Step Guide:
Step 1. Ensure all data is backed up before attempting this method.
Step 2. On your Mac, open Terminal.
Step 3. Input the command below and hit Enter:
sudo nano fstab /etc

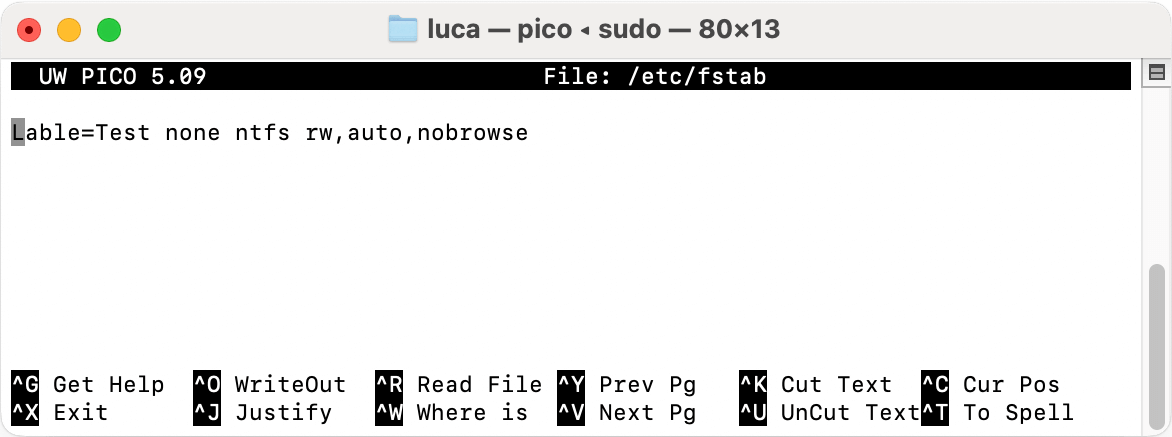
Step 4. In the nano text editor, add a line for each NTFS drive you want to enable write support for. The line should follow this format:
LABEL=NAME none ntfs rw,auto,nobrowse
Replace NAME with the name of your NTFS drive.

Step 5. Save the file and exit nano by pressing Control + X , then Y to confirm, and Enter to save.
Step 6. Restart your Mac and test the NTFS drive to verify that write access is enabled.
🔘 Method 3: Using Virtual Machines or Boot Camp
If you need to work extensively with NTFS drives and prefer not to alter your macOS setup, another option is to use a virtual machine (VM) or Boot Camp to run Windows on your Mac.
Virtual Machines: Software like Parallels Desktop or VMware Fusion allows you to run a Windows environment within macOS. You can then access and modify NTFS drives from within the Windows VM.
Boot Camp: Apple's Boot Camp utility lets you install Windows on a separate partition of your Mac's drive. When booted into Windows, you can directly read and write to NTFS drives.
🔘 Method 4: Network-Based Solutions
For file transfers that don't require direct access to NTFS drives, network-based solutions can be effective. You can share files between macOS and Windows systems over a network.
Shared Network Folders: Set up a shared folder on a Windows PC and access it from your Mac via SMB (Server Message Block). This method allows you to transfer files between systems without needing direct write access to the NTFS drive.
Cloud Storage: Use cloud storage services like Google Drive, Dropbox, or OneDrive to upload files from one system and download them on the other.
Potential Issues and Troubleshooting
When working with NTFS drives on macOS, users may encounter several issues, including:
- Performance Degradation: Third-party tools and manual methods may affect system performance or stability.
- Data Corruption: There is a risk of data corruption if NTFS drives are not handled properly.
- Compatibility Issues: Some third-party tools may not be fully compatible with the latest macOS updates.
🛠️ Troubleshooting Tips:
- Check Tool Updates: Ensure that third-party tools are up-to-date to avoid compatibility issues.
- Verify Permissions: Check and adjust file and drive permissions if you encounter access issues.
- Consult Support: Reach out to the support teams of third-party tools for assistance with specific problems.
Security and Performance Considerations
When using third-party NTFS drivers, it's important to consider security and performance implications. These tools can potentially introduce vulnerabilities or impact system performance.
💡 Security Tips:
- Choose Reputable Tools: Opt for well-known and trusted third-party tools to minimize security risks.
- Regular Updates: Keep your NTFS tools and macOS updated to protect against vulnerabilities.
💡 Performance Tips:
- Monitor System Resources: Keep an eye on system performance and resource usage when using NTFS drivers.
- Backup Data Regularly: Ensure that important data is backed up to prevent data loss in case of system issues.
Conclusion
As of macOS Sonoma, native NTFS support remains limited to read-only access, with no enhancements for write capabilities. Users who need full read-write access to NTFS drives must rely on third-party tools or manual workarounds.
DoYourData NTFS for Mac is a popular option that provide reliable and seamless NTFS read-write support. For those who prefer manual methods, using command-line tools or adjusting system settings can enable write access, though these methods come with risks and require careful handling.
Ultimately, the choice of solution depends on individual needs and technical comfort level. For most users, third-party tools offer a straightforward and effective way to work with NTFS drives on macOS Sonoma. As macOS evolves, future updates may bring improved support for NTFS or other file systems, so staying informed about new developments is beneficial.

DoYourData NTFS for Mac
DoYourData NTFS for Mac is a safe, powerful and easy-to-use NTFS for Mac tool. It allows macOS to read & write files on NTFS drives without any limitation. It is also a comprehensive disk management tool for Mac to mount/unmount disk, format disk, repair disk, read-write disk...on Mac.