Home > Hard Drive Solutions for Mac
How to Use Tuxera NTFS for Mac? Here Is Full User Guide
Download and install Tuxera NTFS for Mac on your Mac, then use it to enable full read-write support for NTFS drives on Mac. Then you can write data to NTFS drives or change the contents stored on the NTFS drives without formatting. Here is the user guide of Tuxera NTFS for Mac, check it now.
![]() Updated by Justin Kenny on August 8, 2023
Updated by Justin Kenny on August 8, 2023
Quick Navigation:
- 1. What is Mac Tuxera NTFS?
- 2. Tuxera NTFS for Mac's read-write instructions
- 3. How to enable/disable Tuxera's Microsoft NTFS for Mac?
- 4. Tuxera NTFS for Mac Alternative
You will likely need an NTFS driver when using a hard drive with a Mac and encountering difficulties due to the NTFS file system. Tuxera NTFS for Mac is one such driver that makes working with NTFS-formatted disks straightforward, whether you need to remove, rename, move, or add files and folders.
You can easily read/write to NTFS drives with the help of Tuxera NTFS for Mac. The software's expedited file transmission between Windows NTFS and Mac is made possible by an improved caching technique. In addition, a Maintenance tab in the application may scan for and fix disk issues.
If you are contemplating this program to solve your NTFS format problems, you have come to the right place. Everything you need to know about Tuxera NTFS for Mac, from how to install it to its essential features and price, is covered in this article.
What is Mac Tuxera NTFS?
Regarding file systems and embedded software, nobody does it better than Tuxera NTFS for MAC. This specialist program can help you reliably access, copy, delete, and relocate NTFS drive data.
Since Mac OS does not natively support reading and writing to NTFS volumes, this is the quickest way to access and work with Windows disks. Because of its incorporation and enhancement of the open-source NTFS, your Mac can access a fully functional, high-quality NTFS driver.
Tuxera NTFS for Mac allows you to read and write to Windows drives without hassle. Its cutting-edge, high-tech cache layer transfers your data quickly and securely via NTFS.
Advanced Mac Tuxera NTFS Features:
There are many Mac NTFS drivers. Tuxera, like the others, has unique traits. Read on about Tuxera NTFS's advanced features.
Mac read-write NTFS:
Macs read-only NTFS drives. Thus, you can only read NTFS files or copy and paste them into your Mac. Tuxera NTFS supports NTFS read/write, allowing complete access to NTFS.
You can move files from your Mac to an NTFS drive, eliminate superfluous files, instantly edit documents, etc. With Tuxera NTFS for Mac, Mac NTFS drives perform like HFS+ or APFS drives.
Maintain data transport speed:
Mac Tuxera NTFS uses increased caching. It helps file transfers run smoothly. Saving or copying files between external drives and Mac doesn't take long. Most data transfers won't stall. When dual-booting Windows and macOS, data interchange is smooth and fast.
Optimize disk management:
Mac disk manager Tuxera NTFS. It manages NTFS, native, and other Mac disks with well-designed functionality and options.
Its "Maintenance" feature checks and fixes volume issues. "Format" can clear a volume for reuse. Tuxera NTFS resembles macOS Disk Utility. It manages volumes but not disks.
Tuxera NTFS for Mac's read-write instructions:
Tuxera NTFS for Mac is a driver that allows you to access NTFS drives on your Mac fully.
To get Tuxera NTFS for Mac and get it set up on your Mac, follow these steps:
- The installation for Tuxera NTFS for Mac can be downloaded directly from the Tuxera website.
- When prompted, double-click the downloaded installation file to begin the process.
- When prompted to open the Tuxera NTFS program, select Open.
- When prompted that the Tuxera installation application will launch, select Continue.
- To install Tuxera NTFS for Mac, click Continue and then follow the on-screen instructions.
- Select Trial version.
- To force your Mac to restart, select Restart.
- Connect your NTFS drive to your Mac after installing Tuxera NTFS, then access the drive through Finder. Then, you can use your Mac to read NTFS volumes and create, modify, copy, relocate, and delete files on NTFS drives.
How to enable/disable Tuxera's Microsoft NTFS for Mac?
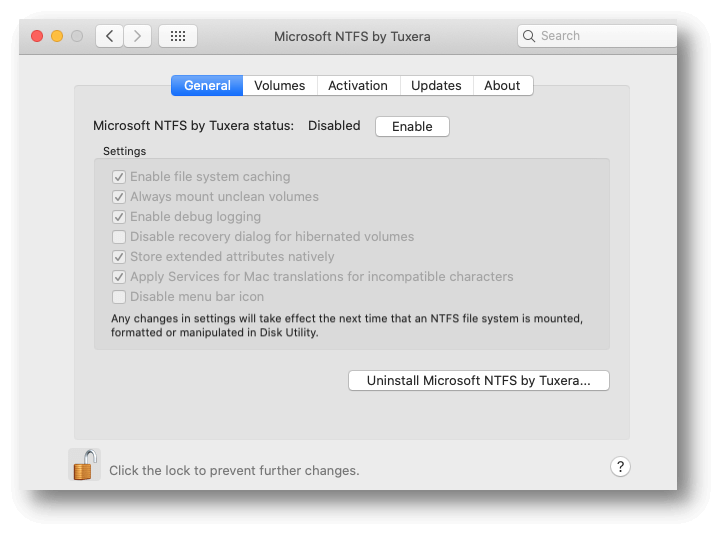
Microsoft NTFS for Mac, developed by Tuxera, can be quickly enabled or turned off. To access the General tab, only launch System Preferences and navigate to the Microsoft NTFS by Tuxera section.
After clicking the padlock icon in the window's lower left corner, you must enter your password to make changes.
If NTFS for Mac is already running, you can turn it off by clicking the corresponding button.
It will stop NTFS For Mac from launching at startup.
If NTFS for Mac is not enabled, however, the following choices will be unavailable until the 'Enable' button is clicked.
Tuxera NTFS for Mac Alternative
If you are looking for an easy-to-use Tuxera NTFS for Mac alternative, you can try DoYourData NTFS for Mac, the powerful and easy-to-use NTFS for Mac tool. It can help you quickly enable writable for NTFS drives, mount and unmount disk on Mac, format and repair hard drive, eject hard drive, open a hard drive on Mac, etc.
Step 1. Download and install the Tuxera NTFS for Mac alternative and then open it.
Step 2. Select the NTFS drive and click on Enable Writable button. Then you can write data to the NTFS drive or delete/save/add/modify/rename/erase/move files on the NTFS drive without any limitation.

Conclusion:
Tuxera NTFS is a great alternative to Terminal for reading and writing NTFS volumes on a Mac. When it comes to data security, however, the truth is that Tuxera NTFS for Mac is a commercial Windows NTFS add-on driver. If you're having trouble with it, you should look at alternatives like DoYourData NTFS for Mac, iBoysoft NTFS for Mac, Fuse for Mac, etc. Finally, I hope you've learned everything you need about Tuxera NTFS for Mac from this article.
Written & Updated by Justin Kenny
Justin Kenny is a writer & editor of DoYourData. He joined DoYourData in 2016 and focuses on writing articles about Windows data recovery, Mac data recovery, external device data recovery, hard drive clone, data erasure, Mac cleanup, computer issue fixes, etc. He is a super fan of Apple devices and is big on testing new digital device and system utility software.