Quick Navigation:
- Understanding Why External Hard Drives Don't Mount on macOS Ventura
- Preliminary Checks
- Fix 1: Restart macOS and Reset NVRAM/PRAM
- Fix 2: Use Disk Utility to Mount the Drive
- Fix 3: Check Drive Format and Compatibility
- Fix 4: Update macOS Ventura and Drive Software
- Fix 5: Use Terminal to Mount the Drive
- Fix 6: Reset SMC (System Management Controller)
- Fix 7: Recover Data With Data Recovery Software.
- When to Seek Professional Help
- Conclusion
External hard drives are essential tools for many Mac users, providing an efficient way to store, backup, and transfer large amounts of data. However, some users of macOS Ventura have encountered a common and frustrating issue: their external hard drives won't mount. This problem can be a headache, as it restricts access to critical files and makes the storage device essentially useless. Fortunately, there are multiple fixes that can resolve this issue. In this article, we will explore some steps to get your external hard drive up and running on macOS Ventura.
Understanding Why External Hard Drives Don't Mount on macOS Ventura
Before diving into solutions, it's essential to understand the possible causes behind the external hard drive not mounting issue on macOS Ventura.
💠System Compatibility
macOS Ventura introduces several changes, and one of these might be related to how the operating system interacts with external drives. Updates in file system handling, security settings, or hardware compatibility can affect mounting. In some cases, third-party hardware drivers that worked on previous macOS versions might not be fully compatible with Ventura.
💠Hardware Issues
Sometimes, the issue is hardware-related. Problems such as faulty USB cables, malfunctioning USB ports, or even a defective external hard drive can prevent macOS from recognizing and mounting the device.
💠Software Conflicts
If you have installed third-party software, it might interfere with your Mac's ability to recognize the external drive. Outdated macOS or external hard drive drivers might also cause compatibility problems.
💠File System Incompatibility
Not all external drives are formatted in ways that are compatible with macOS. macOS prefers file systems like APFS or HFS+, but many external drives come pre-formatted with Windows-friendly systems like NTFS, which macOS can read but not write to without additional software. There could also be issues if the drive is formatted in FAT32, which has limitations on file sizes.
Preliminary Checks
💠Check the Cable and USB Port
The simplest thing to check first is your hardware. Often, a loose cable or malfunctioning port could be the reason the drive isn't mounting.
- Switch to another USB port. Your Mac may have multiple ports, and if one isn't functioning properly, try plugging the external hard drive into a different port.
- Test the cable. The cable connecting your drive to your Mac could be damaged. Use another cable that you know works.
- Try another external drive. If you have a second drive handy, see if it mounts. This can help you rule out whether the problem is with your external drive or your Mac.
💠Try on Another Mac or PC
If possible, test the external hard drive on another computer (Mac or Windows). If it mounts, you'll know the issue lies with your Mac. If it doesn't mount on another machine either, the problem might be with the hard drive itself.
💠Check for External Drive Power Supply
Some larger external hard drives, especially those with more storage capacity, require a separate power supply to function correctly. Ensure your hard drive is receiving power, as the absence of power can prevent the drive from mounting.
Fix 1: Restart macOS and Reset NVRAM/PRAM
A simple restart can solve many problems. Restarting macOS refreshes system settings and eliminates temporary glitches that might be affecting hardware recognition.
- To restart, go to the Apple logo in the upper-left corner of your screen, and choose Restart.
- Once your Mac has restarted, reconnect your external hard drive and check if it mounts.
💠Reset NVRAM/PRAM
If restarting doesn't help, resetting your Mac's NVRAM or PRAM might do the trick. NVRAM (non-volatile random-access memory) stores certain settings related to display resolution, time zone, and external drives.
- Turn off your Mac.
- Switch it back on and hit and hold Option, Command, P , and R right away.
- Release these keys after holding them for roughly 20 seconds.
- The NVRAM will be reset and your Mac will restart.
After the reset, reconnect the external hard drive to see if it mounts.
Fix 2: Use Disk Utility to Mount the Drive
Disk Utility is a built-in tool in macOS that allows you to manage storage devices. Here's how you can use it to mount your external hard drive manually.
- Go to Finder, then navigate to Applications > Utilities > Disk Utility.
![external hard drive not mounting on macOS Ventura]()
- In Disk Utility, check whether your external hard drive is listed in the left panel.
If the drive appears in Disk Utility but isn't mounted, this means the Mac can see the drive but hasn't automatically mounted it for use.
💠Mount the Drive Manually
- Select the external hard drive in the left panel.
- Click on the Mount button located at the top of the window.
![external hard drive not mounting on macOS Ventura]()
If this works, your drive should now be accessible in Finder.
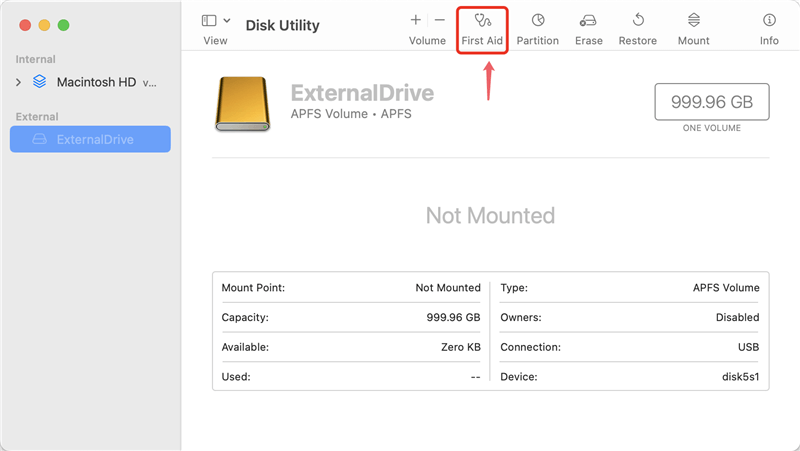
💠Repair the Drive Using First Aid
If the drive doesn't mount or if macOS reports errors, you can try repairing the drive using Disk Utility's First Aid tool.
- Select the drive in Disk Utility.
- Click First Aid, and allow it to run its diagnostic and repair process.
![external hard drive not mounting on macOS Ventura]()
After First Aid finishes, try mounting the drive again.
Fix 3: Check Drive Format and Compatibility
Your external drive might be formatted in a file system that macOS Ventura doesn't fully support. To check the format:
- In Disk Utility, select the external drive.
- Look at the format listed. If it's NTFS, exFAT or another Windows-centric file system, macOS might have trouble working with it.
💠Use third-party software
If your drive is NTFS and cannot be mounted normally, third-party disk management tools might be able to help. DoYourData NTFS for Mac allows full read/write access to NTFS drives on macOS. It can also try to mount the external drives or fix drive issues.
Connect the external hard drive to the Mac and run the software. Select your external hard drive and then click the Mount button.
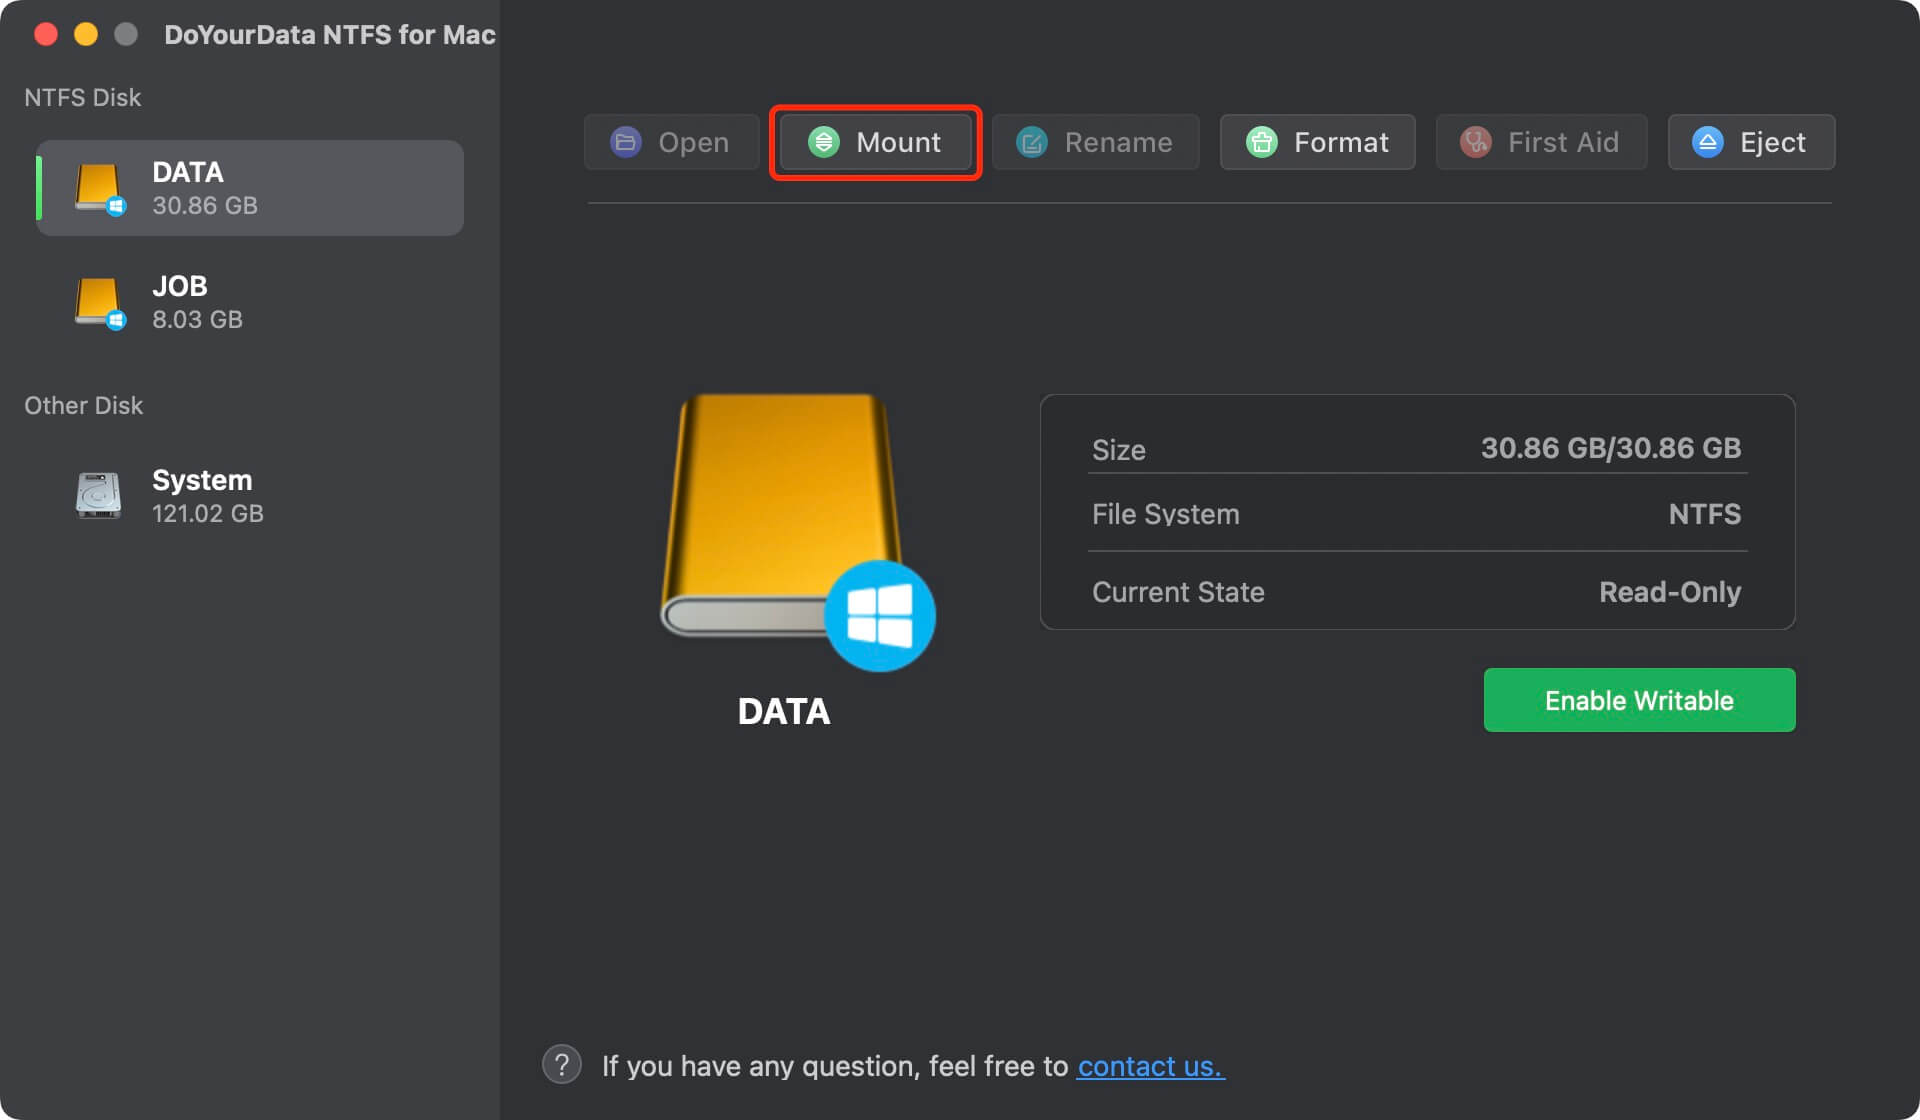
What's more, if your external hard drive is in NTFS format, the software can also help you make it writable on Mac.
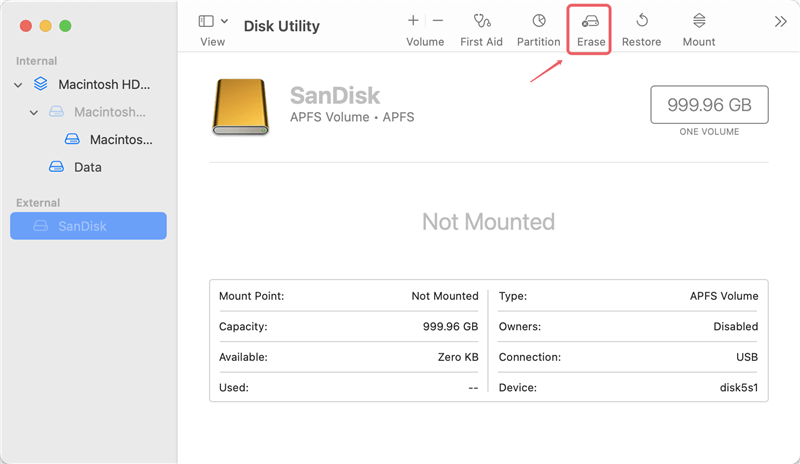
💠Reformatting the Drive (if needed)
If you suspect the format is causing the issue, you can reformat the drive, but be aware that reformatting will erase all data on the drive. If you can, back up your data before proceeding.
- Open Disk Utility from Applications > Utilities. Select the drive in Disk Utility.
- Click Erase and choose a macOS-compatible format such as APFS (for newer drives) or HFS+.
- Once the reformat is complete, check if the drive mounts properly.
![external hard drive not mounting on macOS Ventura]()
Fix 4: Update macOS Ventura and Drive Software
💠Check for macOS Updates
It's important to keep macOS Ventura updated to avoid system conflicts.
- Go to System Settings > General > Software Update.
- If an update is available, install it and restart your Mac.
![external hard drive not mounting on macOS Ventura]()
- Once updated, check if your external hard drive mounts.
💠Update External Drive Firmware
Some external hard drives have firmware that needs updating to stay compatible with new operating systems like macOS Ventura. To find out whether your drive model has any firmware upgrades available, visit the manufacturer's website.
Fix 5: Use Terminal to Mount the Drive
If none of the previous solutions work, you can use the macOS Terminal to force-mount the external hard drive.
💠Using Terminal Commands
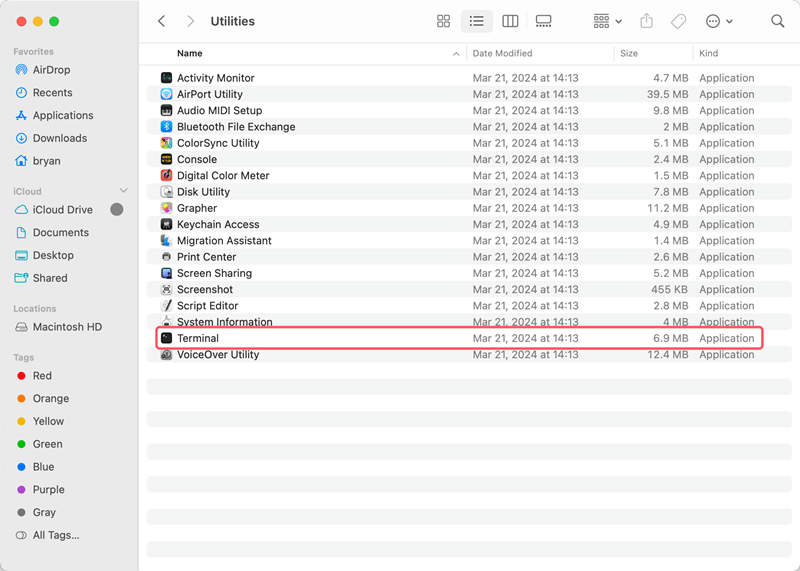
- Open Terminal (located in Applications > Utilities).
![external hard drive not mounting on macOS Ventura]()
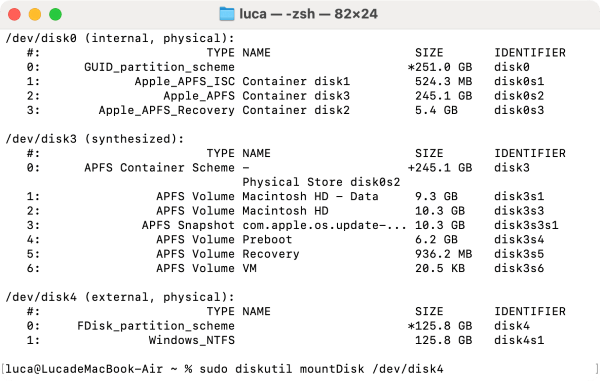
- Type the following command to list all drives connected to your Mac: diskutil list
![external hard drive not mounting on macOS Ventura]() This will show you a list of all disks and partitions. Find your external drive in the list (it may be listed as /dev/disk2 or similar).
This will show you a list of all disks and partitions. Find your external drive in the list (it may be listed as /dev/disk2 or similar).
- Next, mount the drive manually by using the following command (Replace diskX with the correct identifier for your drive from the previous list.): diskutil mountDisk /dev/diskX
![external hard drive not mounting on macOS Ventura]()
- After running the command, your drive should mount and be accessible via Finder.
Fix 6: Reset SMC (System Management Controller)
External drives that won't mount are among the hardware-related problems that can be fixed by resetting the SMC. The process for resetting SMC differs depending on whether your Mac has an Intel chip or an Apple M1/M2 chip.
💠Steps to Reset SMC on Intel-based Macs
- Turn off your Mac.
- Wait for fifteen seconds after unplugging the power cord.
- Re-plug the power cord.
- Turn your Mac back on.
💠Steps to Reset SMC on Apple Silicon Macs
For M1/M2 Macs, simply shutting down and restarting your computer performs the SMC reset.
Fix 7: Recover Data With Data Recovery Software.
If these options still doesn't work but the external hard drive can still be recognized in Disk Utility, we suggest you try to recover data from the external hard drive. Using professional data recovery software, it's easy to recover the files from the not mounting external hard drive on Mac.
We suggest you use the most reliable Mac data recovery software Do Your Data Recovery for Mac. The software is able to recover data from external hard drives, Internal drives, SSDs, USB flash drives, memory cards, etc.
Do Your Data Recovery for Mac
- Effective to recover data from not mounting external hard drive on Mac.
- Recover lost files from external hard drive, SSD, Pen drive, SD card, etc.
- Mac data recovery for deleted, formatted, lost files in any data loss scenarios.
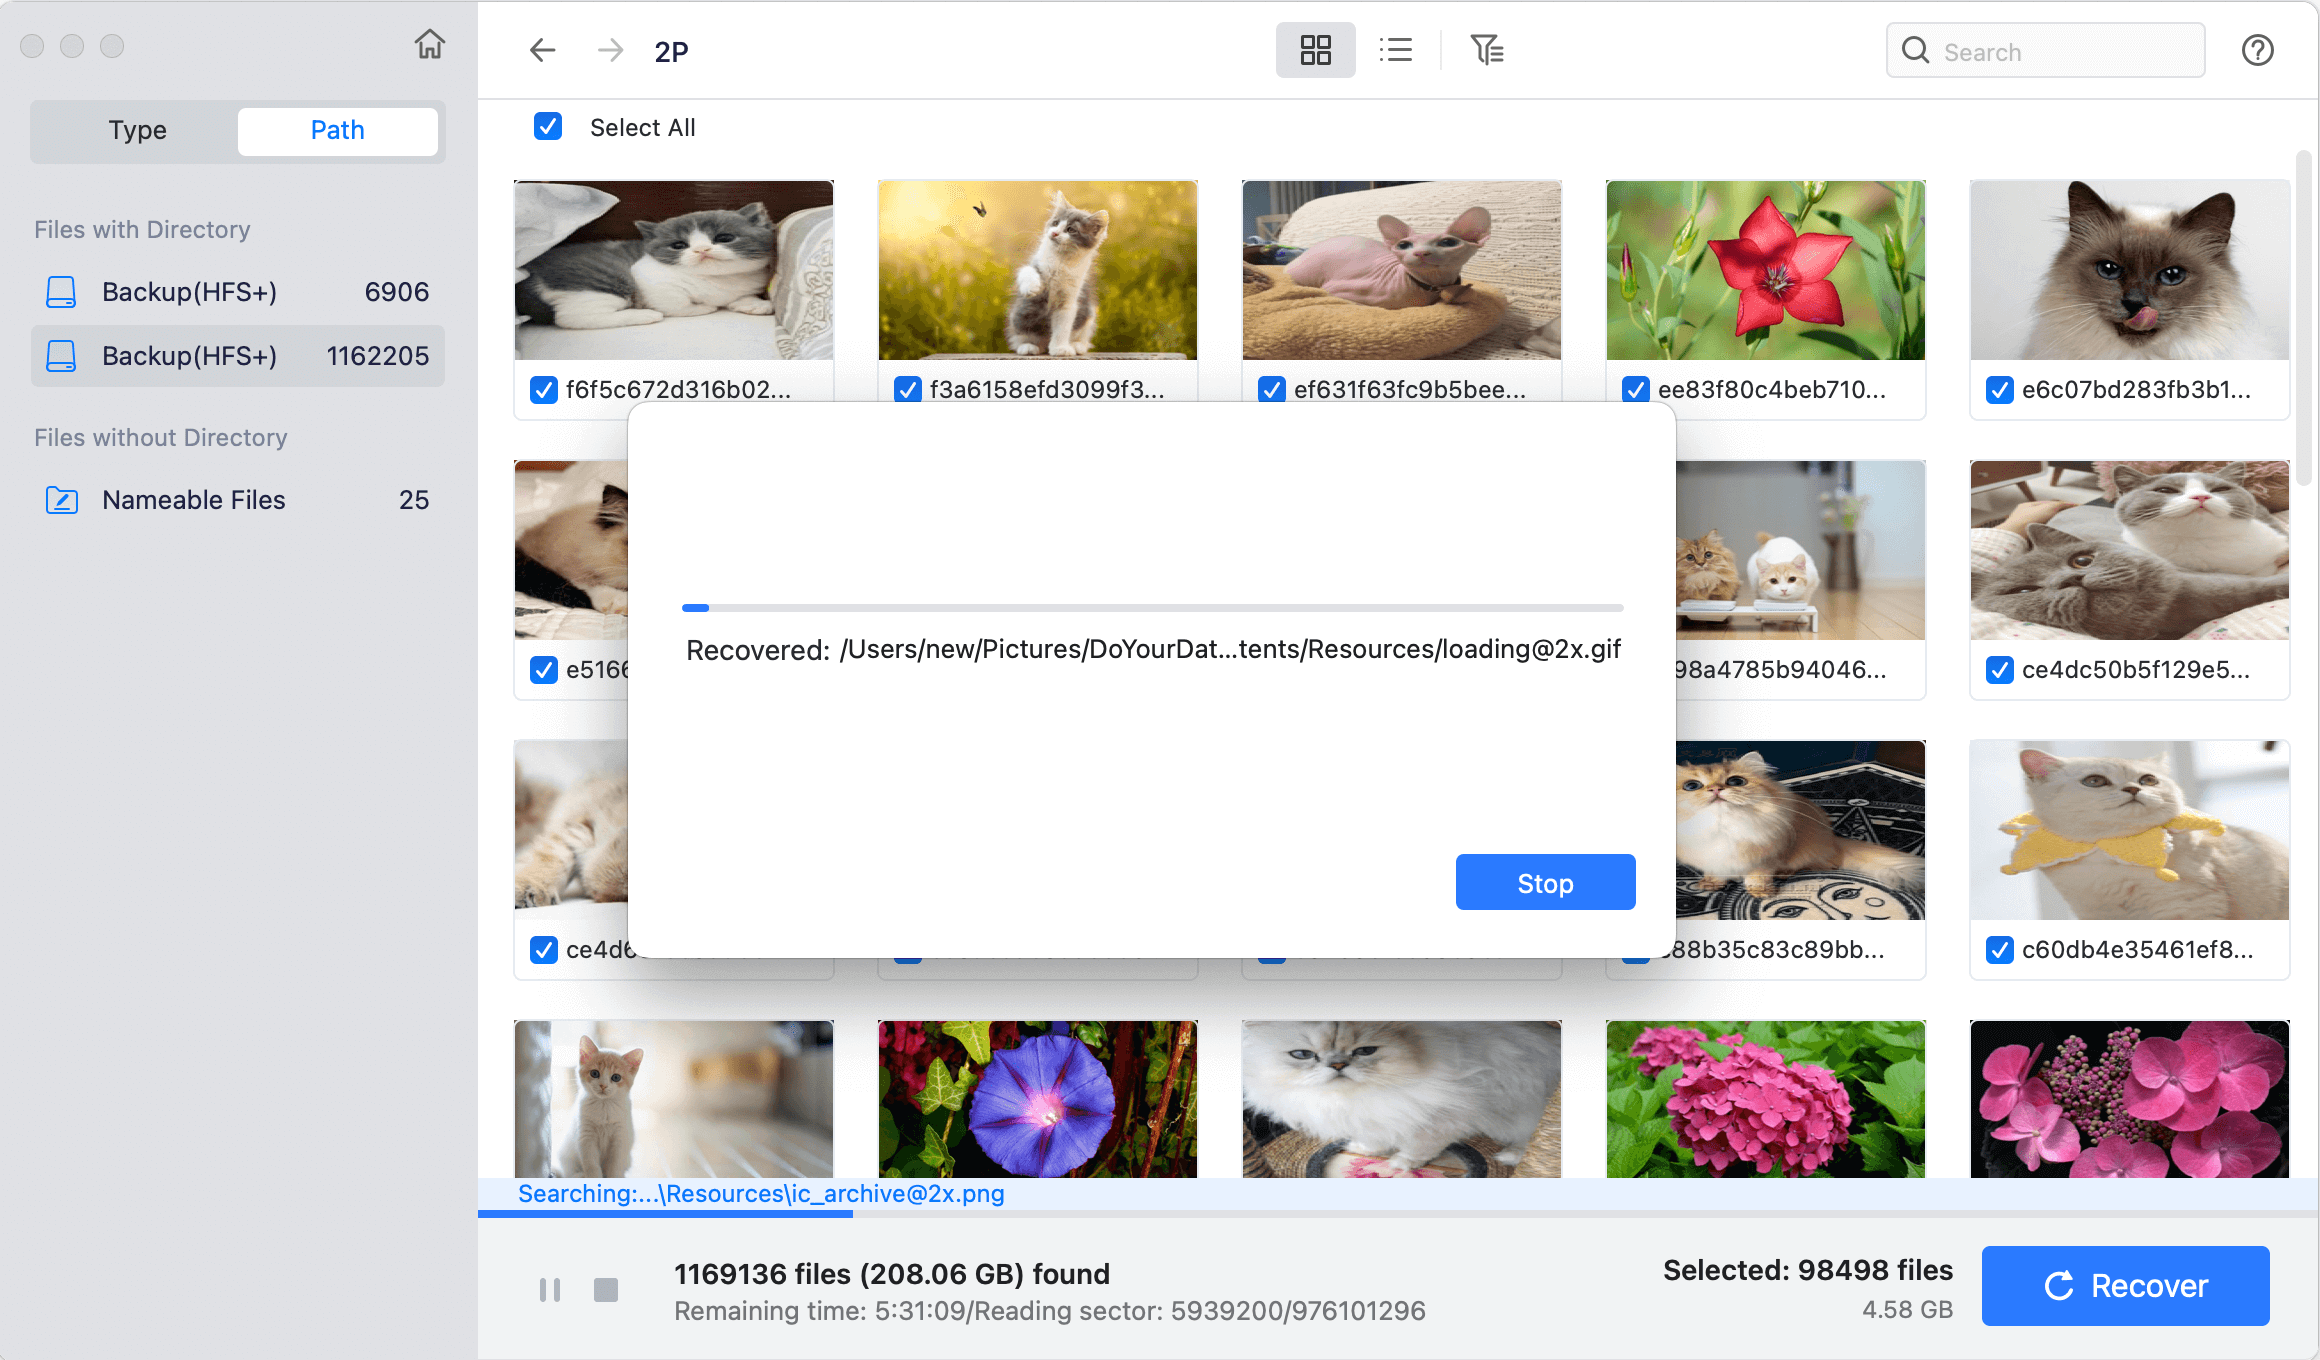
After downloading and installing the Mac data recovery tool on your macOS Ventura, you can start the software and try to recover data from the not mounting external hard drive as following steps.
Step 1. Run the software from launchpad. Choose the not mounting external hard drive from the drive list in the software.

Step 2. Run the deep scan for the external hard drive by clicking on the Scan button.

Step 3. After the scanning process is completed, you can preview to check the files and locate the wanted files among the found files.

Step 4. Select all the wanted files and then click the Recover button to save them to another hard drive or other safe place.
🎈Tips: If there are important data on the not mounting external hard drive, it's highly suggest you try to recover data first before doing any fixing operations.
When to Seek Professional Help
If your external hard drive still won't mount after trying all these steps and cannot even be read normally by data recovery software, it might be time to seek professional assistance.
💠Data Recovery Services
If your external hard drive contains critical data, consider using data recovery services. These professionals can extract data from non-mounting drives, although it can be expensive.
💠Apple Support or Local Repair Shop
If the issue seems to be with your Mac rather than the external drive, reaching out to Apple Support or visiting a local repair shop might resolve the problem.
Conclusion
Dealing with an external hard drive that won't mount on macOS Ventura can be frustrating, but with the steps outlined above, you should be able to troubleshoot and resolve the issue. From simple checks like changing the cable or USB port to more advanced solutions like using Terminal commands or third-party software, these solutions cover a wide range of potential causes. Always remember to back up your data regularly to avoid losing important files in the future.
If all else fails, don't hesitate to reach out to a professional for help. Happy troubleshooting!
Do Your Data Recovery for Mac
Do Your Data Recovery for Mac, one of the best Mac data recovery software, can help you easily and completely recover deleted, formatted or lost files from Mac HDD/SSD, external HDD/SDD, USB drive, memory card, digital camera, or other storage devices.


