Quick Navigation:
- Preparation Before Formatting
- METHOD 1: Formatting a Hard Drive Partition Using Disk Management
- METHOD 2: Formatting Using Command Line Tools
- METHOD 3. Format and Wipe Data Permanently with Software
- Post-Formatting Steps
- Conclusion
Formatting a hard drive section is one of the most important skills for managing your computer's storage and ensuring it runs at its best. Knowing how to format a section is also important when installing a new operating system, using an old drive for something else, or fixing disk problems.
Getting rid of old data and getting the drive ready for new use are both parts of the process. Many different tools and techniques can be used to do this. People who use Windows 2000 should know how to use its formatting tools and choices to make the process go more quickly and avoid major problems.
This guide will show you how to format a hard drive partition on Windows 2000 It will give you the skills to manage your storage needs well. You'll learn to format files confidently and quickly, from planning to doing it.
Preparation Before Formatting
Before you start formatting a hard drive section, you need to make sure the process goes smoothly and avoids any problems that might arise:
🔸 Backup Important Data: If you format a file, all its data will be erased. Before you begin, make a copy of any important items you don't want to lose. Use external storage devices like USB external hard drives or cloud storage to keep your files safe. This step ensures you don't lose important data while editing. Guide for data backup.
🔸 Ensure You Have Necessary Permissions: If you want to format a partition on a Windows 2000 system, you must have administrative powers. Ensure you are logged in as a supervisor or have the right permissions to do this.
🔸 Check Disk Health: Before moving on, checking the hard drive's health is a good idea. Checking tools for disks can help you find and fix any problems, like bad sections or physical damage. Before the cleaning process starts, this check helps ensure that the drive is in good shape and can handle it without any problems.
METHOD 1: Formatting a Hard Drive Partition Using Disk Management
There is a Disk Management tool in Windows 2000 that makes formatting disks easier.
S🔸 tep 1. Open Disk Management:
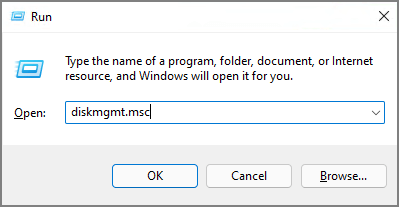
Press the Win + R keys and enter "diskmgmt.msc." You can also press the "Start" button and right-click on My Computer and choose Manage from the menu. Then, select Disk Management from the list left in the Computer Management window.
🔸 Step 2. Select the partition to format:
The Disk Management window shows your disks and folders as pictures. Find the section you want to format. Choose the right folder to prevent data from being lost on other drives.
🔸 Step 3. Initiate the formatting process:
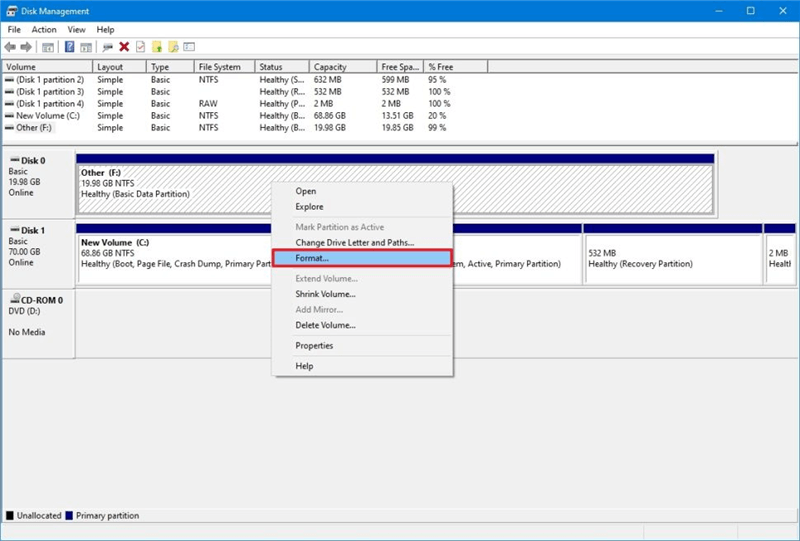
Right-click the drive you wish to format. From the displayed menu, select Format.
🔸 Step 4. Configure formatting options:
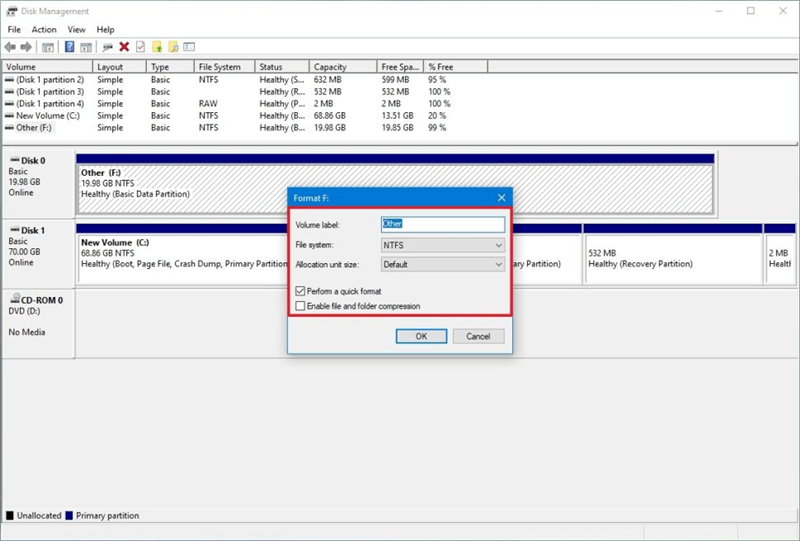
There are some settings you can make in the Format text box, including:
- Volume label: Type in a name for the section. It is the name that will show up when you look through files.
- File system: Choose a file system for the part. NTFS is best for most tasks because it has more advanced features.
- Allocation unit size: The normal setting is usually fine. This setting sets the size of file groups on the partition.
- Perform a quick format: If you check this box, the drive will be formatted faster, but bad sectors will not be checked. Uncheck it if you want a full version.
![Wipe Hard Drive on Windows 2000]()
🔸 Step 5. Start formatting:
To move on, click OK. A message will tell you that all the data on the file will be lost. To be sure of your choice, click OK once more.
🔸 Step 6. Wait for formatting to complete:
It is where the editing process starts. How long it takes depends on the partition size and whether you choose a full or quick format. After everything is done, the split can be used.
METHOD 2: Formatting Using Command Line Tools
You can also use the Command Prompt to format a file if you are an advanced user or like to work with command-line tools:
🔸 Step 1. Open Command Prompt:
Press the "Start" button. Type cmd into Run and press Enter.
🔸 Step 2. Use Diskpart:
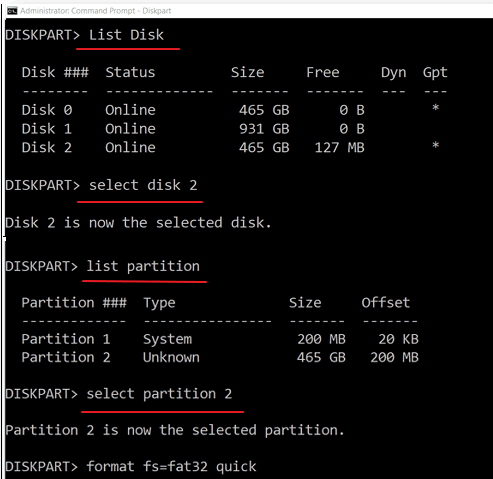
Type diskpart and press Enter to get to the Diskpart tool.
🔸 Step 3. List available disks:
If you type list disk and press Enter, a list of disks will appear. Find the disk with the section you want to format.
🔸 Step 4. Select the disk:
Type "select disk X." X is the number of the disk, and press "Enter."
🔸 Step 5. List partitions:
To see the partitions on the chosen disk, type list partition and press Enter.
🔸 Step 6. Select the partition:
Type pick partition Y, where Y is the partition number, and press Enter.
🔸 Step 7. Format the partition:
Type format fs=ntfs quick and press Enter. If needed, change NTFS to the file system you want to use. Do not select the quick choice if you are not using a quick format. Instead, select the full format.
🔸 Step 8. Exit Diskpart:
To stop Diskpart, type "exit" and press "Enter."
🔸 Step 9. Close Command Prompt:
Type "exit" and press "Enter" again.
METHOD 3. Format and Wipe Data Permanently with Software
After formatting the hard drive partition in Windows 2000 with both methods, the data on the formatted drive is still recoverable before the data is overwritten by new data. It's able to recover the formatted data with professional data recovery software.
If you want to ensure the formatted data will not be recovered in any way, a reliable and secure data wiping software is needed. DoYourData Super Eraser is such a tool which can format and wipe all the data permently on Windows 2000.
DoYourData Super Eraser
- Format drive and wipe data permanently in Windows 2000.
- Support shredding files, wipeing hard drive and free space.
- International data sanitization algorithms ensure secure data wiping.
In order to format and wipe a hard drive partition on Windows 2000, follow the guide below step by step:
🔸 Step 1. Launch the data wiping software on your computer and select the Wipe Hard Drive mode. Choose the drive partition and click Wipe Now.

🔸 Step 2. You need to select a data erasure standard at this step. After confirming the data erasure standard, click Continue to start.
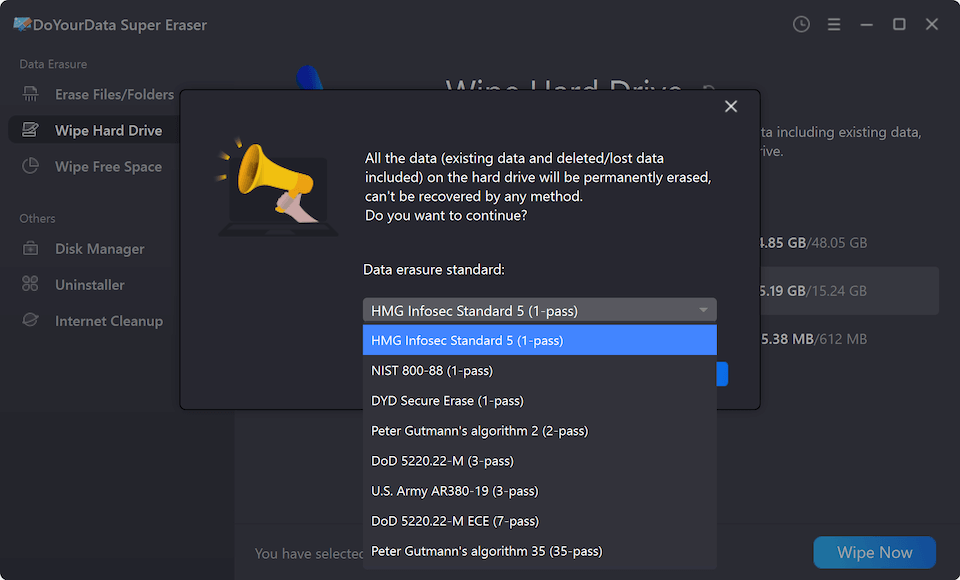
🔸 Step 3. The software will take some time to finish the data wiping process depending on your drive size and data erasure algorithm you choose. Just be patient util the process is done.
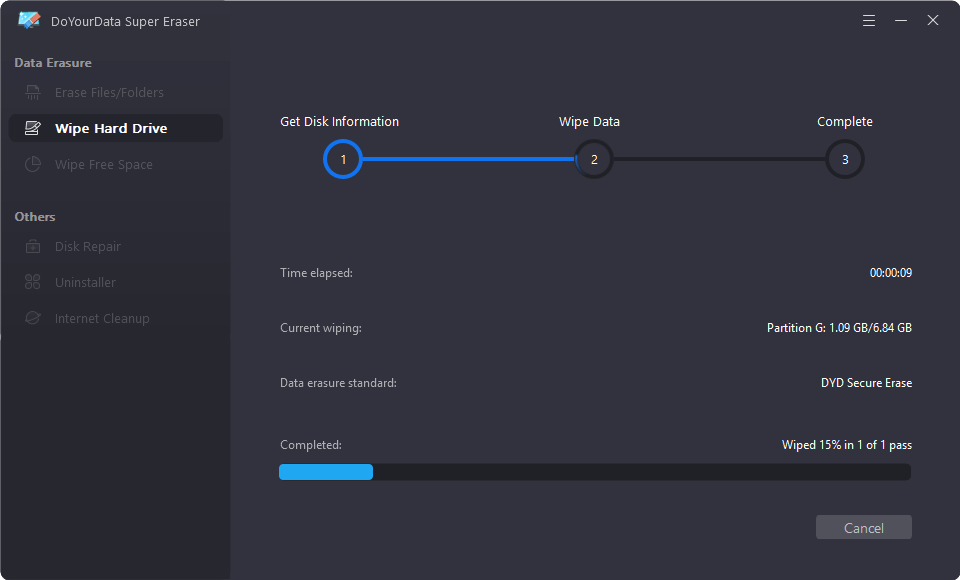
📌 Note: This method will wipe the data and all erased data is not recoverable. So, ensure to back up important files first and choose the correct drive to wipe.
Post-Formatting Steps
After formatting a partition successfully, there are a few important steps to take to make sure everything is set up properly and quickly:
🔸 Verify the Partition
First, Disk Management will be used to examine the newly formatted partition. Check to see that it looks right and works as it should. Ensure that the partition size and file system are correct for your options and that the system can recognize them.
🔸 Install the Operating System
If your goal was to format the drive to be ready for a new operating system, you can now start the installation process. Carefully follow the operating system's installation steps and ensure the new OS is installed and formatted on the partition.
🔸 Restore Data
You can now return data to a partition that has been formatted if you backed it up before formatting. Ensure your important data is safely reintegrated by moving your files to the folder from external storage or cloud backups.
🔸 Reconfigure Partition
You can make more changes to the partition, like giving it a new drive letter or changing the volume name. You can change these settings in Disk Management to suit your tastes or needs, ensuring that the partition is set up in the best way for your needs.
Conclusion:
To organize and maximize your storage, you must know how to format a hard drive partition on Windows 2000. You can ensure the process goes smoothly by properly preparing and formatting with Disk Management or Command Prompt and finishing jobs after formatting.
It keeps the system running smoothly and makes data management easier. You should learn these steps to work confidently and accurately with your drives. They are useful for installing a new operating system or rearranging your storage.
When you trying to format and erase all the data permanently before you repurpose or abandon an external hard drive, it's highly suggested to wipe the data with DoYourData Super Eraser. It can ensure the data be wiped and no way to recover. Then you can feel free to give it away without worring about privacy security.
DoYourData Super Eraser
DoYourData Super Eraser, the award-winning data erasure software, offers certified data erasure standards including U.S. Army AR380-19, DoD 5220.22-M ECE to help you securely and permanently erase data from PC, Mac, HDD, SSD, USB drive, memory card or other device, make data be lost forever, unrecoverable!
