How to Format WD External Hard Drive on Windows or macOS?
How to format a WD external hard drive? How to wipe a WD external hard drive before selling, donating or disposing of it? Don't worry, here are many simple & safe methods to help you format WD external hard drive on Windows or macOS. DoYourData Super Eraser is a powerful disk wipe software, it can help you securely wipe WD external hard drive and permanently erase all data from it before you sell, donate or dispose of the drive.
![]() Updated by Shirly Chen on July 27, 2024
Updated by Shirly Chen on July 27, 2024
Quick Navigation:
- What Should Do Before Formatting Your WD External Hard Drive?
- Format WD External Hard Drive on Windows
- Format WD External Hard Drive on Mac on Mac
- How to Unformat WD External Hard Drive on Windows or macOS?
- Securely and Permanently Wipe WD External Hard Drive Before Selling or Donating
- Conclusion
- Frequently Asked Questions (FAQs)
Formatting an external hard drive is essential for various reasons, including optimizing performance, ensuring compatibility with different operating systems, and clearing out any existing data. This guide provides a detailed, step-by-step approach to formatting a Western Digital (WD) external hard drive on both Windows and Mac systems.
What Should Do Before Formatting Your WD External Hard Drive?
Before formatting your WD external hard drive, taking a few preparatory steps ensures a smooth and successful process. Here's an expanded guide on how to get ready:
1. Backup Data
The importance of backing up your data cannot be overstated. Formatting a drive erases all existing data, and without a backup, you risk losing important files permanently. Here are some tips for backing up your data effectively:
- Use an External Backup Drive: Invest in a second external hard drive specifically for backups. This allows you to keep your data safe even if something goes wrong during the formatting process.
- Cloud Storage: Services like Google Drive, Dropbox, and OneDrive offer ample storage space and the convenience of accessing your files from anywhere. Ensure that your internet connection is stable and the files are fully uploaded before formatting your drive.
- Backup or Clone Software: Consider using dedicated backup software, such as DoYourClone or Acronis True Image, which can completely clone your WD external hard drive to another drive.
2. Ensure Compatibility
Choosing the right file system depends on the operating systems you plan to use the drive with. Here's a deeper look at each file system option:
- NTFS (New Technology File System): Developed by Microsoft, NTFS is the default file system for Windows. It supports large files (over 4GB), advanced security features, and faster read/write speeds. However, NTFS is not natively writable on macOS, which may require third-party software or WD NTFS driver for Mac like DoYourData NTFS for Mac to use the drive seamlessly on both systems.
- FAT32 (File Allocation Table 32): An older file system compatible with almost all operating systems, including Windows, macOS, and Linux. However, it has significant limitations, such as a maximum file size of 4GB and partition sizes limited to 32GB on Windows without using third-party tools. FAT32 is suitable for smaller drives or devices where cross-compatibility is essential, but the file size limit can be restrictive for modern use.
- exFAT (Extended File Allocation Table): Designed to bridge the gap between NTFS and FAT32, exFAT is optimized for flash drives and external hard drives. It supports files larger than 4GB and is natively supported by both Windows and macOS. This makes exFAT the ideal choice for users who need to transfer large files between different operating systems without dealing with compatibility issues.
If you are a Mac user, you can choose APFS (for macOS 10.13 or later) or Mac OS Extended (HFS+, for older macOS operating systems) as the file system when you format your WD external hard drive.
3. Choose the Right File System
When deciding which file system to use, consider the following scenarios:
- Single Operating System Use: If you primarily use the drive with a single operating system, choose the file system that best supports that OS. For example, NTFS for Windows or APFS (Apple File System) for macOS.
- Multiple Operating System Use: For users who frequently switch between Windows and macOS, exFAT offers the best balance of compatibility and functionality.
- Specialized Uses: For specific needs, such as using the drive with gaming consoles, smart TVs, or older devices, check the compatibility requirements of those devices and choose accordingly. Some devices may only support FAT32, despite its limitations.
Format WD External Hard Drive on Windows
Method 1: Using Disk Management
Step 1. Connect the WD External Hard Drive: Plug your drive into a USB port on your computer.
Step 2. Access Disk Management: Press Windows + R, type diskmgmt.msc, and hit Enter.
Step 3. Select the Drive to Format: Locate your WD external hard drive in the list of drives. Right-click on it and select "Format".
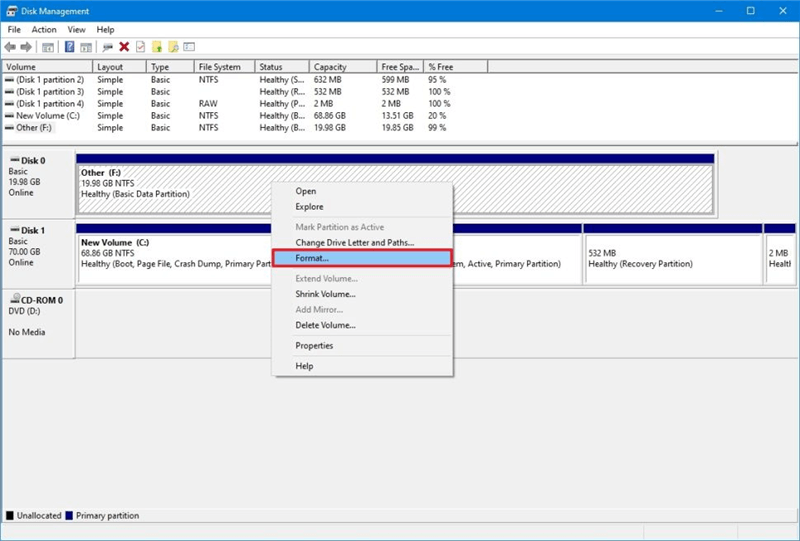
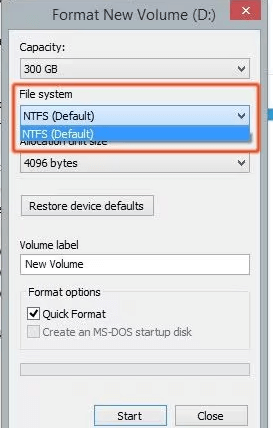
Step 4. Choose the File System: Select the appropriate file system (NTFS, FAT32, exFAT) from the dropdown menu.
Step 5. Assign a Drive Letter: Choose a letter to assign to the drive.
Step 6. Start the Format Process: Check the box for "Perform a quick format" if desired, then click "OK" to begin the formatting process.
Step 7. Confirm Completion: Wait for the process to finish. Your drive is now formatted and ready for use.
Method 2:Using File Explorer
Step 1. Open This PC: Navigate to This PC or My Computer.
Step 2. Right-click the Drive: Select your WD external drive, right-click, and choose "Format".
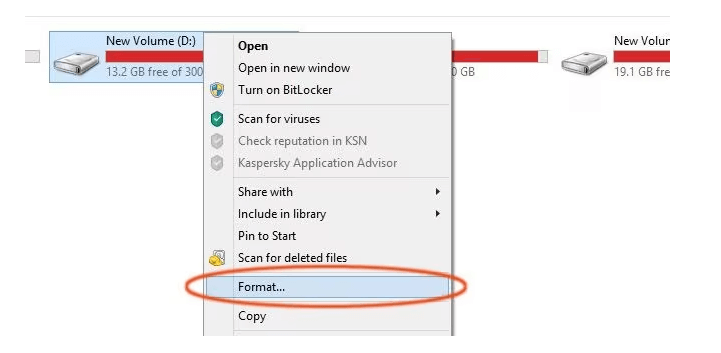
Step 3. Select File System: Pick the desired file system and check the box for quick format if needed.
Step 4. Start Formatting: Click "Start" and wait for the process to complete.
Method 3: Using Command Prompt
For users who prefer a command-line interface, Command Prompt offers a powerful way to format drives:
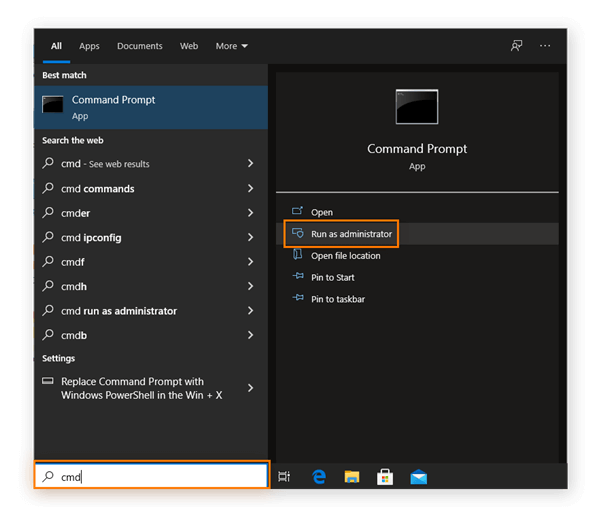
Step 1. Open Command Prompt as Administrator: Search for Command Prompt in the Start menu, right-click, and select "Run as administrator".
Step 2. Enter DiskPart: Type diskpart and press Enter. DiskPart is a command-line utility for disk management.
Step 3. List Disks: Type list disk to display all connected disks. Identify your WD external drive by its size and number.

Step 4. Select Disk: Type select disk X (replace X with the number of your WD drive) and press Enter.
Step 5. Clean the Disk: Type clean to remove all partitions and data from the drive.
Step 6. Create Partition: Type create partition primary to create a new primary partition.
Step 7. Format the Disk: Type format fs=ntfs quick (or replace ntfs with exFAT/FAT32 as needed) and press Enter to format the drive.
Step 8. Assign a Drive Letter: Type assign letter=X (replace X with your preferred drive letter) and press Enter. The drive is now ready for use.
Format WD External Hard Drive on Mac on Mac
Solution 1: Using Disk Utility
Step 1. Connect the WD External Hard Drive: Plug the drive into your Mac.
Step 2. Open Disk Utility: Go to Applications > Utilities > Disk Utility.
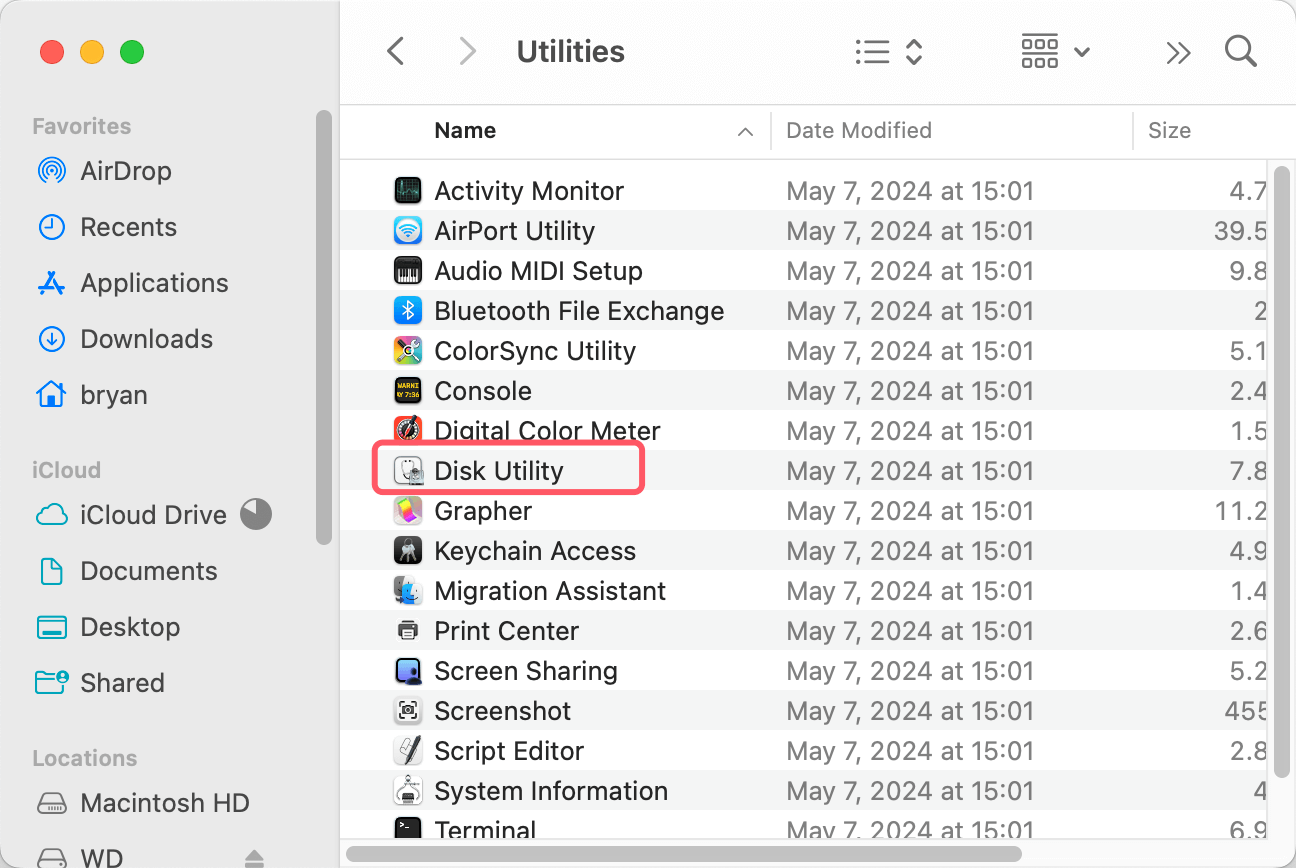
Step 3. Select the Drive: Click on your WD external drive in the left sidebar.
Step 4. Erase the Drive: Click "Erase" at the top.
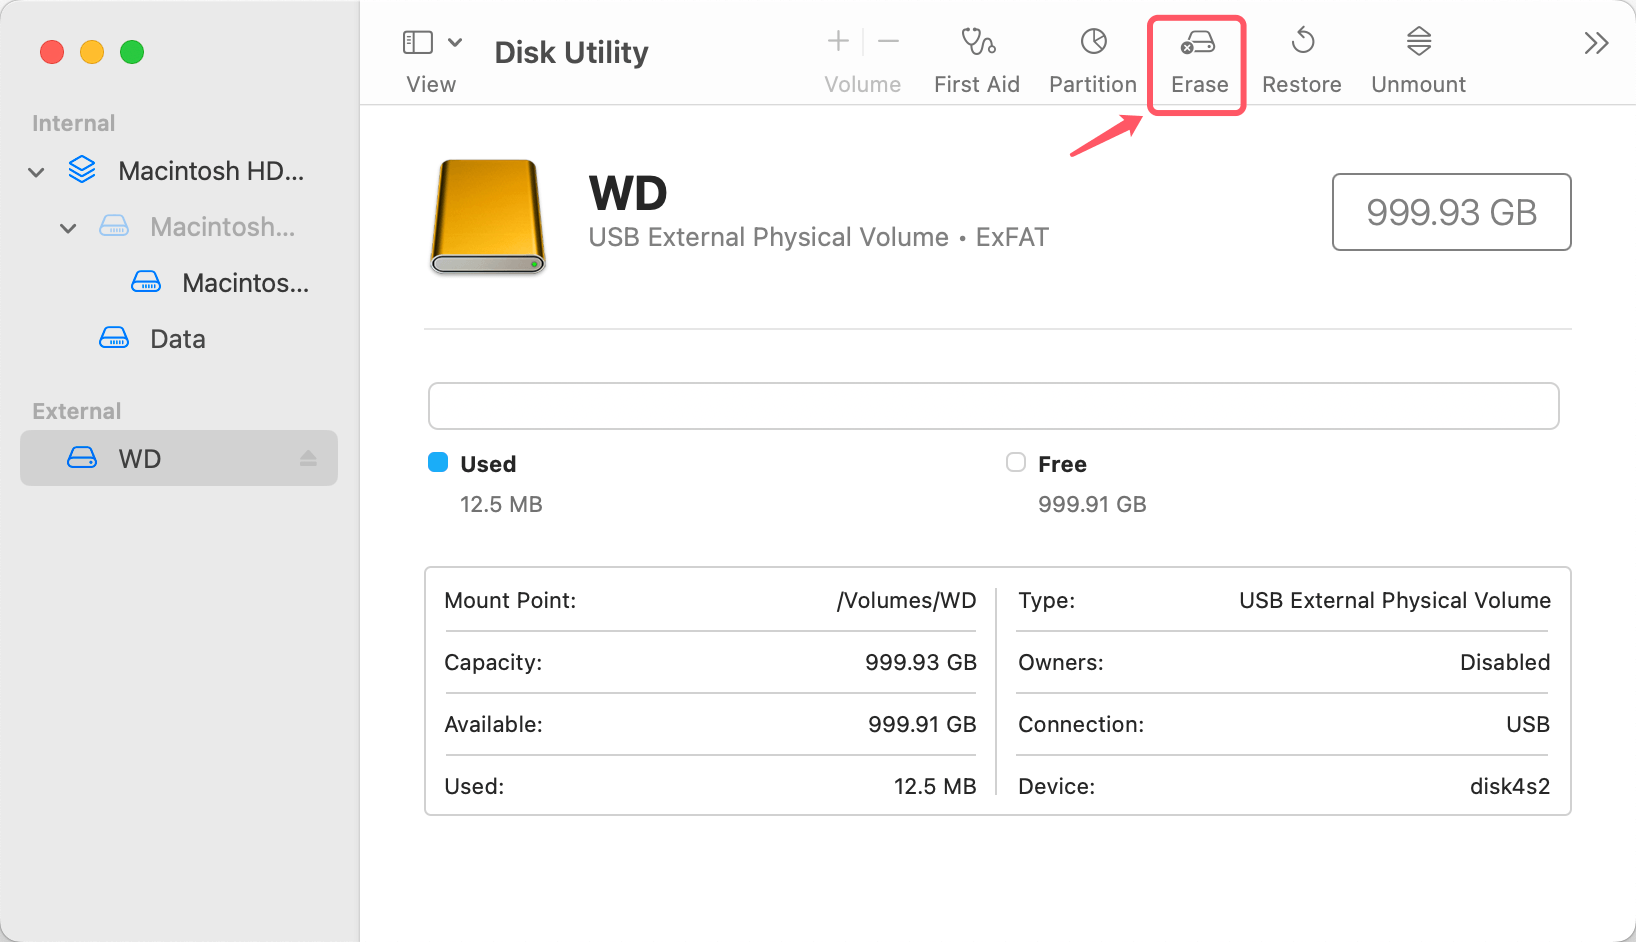
Step 5. Choose File System: Select a file system (APFS for Mac-only use, exFAT for Mac and Windows).
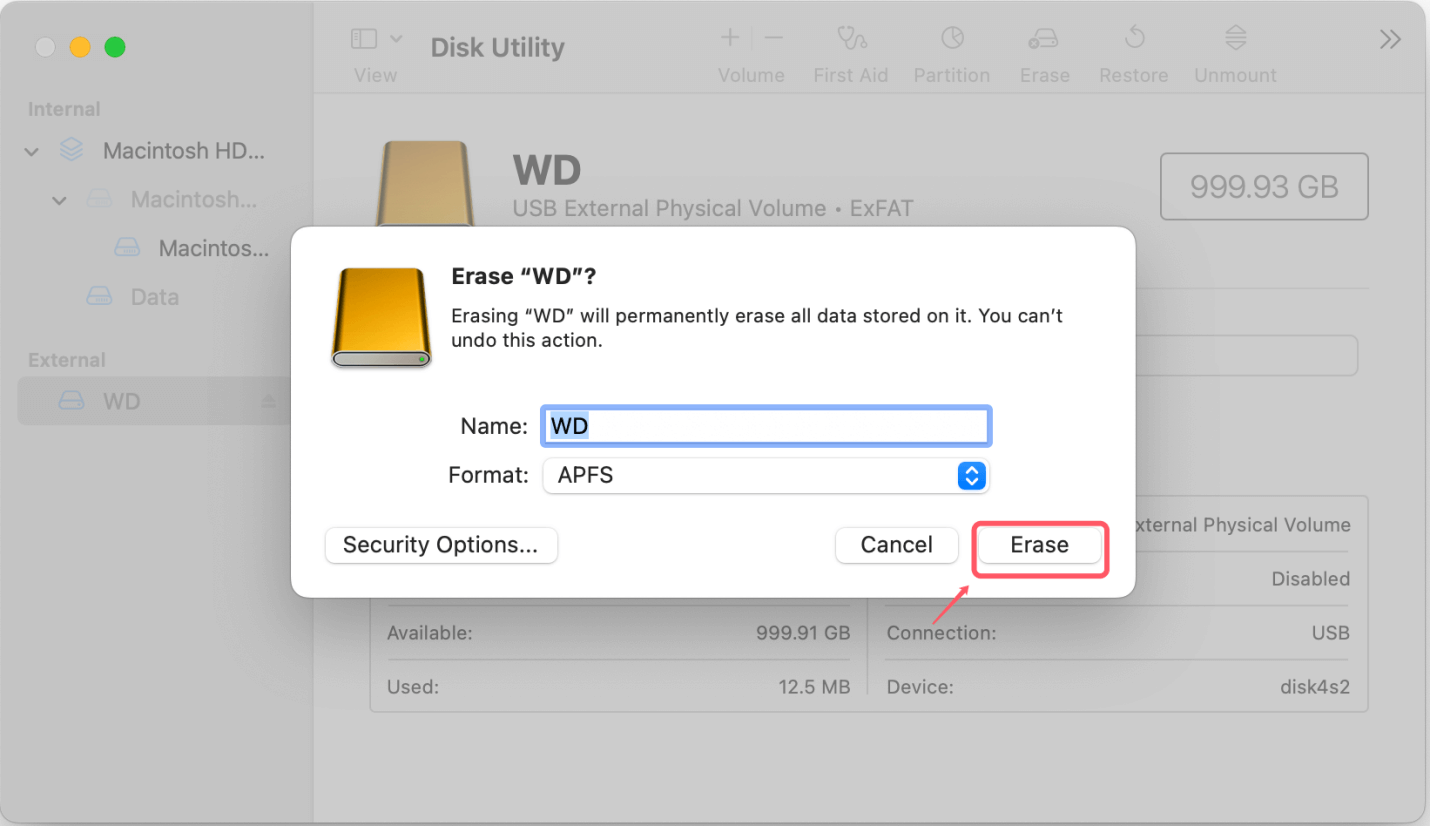
Step 6. Assign a Name: Enter a name for the drive.
Step 7. Start the Format Process: Click "Erase" and wait for the process to complete.
Solution 2: Using Terminal Command
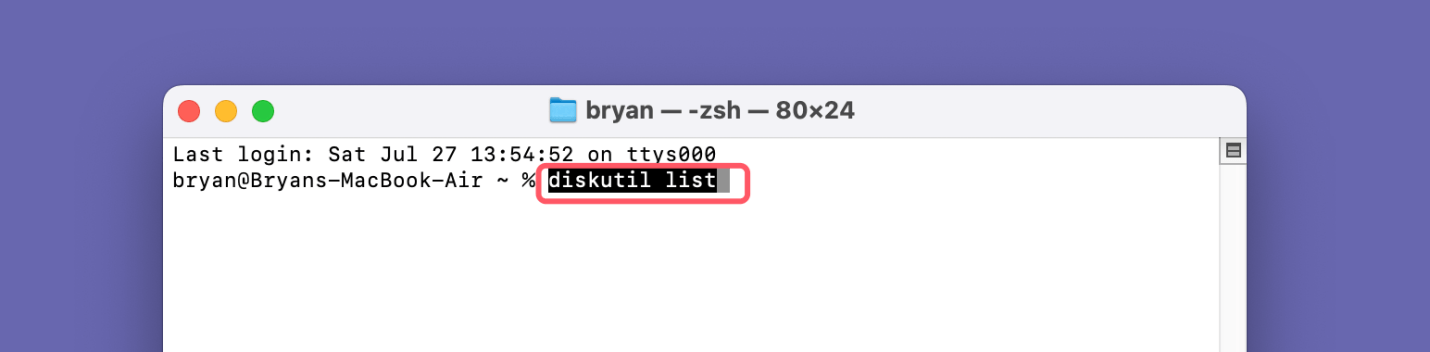
Step 1. Open Terminal: Go to Applications > Utilities > Terminal.
Step 2. List Drives: Type diskutil list to display all connected drives.
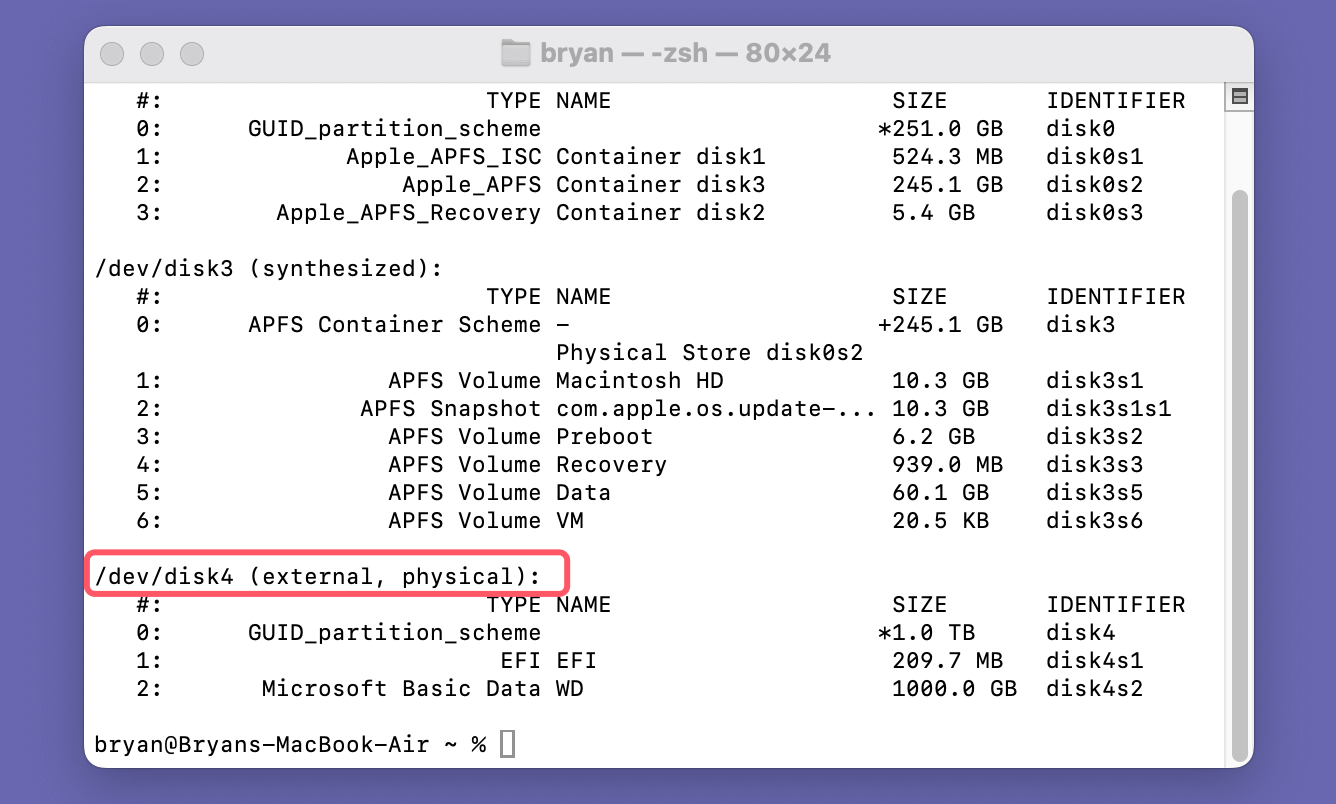
Step 3. Select Drive: Identify your WD drive and note its identifier (e.g., /dev/disk4).
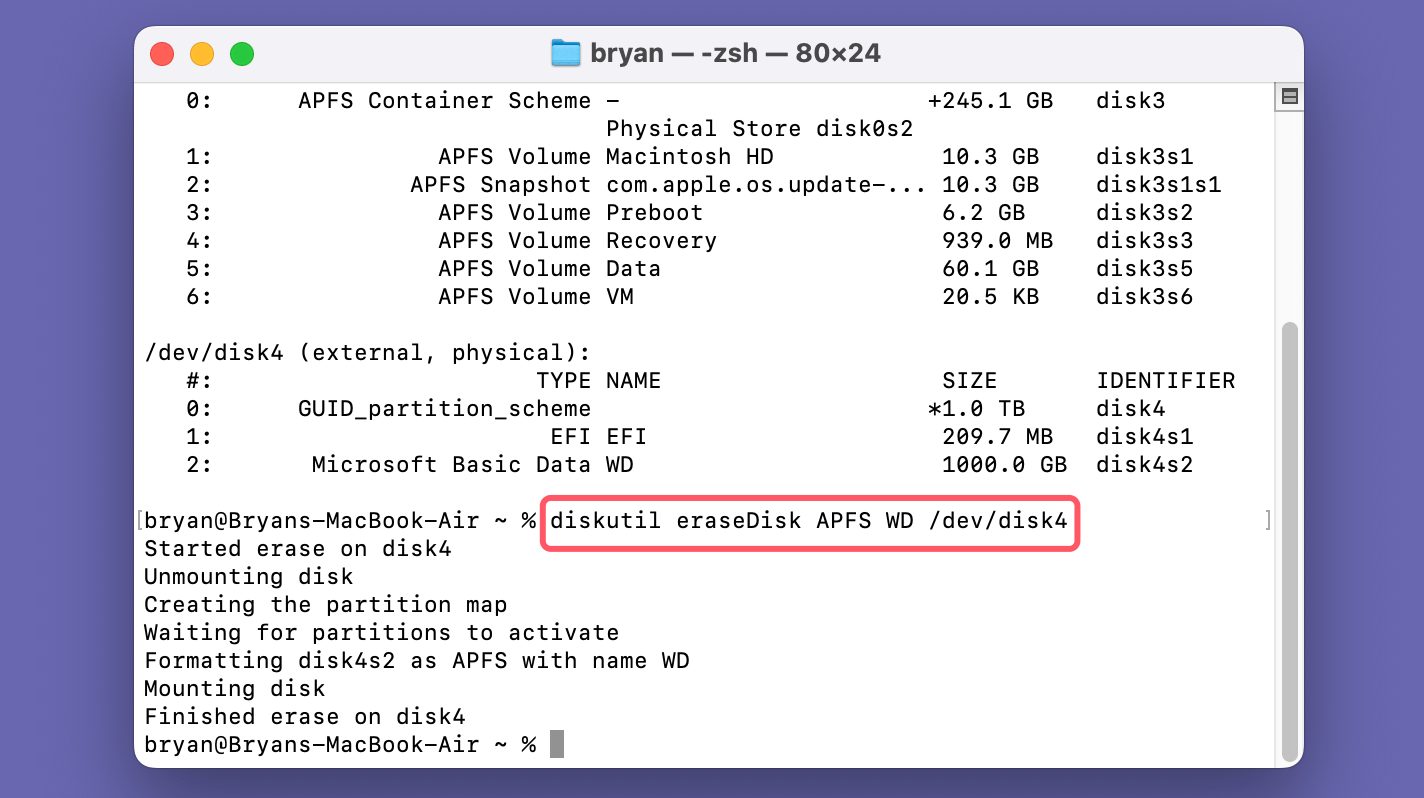
Step 4. Format the Drive: Type diskutil eraseDisk APFS WD /dev/disk4 (replace APFS and /dev/disk4 with your chosen file system and drive identifier, WD is the disk name, you can change it as you want).
Common Issues and Troubleshooting:
Even with careful preparation, issues can arise during the formatting process. Here are some common problems and their solutions:
1. Drive Not Recognized: If your WD external hard drive is not recognized by your computer, try the following steps:
- Ensure the drive is properly connected and powered.
- Use a different USB port or cable.
- Check Device Manager (Windows) or Disk Utility (Mac) to see if the drive appears there. If it does, you may need to initialize it.
- Update your computer’s USB drivers and firmware for the drive.
- Try connecting the drive to a different computer to rule out issues with your current setup.
2. Errors During Formatting: If you encounter errors during the formatting process, try these troubleshooting steps:
- Restart your computer and attempt the format again.
- Use a different formatting tool or method (e.g., Disk Management, File Explorer, Command Prompt on Windows; Disk Utility or Terminal on Mac).
- Check for disk errors using tools like CHKDSK (Windows) or First Aid (Mac).
- If the drive has bad sectors or hardware issues, consider replacing it.
3. File System Compatibility Issues: Ensure the chosen file system is compatible with all intended devices:
- For Windows-only use, NTFS is recommended.
- For compatibility with both Windows and Mac, exFAT is the best choice.
- For older devices or specific use cases, FAT32 might be necessary despite its limitations.
4. Partition Problems: If you encounter issues with partitions, you can use disk management tools to create, delete, or resize partitions:
- On Windows, use Disk Management (diskmgmt.msc) to manage partitions.
- On Mac, use Disk Utility to manage partitions and volumes.
- For more advanced partition management, consider third-party tools like MiniTool or Paragon Partition Manager.
Additional Tips and Best Practices:
- Regular Backups: Regularly back up important data to avoid data loss.
- Firmware Updates: Keep your drive’s firmware updated for optimal performance.
- Use Partitioning: Partitioning can help organize data and improve security.
- Secure Erasing: Use secure erase options if you need to completely wipe data.
How to Unformat WD External Hard Drive on Windows or macOS?
Formatting will delete everything stored on the WD external hard drive, but the lost data is not lost for good and can be recovered by data recovery software. Follow these steps to unformat WD external hard drive and get all lost data back.
Step 1. Download and install the best WD data recovery software - Do Your Data Recovery on your Windows or macOS computer.
Step 2. Open Do Your Data Recovery, then select the formatted WD external hard drive to start data recovery.

Step 3. Click on Scan button to deeply scan the formatted WD external hard drive and find all recoverable files.
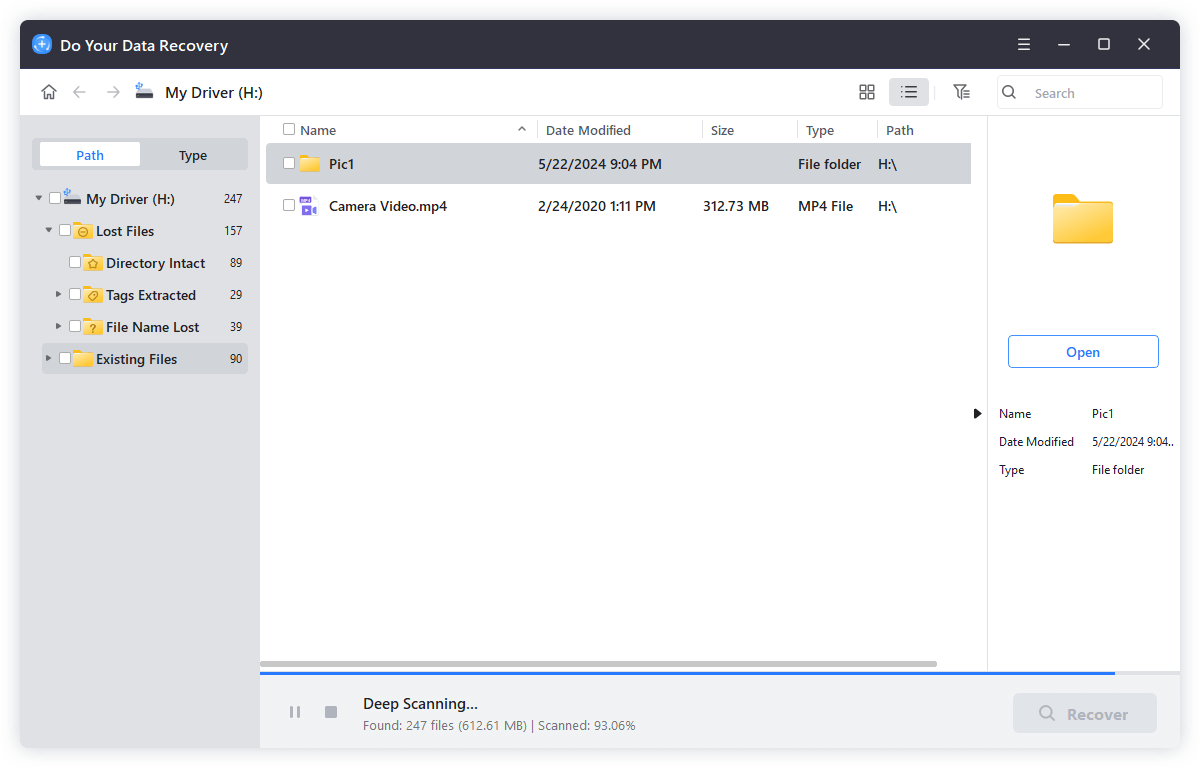
Step 4. Once the scan is completed, you can preview all recoverable files. Select the wanted files, click on Recover button to save them.

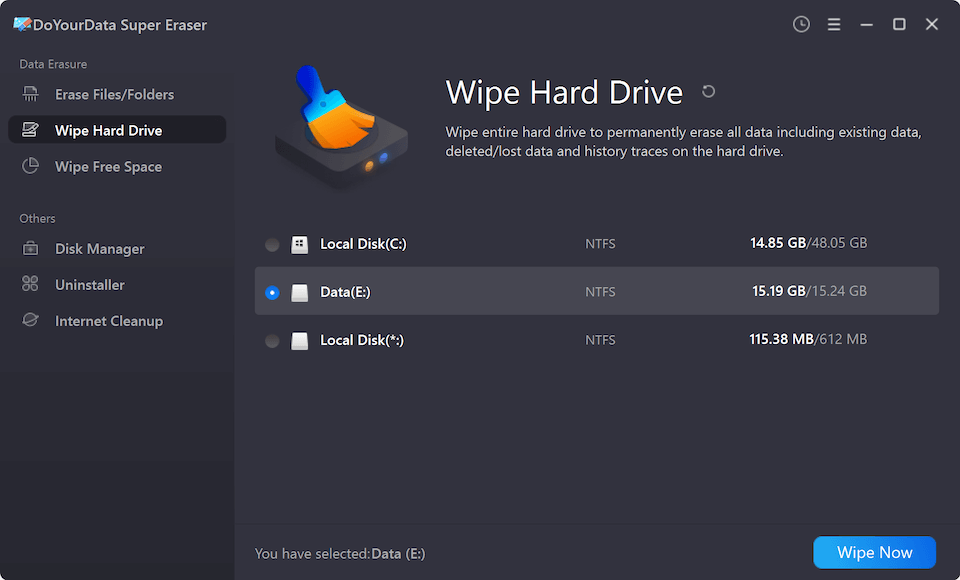
Securely and Permanently Wipe WD External Hard Drive Before Selling or Donating
To prevent the data from being recovered by data recovery software, you can use data erasure program to wipe the WD external hard drive. It will securely erase all data from the WD external hard drive, no trace left, no way to recover the erased data.
Step 1. Download and install the reliable data erasure program - DoYourData Super Eraser.
Step 2. Open DoYourData Super Eraser, choose Wipe Hard Drive mode, select the WD external hard drive, click on Wipe Now button.
Step 3. Select a data erasure standard (such as HMG Infosec, NIST 800-88, Peter Gutmann's algorithm, DoD 5220.22-M, U.S. Army AR380-19), click on Continue button.
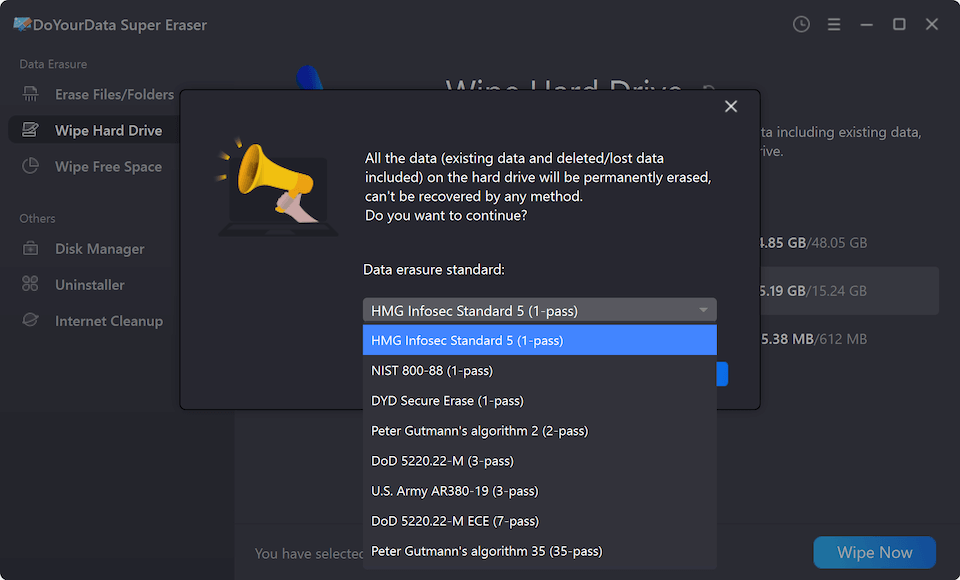
Step 4. It will securely format and wipe your WD external hard drive, permanently erasing all data from it.
Note: Once the data is erased by DoYourData Super Eraser, the data is lost for good, cannot be recovered by any method.
Conclusion
Formatting a WD external hard drive is a straightforward process that ensures your drive is ready for optimal performance and compatibility. By following the steps outlined in this guide, you can format your drive on both Windows and Mac systems effectively. Remember to always back up your data before formatting and choose the appropriate file system based on your needs.
DoYourData Super Eraser is a powerful data erasure program. It not only can format your WD external hard drive, but it also can permanently data from the drive, making data recovery be impossible.
Frequently Asked Questions (FAQs)
1. Can I change the file system after formatting?
Yes, but you will need to reformat the drive, which will erase all data. Ensure you back up your data before changing the file system.
2. What should I do if the WD drive is not recognized by my computer?
Check the connection, try a different USB port or cable, and ensure any necessary drivers are installed. If the issue persists, use Disk Management (Windows) or Disk Utility (Mac) to diagnose the problem.
3. How often should I format my WD external hard drive?
There is no fixed schedule, but consider reformatting if you encounter performance issues, compatibility problems, or after significant use to ensure optimal performance.
4. Is it possible to recover data after formatting?
Data recovery is possible using specialized software, but it's not guaranteed. Always back up important data before formatting to avoid data loss.
DoYourData Super Eraser
DoYourData Super Eraser, the award-winning data erasure software, offers certified data erasure standards including U.S. Army AR380-19, DoD 5220.22-M ECE to help you securely and permanently erase data from PC, Mac, HDD, SSD, USB drive, memory card or other device, make data be lost forever, unrecoverable!
Written & Updated by Shirly Chen
Shirly Chen has been writing data recovery, data erasure articles for DoYourData over 4 years. She has been working as a professional website content writer & editor for quite a long time. She also writes articles about disk clone, Mac optimization, disk backup, etc.