
How to Clone Computer SSD to An External Hard Drive
Clone all data from your computer internal SSD to an external hard drive and create a bootable clone backup. Read more >>
Do you know how to erase your computer’s SSD in BIOS? First of all, find out how to boot your computer into BIOS, then find the Erase tool to erase the SSD. DoYourData Super Eraser, another SSD wipe tool, can help you easily and securely wipe SSD on your computer. It is much easier to use than BIOS erase tool and also can wipe HDD, USB drive, memory card, etc.
![]() Updated by Shirly Chen on August 5, 2024
Updated by Shirly Chen on August 5, 2024
Quick Navigation:
Solid State Drives (SSDs) have revolutionized the storage industry with their high speed and reliability. However, there are times when you might need to erase an SSD, such as when you're selling or donating your computer, reinstalling the operating system, or troubleshooting hardware issues. One of the most secure ways to erase an SSD is through the Basic Input/Output System (BIOS). This article will guide you through the process of erasing an SSD in BIOS, ensuring your data is securely wiped and the drive is ready for its next use.
Erasing an SSD in BIOS offers several advantages:
Back up important data. Before proceeding, ensure to check the personal data on the SSD. it's crucial to back up any important data on the SSD to another place first. Once the erasure process begins, all data on the drive will be irretrievably lost for good.
How to Clone Computer SSD to An External Hard Drive
Clone all data from your computer internal SSD to an external hard drive and create a bootable clone backup. Read more >>
Ensure a stable power supply. A sudden power loss during the erasure process can lead to damage to the SSD. Make sure your computer is connected to a stable power source when erasing the SSD.
To erase an SSD in BIOS, you first need to access the BIOS menu:
Restart your computer: Start by restarting your computer.
Enter BIOS: During the boot process, press the correct designated key to enter the BIOS setup. This key varies by manufacturer but is usually F2, Delete, F10, or Esc. Check your motherboard's manual, online guide, forum, or startup screen for the correct key.
Here is the list of BIOS keys of some famous manufacturers:
Once you're in the BIOS setup, follow these steps to erase your SSD (Here we use Dell P computer as an example):
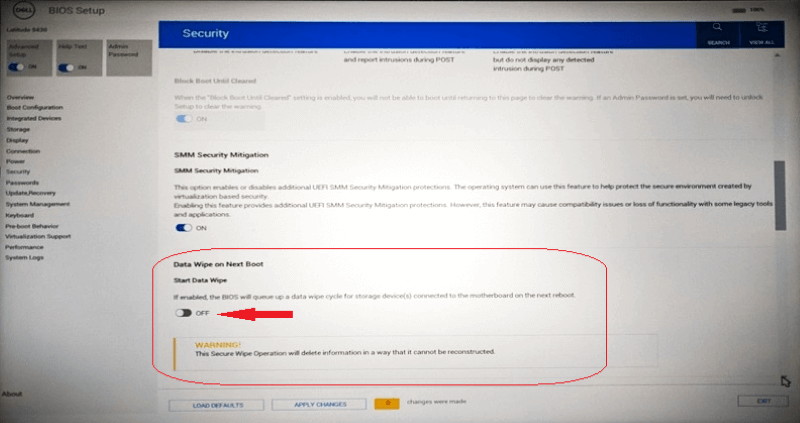
Step 1. Navigate to the Data Wipe option
Press F2 (or F12) key at the Dell splash screen to enter BIOS Setup. Once in the BIOS, you can select "Wipe on Next Boot" from the Security > Data Wipe. Click to turn on the option.
Step 2. Confirm the data wipe process.
The BIOS requires double confirmation before allowing the user to exit setup with the "Wipe on Next Boot" option selected, ensuring intentional erasure of all storage devices.
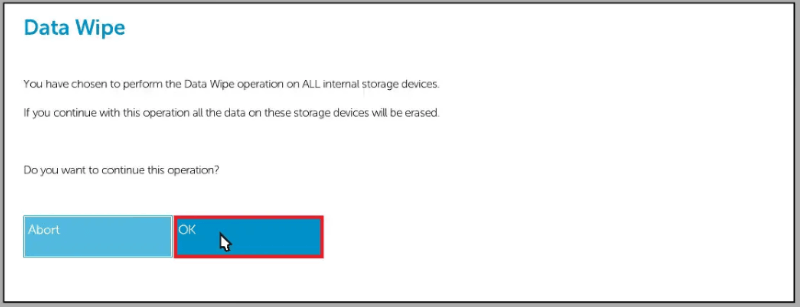
Additionally, the BIOS will adjust the default selection on the final prompt to enforce direct user acceptance of this operation. Upon successful selection and confirmation, the user exits BIOS Setup, initiating a system reboot to start the data wipe process.

Step 3. Reboot the computer and start data wiping.
After the reboot, the BIOS prompts for several confirmations before sending the data wipe instructions to the storage devices. A successful erase procedure is indicated by a green dialog and the message "Data Wipe Completed Successfully." Press the OK button to reboot the computer into the operating system.

Note: If you erase a wrong drive, you can try to recover the data from the drive with the data recovery software - Do Your Data Recovery. It can help you recover data from the formatted SSD or other drives.
After erasing the SSD, you'll need to reformat it before it can be used again. This can be done using your operating system's disk management tools.
If the SSD was your primary drive, you'll need to reinstall your operating system. Follow the standard installation procedures for your OS.
If you formatted or erased the SSD by mistake and don’t have a backup, you can use a data recovery application to help you get the lost data back.
Step 1. Download and install the reliable SSD data recovery software - Do Your Data Recovery on your computer.
Step 2. Run Do Your Data Recovery, then select the formatted SSD to start data recovery.

Step 3. Once the SSD is selected, click on Scan button. This SSD data recovery software will deeply scan the formatted SSD and find all erased or deleted files.
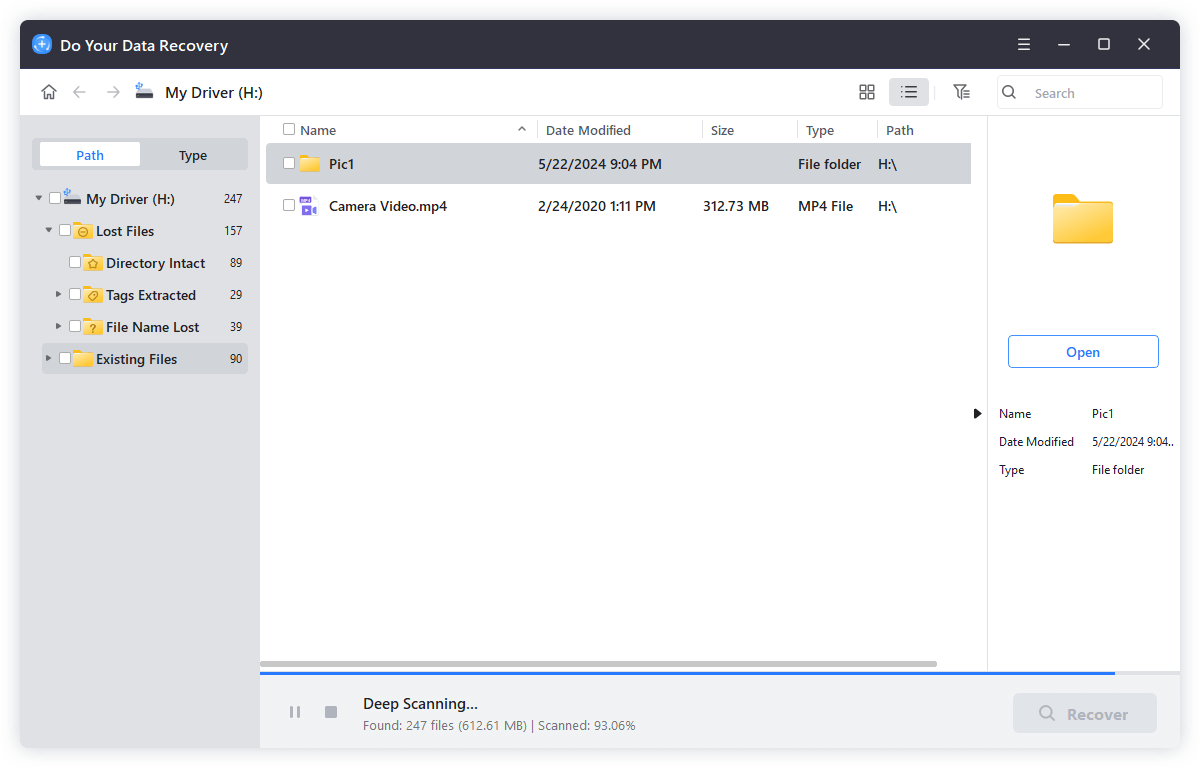
Step 4. Once the scan is completed, it lists all recoverable files including erased files. Then select the wanted files and save them to another drive.

For some home users who are not skilled, it's a challenge to erase SSD in BIOS. Actually, there are other alternatives available for the job. For example, you can format SSD in Disk Management or wipe the SSD with third-party data erasure software.
If you require more simple and safe methods, here we recommend the safe data-erasing tool DoYourData Super Eraser. This software is professional in data wiping for SSDs and other media, like hard drives, USB flash drives, SD cards, etc. Also, there are flexible solutions in the software. It offers the option to only wipe specified existing files, erase all data on a drive, or only wipe the free space of a drive.
Furthermore, the software is easy to use for any user. You can use the software without training. The intuitive interface can lead you to format an SSD quickly. Here we will show you a short and understandable tutorial for the SSD erasing with the software.
Step 1. Ensure the SSD is connected to the computer internally or externally, and then download the software. It is 100% safe and virus-free. Feel free to download and install it on your computer. Then run it.
Step 2. Choose Wipe Hard Drive mode, and select the SSD from the list. Please ensure to choose the correct SSD drive to wipe. If you wipe the drive with this professional tool, it's impossible to recover the data in any way.
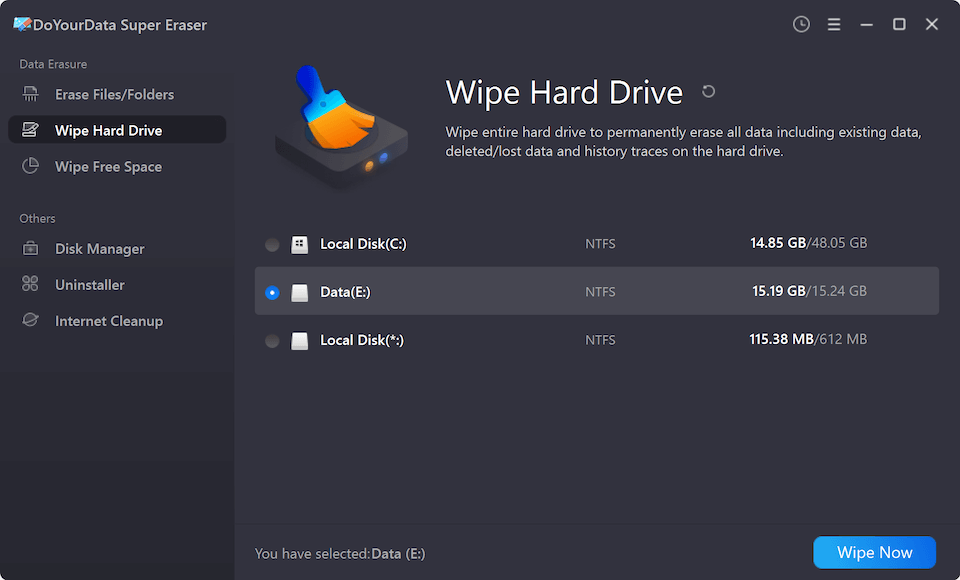
Step 3.Choose a data erasure standard from the down-list to continue. Then the software will erase all the data from the SSD.
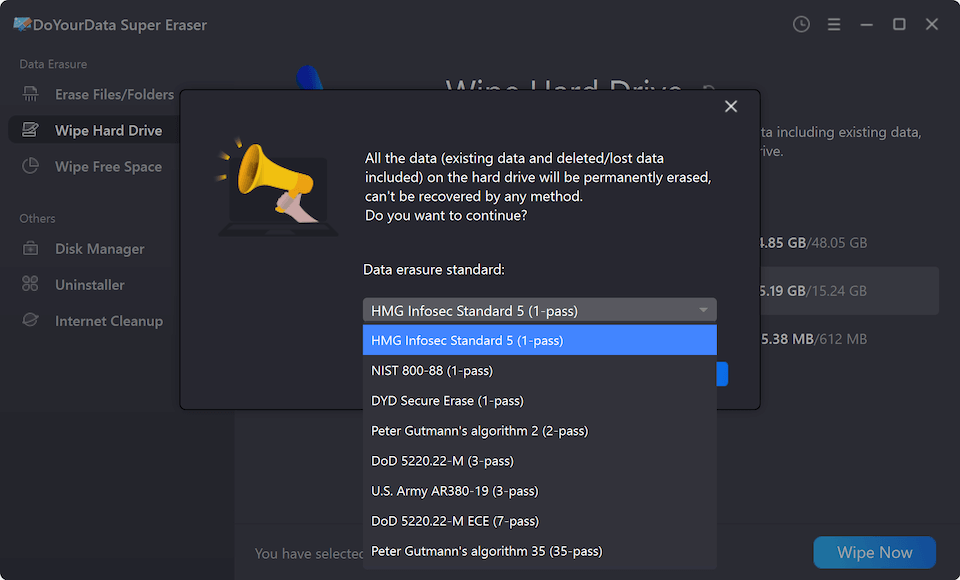
Note: Once the process gets finished, all data stored on the SSD is lost for good, cannot be recovered by any data recovery software.
Erasing an SSD in BIOS is a secure and effective way to ensure your data is permanently deleted. By following the steps outlined in this guide, you can confidently erase your SSD, knowing that your data is irretrievable and your drive is ready for its next use. Always remember to back up your data before starting the process and ensure a stable power supply to avoid any interruptions. Also, you can choose other simple methods in this article to wipe SSD or other hard drives easily.
1. How to erase an SSD in BIOS?
2. How to format SSD?
In Windows OS, formatting is usually done in File Explorer or Disk Management tool. It's easy to get to both options and right-click the SSD partition you want to format, then select "Format" to continue.
Method 1. Format SSD in Windows File Explorer
1) Right-click the Start button of the operating system and click File Explorer. The SSD partition will show up in "This PC".
2) Right-click the SSD partition which you want to format and choose "Format…".
3) After that, you will see a pop-up dialogue box. You can choose a wanted file system and name the SSD. If you want to perform a full format, you can also tick the "Quick Format" option. Click the Start button to start formatting the SSD.
Format SSD in Disk Management
As a system built-in tool, Disk Management can help users manage hard drives with some essential features, like format, extend, shrink hard drive partitions, etc. Here's how to wipe SSD in Disk Management.
Step 1. Open Disk Management. You can press the Win + R keys at the same time to open then Run popup, and enter the following command to open Disk Management:
diskmgmt.msc
Step 2. Check and choose the correct SSD in the window. Right-click the SSD and choose "Format…" to continue.
Step 3. In the popup, enter the name and choose the file system to continue. Also, if you want to wipe all the data permanently, please uncheck the option "Quick Format". It will then perform a full format to wipe all the data on the SSD.
3. Why SSD cannot be formatted in Windows?
1) heck if it's write-protected. If so, remove the write-protection first and format it again.
2) If it's a system disk, it's not able to format it directly. You can connect it as a slave drive on another computer to format or create a bootable media to boot the computer and format it.
3) If the SSD is not initialized, you can first initialize it and then create a partition and format it.
4) If there are issues with the drive, it would also cause the problem, you can check and fix it with the CHKDSK command first and then try to format it.
4. Is it possible to recover lost data from SSD?
Yes, it's able to recover data from SSD. The software Do Your Data Recovery is an effective tool for SSD recovery.
5. The file system of SSD becomes RAW, how to fix it?
If the SSD is in RAW format, it means the file system is corrupted. An unexpected power outage, unplugging without safely ejection, virus infection, overuse, or other issues can develop file system errors. To solve the issue, please try the following solutions:
1) You can format it directly. If there are important files on the SSD, please ensure to recover the files from the RAW drive first, and then reformat it for reuse. Then you can open Disk Management (right-click the Start button and choose Disk Management), right click the RAW partition and click the Format option and follow the wizard to finish the process.
2) Fix the file system by CHKDSK command. Click the Start button and search Command Prompt, right-click it and choose Run as Administrator. Then enter the command chkdsk d: /f /r, you can change the d: to the drive letter of your own corrupted partition.
3) In File Explorer, right-click the RAW partition and choose "Properties" from the context menu. in the Properties window, click the "Tools" > "Check" button. At this point, you will see an option "Scan and repair drive". Click it and system will start scanning the drive for errors and fixing them automatically.
DoYourData Super Eraser
DoYourData Super Eraser, the award-winning data erasure software, offers certified data erasure standards including U.S. Army AR380-19, DoD 5220.22-M ECE to help you securely and permanently erase data from PC, Mac, HDD, SSD, USB drive, memory card or other device, make data be lost forever, unrecoverable!
Written & Updated by Shirly Chen
Shirly Chen has been writing data recovery, data erasure articles for DoYourData over 4 years. She has been working as a professional website content writer & editor for quite a long time. She also writes articles about disk clone, Mac optimization, disk backup, etc.