Quick Navigation:
- How File Shredding Works on a Mac?
- Assessing the Chances of Recovery
- Possible Methods to Recover Shredded Data on Mac:
- Preventive Measures and Best Practices
- Conclusion
Accidentally deleting important files is a common occurrence, but when those files have been shredded, recovery becomes a much more challenging task. File shredding is a process that involves overwriting and permanently deleting files, making them almost impossible to recover through conventional methods. Understanding how to recover shredded files on a Mac can be critical, especially when dealing with important data. This guide will help you understand how shredding works, assess the chances of recovery, and explore possible recovery methods.

How File Shredding Works on a Mac?
To grasp the concept of file recovery, it's important to first understand what file shredding is and how it works. Unlike standard deletion, which simply marks a file's space as available for new data, shredding goes a step further. When a file is shredded, its data is overwritten with random information, often multiple times. This process makes it extremely difficult for conventional recovery tools to locate and piece the original file back together.
On a Mac, shredding can be done using built-in tools or third-party software. One common method is the "Secure Empty Trash" feature, which securely deletes files by overwriting them with random data. Although this feature was removed in macOS El Capitan and later versions, some users still utilize it on older Mac systems. Alternatively, third-party applications like CleanMyMac, Permanent Eraser, and ShredIt X offer file shredding capabilities that comply with advanced data protection standards.
The purpose of file shredding is to ensure that sensitive information cannot be easily recovered by unauthorized individuals. However, this becomes problematic when files are accidentally shredded. Let's explore what can be done in such cases.
Assessing the Chances of Recovery
When it comes to recovering shredded files, the chances of success depend on several factors. Understanding these factors can help you make an informed decision on whether to attempt recovery.
🪧 Number of Overwrites: The more times a file has been overwritten, the harder it becomes to recover. Most shredding tools overwrite data multiple times to ensure it is thoroughly erased. If the shredding software you used performed a single overwrite, there might be a slim chance of recovery, but with multiple overwrites, recovery becomes nearly impossible.
🪧 Time Elapsed Since Shredding: The sooner you attempt recovery after shredding, the better. This is because new data can be written to the freed-up space on the hard drive, further complicating recovery efforts. If too much time has passed, the space that held your shredded file is more likely to have been overwritten by new files.
🪧 Type of Storage Drive: The type of storage device used on your Mac also plays a role. Hard Disk Drives (HDDs) store data magnetically, and sometimes remnants of deleted files can be detected using sophisticated recovery techniques. Solid State Drives (SSDs), on the other hand, use a different technology called NAND flash memory. SSDs come with a feature called TRIM, which actively wipes deleted data to prolong the drive's lifespan. If TRIM is enabled on an SSD, the chances of recovering shredded files are close to zero.
🪧 Shredding Method: Different shredding methods yield different chances of recovery. A simple single-pass overwrite might leave some residual data that can be pieced together by a data recovery expert. However, multi-pass overwriting or data shredding techniques that comply with government standards (such as DoD 5220.22-M) make recovery virtually impossible.
Given these factors, it's clear that the chances of recovering shredded files are generally slim, but not always zero. If the conditions are right, there may still be hope.
Possible Methods to Recover Shredded Data on Mac:
If you decide to try and recover shredded files, there are several tools and techniques you can use. Although success is not guaranteed, these methods are worth considering.
🔹 Method 1: Recover Using Time Machine Backup
If you have set up Time Machine on your Mac, you may be able to recover files from a backup created before the shredding occurred. Time Machine automatically backs up your entire system, including files that might have been deleted.
Here’s how to use Time Machine for recovery:
Step 1. Attach your Mac to your Time Machine backup drive.
Step 2. Locate the original location of the shredded file and open it.
Step 3. Select Browser Time Machine Backups (or "Enter Time Machine") after clicking the Time Machine icon in the menu bar.

Step 4. Use the timeline to search for the necessary file. After choosing the file, select Restore.

🔹 Method 2: Recover Using Terminal
If you are comfortable using the Terminal on your Mac, there are a few commands that might help you recover recently deleted files. However, this method is not foolproof and works only under certain conditions.
How to Use Terminal for File Recovery:
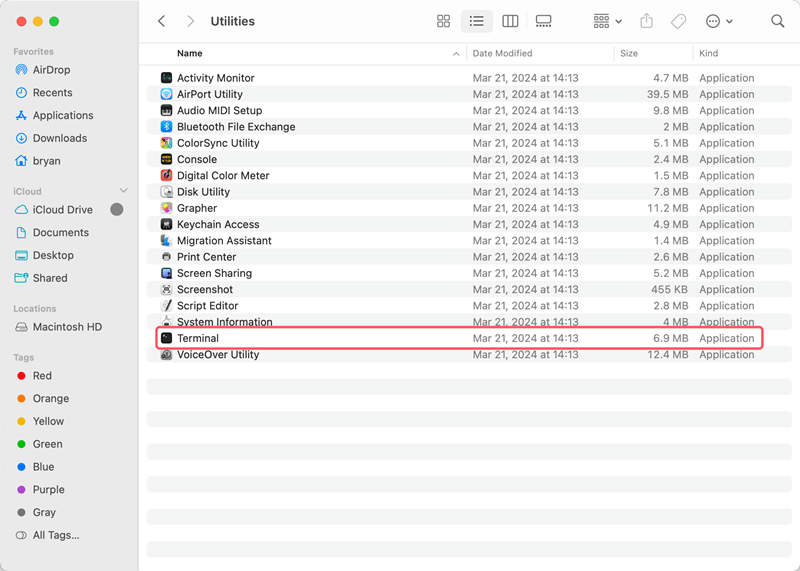
Step 1. Open Terminal by navigating to Applications > Utilities > Terminal.

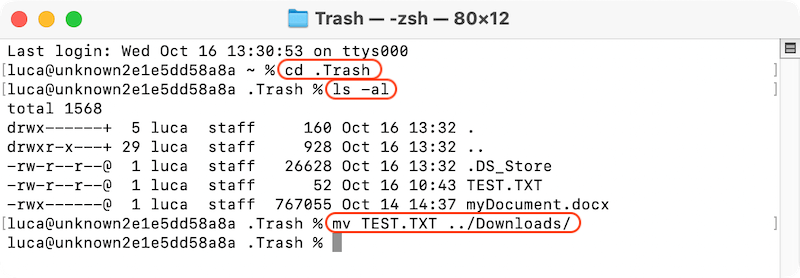
Step 2. To view the contents of the Trash, type the following command and press Enter:
cd .Trash
ls -la
This command navigates to the Trash directory and lists all files present.
Step 3. If you find the file you want to recover, use the following command to move it back to a desired location:
mv filename /path/to/destination/

Replace filename with the actual name of the file and /path/to/destination/ with the location where you want to save it.
If the file is not in the Trash or if it has been shredded, this method may not be effective. Terminal commands are generally more useful for recovering files that have been accidentally deleted, not shredded.
🔹 Method 3. Recover from iCloud Backup
If you use iCloud for file storage, you might be able to recover shredded files from an iCloud backup. This method works if your files were synced to iCloud before they were deleted or shredded from your Mac.
How to Recover Files from iCloud:
Open a web browser and go to icloud.com. Sign in with your Apple ID. Click on "iCloud Drive" to see the files stored in your iCloud. If you find the file you need, you can download it directly to your Mac.
Alternatively, you can do as follows to check and recover the deleted files from the iCloud:
Step 1. Click on iCloud Settings
.
Step 2. Change to the tab Data Recovery section, and click on Restore Files.

Step 3. Choose the files you want to restore and click Restore to recover them to iCloud Drive.

iCloud stores deleted files for up to 30 days, so if your file was deleted or shredded within this period, you have a good chance of recovering it.
🔹 Method 4: Recover with Data Recovery Software
There are many Mac data recovery programs available which can try to recover the deleted or lost files in macOS, such as Do Your Data Recovery for Mac, Disk Drill, Data Rescue, etc. If you cannot recover the deleted or shredded files with the above methods, you can have a try with the data recovery software.
You can download and have a try with Do Your Data Recovery for Mac. The software is one of the most widely used Mac data recovery programs. It allows the recovery of numerous file kinds, including documents, images, videos, and more, and features an easy-to-use interface.
Do Your Data Recovery
- Most reliable and safe data recovery software for macOS.
- Recover any lost files, including photos, videos, audio, documents, etc.
- Effectively recover deleted files, formatted data, or other lost information.
This powerful tool offers advanced scanning options to recover lost or deleted files on Mac. It has a streamlined process for searching and recovering shredded files.
It provides an easy way to recover lost files with a high success rate. To use the software Do Your Data Recovery for Mac and recover shredded files on Mac, please follow the steps below:
Step 1. Run the software from the launchpad and select the drive where you deleted or shredded the files.

Step 2. Click the Scan button to scan the drive deeply and search for the lost files.

Step 3. Check and preview the files after the scan is done. You can preview the files to verify if the wanted files are still recoverable.

Step 4. Ensure to choose all the wanted files and then click the Recover button and save to another drive.

🪄 Tips: Don't save the recovered files back to the original drive where you lost the files. Otherwise, the recover may fail and further damage the lost data.
Preventive Measures and Best Practices
To minimize the risk of accidental shredding or data loss in the future, consider the following preventive measures and best practices:
🕗 Regular Backups: Always back up your important files regularly. Use Time Machine, iCloud, or another backup solution to ensure that your data is safe. With regular backups, even if a file is accidentally shredded, you can restore it from a previous backup.
🛠️ Use Reliable Shredding Software: If you need to securely delete files, use reliable software that provides a clear interface and options. Make sure the software complies with recognized standards for data deletion and is regularly updated to avoid bugs or vulnerabilities.
🚨 Double-Check Before Shredding: Before you shred any file, double-check that it is the correct file. Take a moment to review the files you are about to delete permanently. This can help prevent accidental shredding of important files.
💾 Create Copies of Important Files: For critical files, consider keeping multiple copies in different locations. This redundancy adds an extra layer of security and ensures that you have a backup if something goes wrong.
🔐 Use Disk Encryption: Encrypting your hard drive with FileVault or another encryption tool can help protect your data from unauthorized access. Even if a file is accidentally shredded, the encryption ensures that residual data remains secure.
Conclusion
Recovering shredded files on a Mac is a challenging task that requires immediate action, the right tools, and a bit of luck. While the chances of recovery are generally low, they are not entirely zero. By understanding how shredding works and using available recovery tools and techniques—including iCloud, Terminal, and professional data recovery services—you may still be able to retrieve important files. However, prevention is always better than cure. Following best practices for data management, such as regular backups and careful handling of shredding tools, can help avoid the need for recovery altogether.

Do Your Data Recovery for Mac
Do Your Data Recovery for Mac, one of the best Mac data recovery software, can help you easily and completely recover deleted, formatted or lost files from Mac HDD/SSD, external HDD/SDD, USB drive, memory card, digital camera, or other storage devices.