The reliable Mac data recovery software to recover deleted or lost files.
Free TrialFor most Mac users, Time Machine is their go-to backup solution because of its simplicity and powerful capabilities. Like other backup software, Time Machine is prone to errors and malfunctions that might lead you to be concerned about the safety of your data.
The Time Machine includes a variety of checks to ensure that the backup process does not suffer from mistakes or delays. However, these checks might delay the start of the backup procedure at a certain point. This article explains how to repair a time machine that has stopped working while making a backup.
How to repair a failed Time Machine backup?
Unfortunately, a number of Mac customers have reported seeing a Time Machine backup failed message after doing an operating system update on their Mac. Fortunately, if you fall into this category, there are a few things you can do.
Method 1: Reboot your Mac and try again
Start your Mac again if Time Machine does not recognize your backup drive, gives problems, or is stuck. This clears off old system data and helps macOS run more smoothly again.
- Open System Preferences, choose Time Machine, then click Cancel the current Time Machine backup.
- Restart your computer by selecting Restart from the Apple menu.
- Restart your computer by unchecking the box next to the Reopen windows when login back in option.

- After restarting, click Time Machine, then click Back Up Now from the menu bar to start a new backup.
Method 2: Verify the file system on the external hard disk
The Time Machine Backup issue may occur if your external drive does not have enough storage space or is incorrectly formatted. Make sure that the external device you're using is formatted in a native macOS file system. Time Machine does not support the FAT or NTFS file systems.
In addition, if the external hard disk is in APFS macOS format, Time Machine backups will not operate with it. You may verify the drive's format by following the instructions below:
Connect the external drive to your Mac.
Now open up the Finder.
Right-click on the external drive and choose Get Info.

This will display the drive's format under the general information section.
If the external drive you're using has one of the incompatible formats, you'll need to convert it to Mac OS Extended (Journaled) with a GUID Partition Table (GPT). Disk Utility may be used to do this. Please follow these instructions in order to format the external hard disk.
Connect the external hard disk to your Mac.
Go to the Finder menu choose Applications, Utilities, and Disk Utility.

Choose your external drive from the left pane of Disk Utility.

In the Disk Utility window, click Erase at the top of the screen.

Then, in the new pop-up window that appears, rename the drive if you choose and change the disk format to the supported one (Mac OS Extended (Journaled) > Erase.)

This will allow you to use your external drive with Time Machine by changing its format. Time Machine may now be used to make backups.
Method 3: Look at the free space on your external hard drive
Whether reformatting your external hard drive doesn't fix the problem, check to see if there is enough empty space on your disk to back up your data (go to Disk Utility to check how much free space is left). A new hard drive or deleting unnecessary data may be necessary if you don't have enough space.
Method 4: Remove Spotlight from indexing Time Machine backup
Spotlight is a Mac utility that makes it easy to find documents, music, photos, and other software. The Spotlight program may be indexing the data on the disk, preventing Time Machine from backing it up.
Since Time Machine cannot index this program, backups will be completed more quickly. For this, just follow the given guidelines.
- Pick System Preferences from the Apple menu.
- Click on the Spotlight icon.
- Then click on the Privacy tab and select (+) to search for the backup folder.
Method For Dealing With Recurring Failures Of Time Machine Backup
There are specific other files that Time Machine needs to function. In rare cases, when Time Machine fails, it leaves behind some temporary files that it was relying on. It's possible that "cleaning up" Time Machine and removing these files would cure any backup troubles you're encountering.
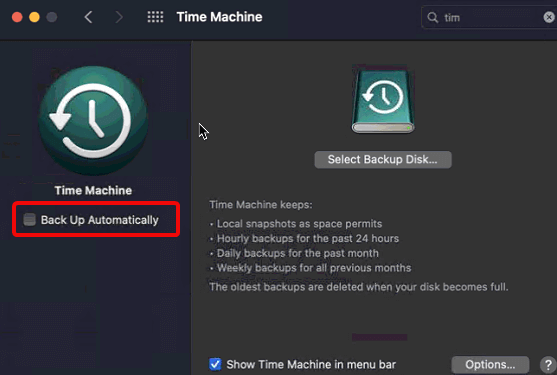
Time Machine must be turned off for this to work.
Go to the Time Machine preferences in System Preferences.

Uncheck the box next to "Back Up Automatically".

Time Machine's working files need to be cleaned up next.
Go to your Mac's menu bar and choose Finder.
Take a look at your external hard disk.
Open the "Backups.backupdb" folder and delete the file with the suffix ".inProgress" from it.

Empty the Trash.
Restart your computer.
Afterward, restart Time Machine and begin the process of backing up again.
Conclusion
Time Machine backup failed error messages may be caused by a variety of different issues. Time Machine backup difficulties may usually be remedied relatively easily. Aside from a severe instance of file corruption, restarting your Mac and looking for storage should help you get Time Machine to back up properly again.
DoYourData Products
DoYourData Super Eraser for Mac
Permanently shred files or wipe hard drive to prevent data recovery on Mac.
Free TrialClone HDD, SSD, Mac OS, external disk, USB drive, and more under Mac OS.
Free Trial