Recover deleted, formatted or corrupted data from hard drive or external device.
Free TrialIt’s expected that most people would upgrade to Windows 11 when it comes, but what if you’d want to start from scratch and install the operating system from scratch? Whether you’re building a new PC, updating an existing one, or starting from scratch, you may want to clear all of your previous settings and start again.
As a result, you’ll be looking for an ISO file to allow you to do a clean install of Windows 11. You can download and install the Windows 11 ISO if you’ve got the know-how, so here is our guide to the process.
How to Get the ISO Image of Windows 11
You may get the Windows 11 October 2021 Update ISO by following these procedures.
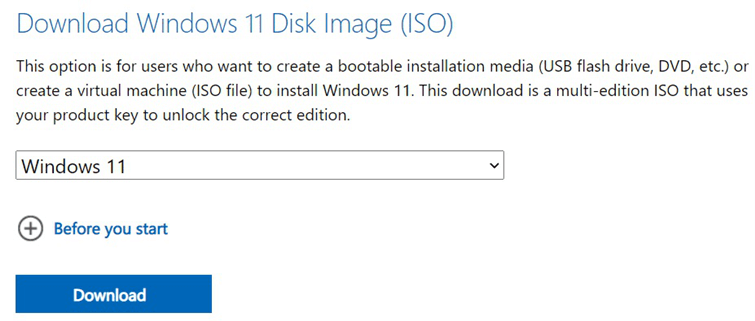
Go to the download page in your preferred web browser.
Select “Download Windows 11 Disk Image (ISO)” from the drop-down menu.

When the drop-down selection appears, choose “Windows 11.”
Click on “Download.“
It’s time to choose a language! Verify the current hardware setup in Settings > System > About if you intend on upgrading it in the future.
In order to initiate the 64-bit download, click on it.
How to Install Windows 11 in A Fresh State
Sign up for the Windows Insider Program and upgrade from Windows 10 to try out Windows 11. You’ll need to be a Microsoft Insider to attempt this technique of downloading the next operating system’s ISO files.
To Get the ISO File for Windows 11 Build 22572, Use UUP Dump
To obtain the Windows 11 ISO file for any Insider Preview build, such as build 22572, follow these instructions:
Go to the UUP Dump website.
Navigate to the Downloads menu.
Choose the Windows 11 Insider Preview to build (such as 22572) that you want to save as an ISO file.

Select the installation language from the “Language” drop-down menu.
Select the Next option.
Double-check the Windows 11 editions you want to include in your ISO image.

Click on the Next button.
Select the option to download and convert to ISO file.

Clear all of the choices in the “Conversion options” section of the menu. Select the ones you want to use.
To download the utility, click the Create download package option.
File Explorer may be used to access the zip file.
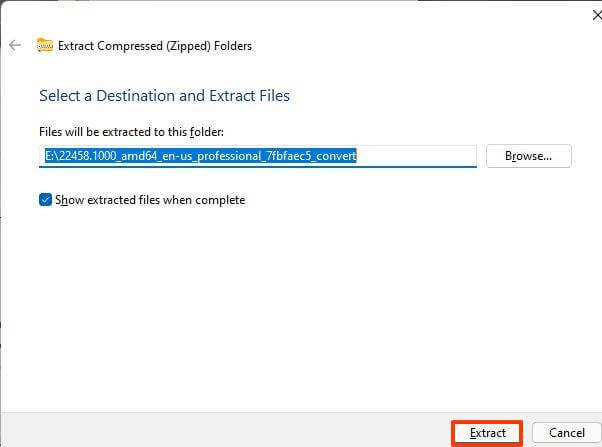
Select “Extract all” from the menu.

Extract the files to the place of your choice.
To extract the files, just click the Extract button.

As a user with administrative privileges, right-click the uup_download_windows.cmd batch file and choose Run as administrator.
Select the “More info” menu item.
To begin the lengthy procedure, click the Run anyway button.

When asked to dismiss the screen, press the 0 key.
You should now have a copy of Windows 11 installed on your computer following the above procedures. Microsoft has released an ISO file that you may use to install Windows 11 on a testing virtual machine. Other options include creating the OS installation disk for a second machine from scratch using third-party programs like Rufus.
Make A Bootable USB Drive from the Windows 11 ISO Image
Creating a bootable Windows 11 USB flash drive is necessary after the Windows 11 ISO is downloaded and ready. Creating a bootable ISO using Rufus is what I will demonstrate here.
Additionally, you’ll need a USB flash drive with at least 8 GB of storage space. Make sure you have a copy of any data on the disk before you begin the ISO burning procedure.
Plugin your USB flash drive.
Open Rufus.
Click the Select button. Select your Windows 11 ISO file by navigating its location and clicking on it there.
Rufus will automatically update the drive’s and burner’s settings. When you’re ready to begin, press the Start button.
Take a break and prepare a cup of tea or coffee while the Windows 11 ISO burning process completes itself.

Install A Fresh Copy of Windows 11 on Your Computer
You may now cleanly install Windows 11 on your PC using the instructions below.
Restart your computer once you’ve connected the bootable installation disk to it.
Upon reloading, hit the boot key (e.g., Esc, Del, F2, F9). System manufacturers use different boot keys, so check your manual to see what yours is.
Select your USB drive when the system asks for a device.
Windows 11 begins loading the necessary files to complete a clean installation.
Waiting for 10-15 minutes may be necessary, so be patient.

During the installation, your PC may restart a number of times. Once the cursor reaches the Finishing up area, remove your pen drive.
Upon completion of this process, you will see the new OOBE interface.
Choose your country of residence.

Select your preferred keyboard layout on the next screen.

If Windows 11 asks you to add a second keyboard, do it anyway you like and click Next.
Then Windows 11 will ask for a network connection. It’s possible to skip this step entirely. Finally, choose your device’s privacy settings and click Next.

You’ll be able to utilize Windows 11 on your computer when your device has restarted once again.
Conclusion
Windows 11 may be installed on a new computer, a dual-boot system, or a virtual machine using Microsoft’s freshly published ISO file. Please let us know if you find it informative and simple to follow. For any questions or concerns, don’t hesitate to get in touch!