Page Content:
- 1. For What Reason Won't My Mac Play Videos?
- 2. Can't Get Videos To Play On Your Mac? Here's What To Do!
- 3. How to Recover Lost Videos on Mac?
Watching anything entertaining on your Mac will help you escape the dullness. However, your Mac refuses to perform as you ask whenever you attempt to play the video. When videos don't play on your Mac, the moment of irritation comes, and you have no clue why.
Unfortunately, this is a common problem for Mac users, although it's typically easy to fix. In this post, we'll investigate the possible causes of your Mac's inability to play videos and then look at potential fixes.
For What Reason Won't My Mac Play Videos?
Video playback issues on a Mac might have several causes, such as an incompatible file format or an older program version. Some of the more frequent ones are listed below.
Outdated Application
Videos may not load on a Mac if the software it requires is too old. Check to see if there is an updated player or browser version available before beginning the video.
Malware And Virus Attack
A virus is likely to blame for your Mac's sluggish performance and the disappearance or inability to access certain files. It's crucial to keep your MacOS updated and protected from viruses since this one might compromise your data and system.
Incompatible File Types
Since QuickTime supports not all video file types, you may need a different video player to watch certain videos.
Damaged Video Files
If you're having trouble playing a video because it's corrupted. You may re-download the video or switch to a different format to see it.
Can't Get Videos To Play On Your Mac? Here's What To Do!
1. Enable JavaScript
JavaScript is a scripting language used to build dynamic web applications that allow users to interact with content. In addition, videos may be played in browsers using JavaScript. In case you have JavaScript turned off in your browser by accident, you may turn it back on by following these instructions.
Start by opening Safari on your Mac.
Select "Preferences" from the menu that appears.
You should then click the "Security" button.
Finally, choose "Enable JavaScript" by checking the box.

Now shut Safari, reopen it, and check whether the video loads properly.
2. Upgrade Your Browser
New features aren't the only reason for software upgrades — issues are often fixed. Your Mac's browser may be out of the current, preventing videos from playing; thus, updating it is recommended.
To see whether Safari has any new releases, follow these steps:
Open System Preferences and choose General from the sidebar General section to update Safari.
Choose "Software Update."
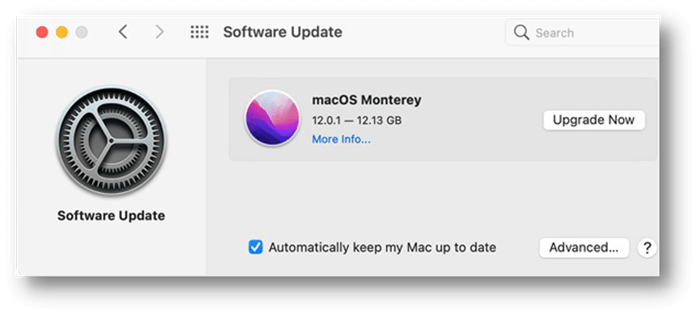
The operating system will automatically check for updates, even for built-in programs like Safari.
Then, if macOS detects an update for Safari, choose it and click Update Now.
To test whether the update was successful, launch Safari again and see if the videos now play without any issues.
3. Clear The Cache From Your Browser
Changes to your browser's preferences may not take effect immediately due to the browser's caching mechanisms. This means it saved your preferences on your Mac, but you may delete them just as you would delete data from a computer's hard drive.
Open Safari's Preferences Menu.
In the toolbar's far rightmost corner, you'll see an option labeled "Advanced."
Mark the last box. Develop menu shown in the menu bar.
Choose Empty Caches from the Develop menu.
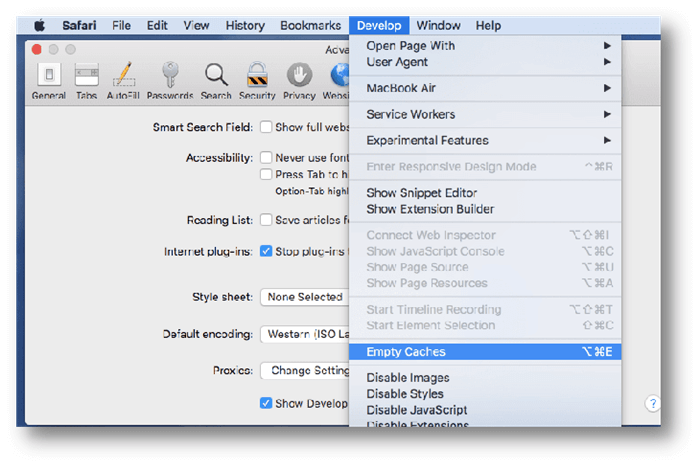
Launch Safari again.
You may also delete your cache by going to the settings page in Chrome. It should do the job if it were only a technical hiccup.
4. Install The Necessary Video Codecs
Video codecs allow your Mac to play various file types, so it's worth installing. Many different free video codecs may be downloaded online; before you do so, however, you need to determine which ones are Mac-friendly. Quicktime is a great codec to utilize.
The procedures for setting up the QuickTime codec are detailed below.
Download the QuickTime codec bundle. Visit Apple's webpage and get the Mac version of the QuickTime codec kit.
Installing the QuickTime codec bundle. Double-click the installer when the download is finished and proceed with the installation as directed.
Next, you should restart your Mac. If you want the updated codecs to take effect once the installation is finished, you'll need to restart your Mac.
And that's the end of it! With QuickTime installed on your Mac, you may now play almost any audio or video file.
How to Recover Lost Videos on Mac?
If you deleted videos or erased videos on Mac and can’t restore them from Time Machine backup or Trash, you can use data recovery software to quickly recover deleted/lost videos on Mac.
- Quickly recover deleted or lost videos on Mac.
- Recover lost videos from formatted hard drive.
- Recover lost videos with original quality.
Step 1. Download and install Do Your Data Recovery for Mac, then open it from Launchpad. Select the Mac hard drive to start data recovery.

Step 2. Click on Scan button to deeply scan the Mac hard drive and find all recoverable files including videos.

Step 3. Once the scan is completed, you can preview the videos. Then select the wanted videos and save them.

This Mac data recovery software supports to recover all types of videos including MP4, WMA, AVI, 3GP, MOV, MXF, MPG, M4A, etc.
Conclusion
In the YouTube and TikTok-dependent world, losing a video due to corruption or destruction may be financially devastating. The finest kind of entertainment in the modern world is watching videos, whether online or offline.
It is annoying when technological difficulties prevent us from watching videos. Having trouble playing videos on your Mac? Hopefully, this post has helped you figure out how to do so.
Written & Updated by Nancy
Nancy works as a tech columnist at DoYourData. She is familiar with macOS and Windows OS and writes computer solution, data recovery, disk clone, data erasure articles for DoYourData. She is a big fan of Mac products and is fond of testing utilities software (such as cleaner, recovery, eraser, NTFS for Mac, video editor, etc) on Mac.