Crucial Portable SSD Is Not Showing Up on Mac, How to Fix It?
To fix Crucial portable SSD is not detected or not showing up on Mac, you should make sure the connection/USB port is good and check if the Finder Settings can show all external disks on Mac. Or you can reformat the incompatible Crucial portable SSD for your Mac. Once your have lost important data stored on it, try Mac data recovery software - Do Your Data Recovery to get all lost data back.
![]() Updated by Nancy on December 20, 2023
Updated by Nancy on December 20, 2023
Quick Navigation:
- Fix 1. Check the SSD Connection and Cable
- Fix 2. Edit the Finder's Preferences or Settings
- Fix 3. Reboot Your Mac
- Fix 4. Format Your Crucial SSD in Disk Utility
- Fix 5. Mount the Crucial SSD Using Disk Utility
- FAQs About Fixing Unrecognized Crucial Portable SSD on Mac
- Conclusion
Is it annoying that your Mac and reliable Crucial Portable SSD keep playing hide-and-seek? In this tech tango, you're not alone! Imagine this: after inserting your Crucial Portable SSD into your Mac, you're hoping for instant access to your files, but you can't see it anywhere. But have no fear; there are workable answers to this confusing problem! Get your Crucial SSD showing again on your Mac with the help of this troubleshooting article.
We'll go over each step-by-step process. We will guide you through the complex process of resolving compatibility issues with your macOS system and re-establishing recognition of your Crucial Portable SSD by inspecting connections, adjusting software settings, and navigating compatibility challenges. Get your hands on your valuable data without any fuss and say farewell to the disappearing act!

Fix 1. Check the SSD Connection and Cable
When troubleshooting an SSD not detected on your MacBook, you must use the correct connector and connection. Ensure the cable is in good condition and the connection is correct. You can also see if the cable is compatible with your SSD model. Here is a step-by-step guide:
- Cable Compatibility: Be sure the cable is compatible with your SSD model. Verify the original's integrity by testing with an alternate cable.
- Power Supply Check: Ensure enough juice goes to the SSD. Ensure you connect the right cable and adaptor to a power source.
- SATA Interface: Verify that the insert is correct. Ensure the adapter is compatible with the SSD and has a SATA type (1, 2, or 3). If it fails, look at other options like a SATA to USB adapter. Directly connect to your MacBook for type C drives.
Fix 2. Edit the Finder's Preferences or Settings
Check the Finder Settings if your Crucial portable SSD isn't visible on your Mac. Here are the methods to fix this and get your Mac to recognize the SSD:
- To access the Finder Settings, navigate to Apple menu > Finder > Settings.
- Choose "External Disks" in General.
- Ensure that "External Disks" is chosen under Locations in the Sidebar.

Fix 3. Reboot Your Mac
In many cases, a simple reboot would fix system difficulties, which may be the cause of your external Crucial SSD not mounting on a Mac. Restarting the device can often fix problems quickly. To start macOS over with a clean slate, select
"Restart" from the Apple menu. It may be your best bet if your USB port is always full.

If your external solid-state drive (SSD) isn't showing up or mounting on your Mac, try this simple step.
Fix 4. Format Your Crucial SSD in Disk Utility
If your Mac isn't detecting your brand-new Crucial portable SSD, and the formatting seems to be the problem, the SSD might be unallocated. Formatting a new solid-state drive (SSD) is usually necessary to ensure it works with your macOS. To format a new solid-state drive (SSD) on a Mac, follow these steps:
Step 1. Go to Launchpad > Other > Disk Utility, open this app.
Step 2. Connect the Crucial portable SSD to your Mac.
Step 3. Find the Crucial portable SSD in Disk Utility and select it, then click Erase.
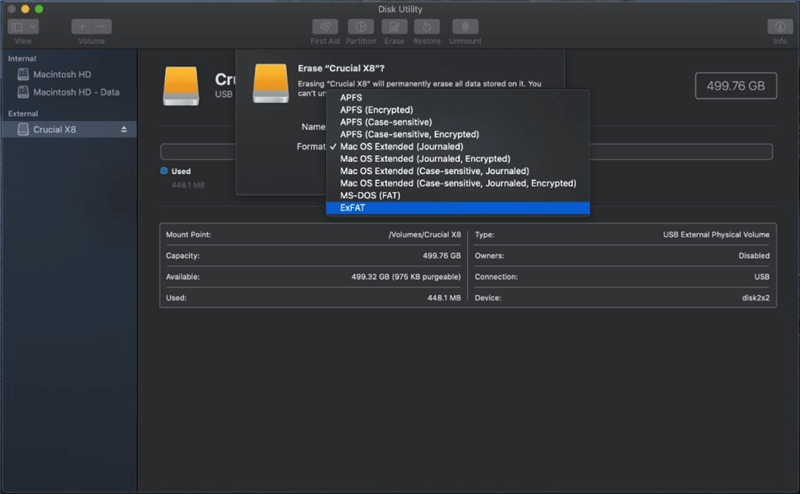
Step 4. Choose a file system, then click Erase again. When it completes, click Done.

If you have important data stored on the Crucial portable SSD and want to get it back, you can use data recovery app to scan the Crucial portable SSD.
Step 1. Download and install Do Your Data Recovery for Mac, open it from Launchpad.
Step 2. Select the Crucial portable SSD to start data recovery.

Step 3. Click on Scan button. It will deeply scan the Crucial portable SSD and will find all lost files.

Step 4. After scanning, find the lost files you want to recover and select them. Then click on Recover button, select a location, save them.

Fix 5. Mount the Crucial SSD Using Disk Utility
If your Mac doesn't automatically mount Crucial portable SSD, you might not see them in Finder or on the desktop after connecting them. A faulty interface, a disconnected cable, or a USB port could be to blame.
To fix this, you'll need to mount external storage, such as an SSD, manually. After you do this, macOS can identify the disk and open its contents. In certain cases, the SSD is recognized by Disk Utility but goes unnoticed in Finder. By mounting it, you may fix this compatibility issue and make sure the SSD is visible in Finder.
Step 1. To access Disk Utility, navigate to Finder > Applications > Utilities.
Step 2. Locate your external solid-state drive (SSD) in the left-hand drive list in Disk Utility.
Step 3. A grayed-out drive icon may show if the solid-state drive (SSD) is detected but not mounted.
Step 3. To attach an external solid-state drive, choose it.
Step 4. Select the SSD and click on Mount button.
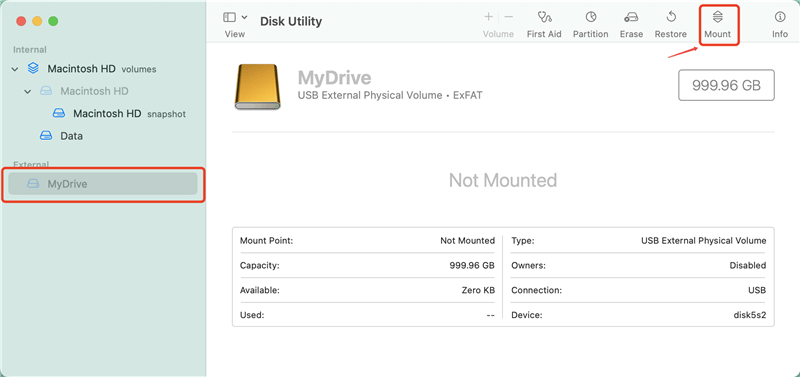
Be patient and let the mounting finish.
FAQs About Fixing Unrecognized Crucial Portable SSD on Mac
1. can not find the connected Crucial portable SSD on Mac, how to fix it?
If your Mac does not recognize the connected Crucial portable SSD, you can try the following solutions:
- Update macOS to latest version, restart your Mac.
- Try another USB port, USB hub, reconnect the Crucial portable SSD to your Mac.
- Open Finder > Settings, then make sure you have selected External disks in Finder Settings.
- Open Disk Utility, mount the Crucial portable SSD or erase the Crucial portable SSD or run First Aid on the Crucial portable SSD.
- Try the Crucial portable SSD on another PC or Mac.
2. How to use a Crucial portable SSD which has been formatted to NTFS on Mac?
To use an NTFS Crucial portable SSD on your Mac without formatting, just install a third-party NTFS for Mac tool on your Mac.
- Download and install DoYourData NTFS for Mac tool, open it.
- Find the Crucial portable SSD under NTFS Disk, then select it.
- Click on Enable Writable button. Then you can use the Crucial portable SSD on your Mac without any limitation.

3. How to recover lost data from a Crucial portable SSD erased by Disk Utility?
- Download and install Do Your Data Recovery for Mac. Open it.
- Select the erased Crucial portable SSD.
- Click on Scan button.
- Recover lost data after scanning.
4. The Crucial portable SSD is unmounted, how to mount it on your Mac?
Open Disk Utility, select the Crucial portable SSD and click on Mount button. If the mount button is greyed out, just click First Aid to repair the Crucial portable SSD.
Conclusion:
After going through several troubleshooting steps, you should be able to get your Crucial Portable SSD to appear on your Mac again. You can fix the issue and get access to the data on your Crucial SSD again by checking connections, making sure they are compatible, using system tools, and getting help if necessary.
To keep your important data safe from loss, you should back it up often. If you're determined and follow these instructions to fix the problem, you can use your Crucial Portable SSD on your Mac again with no problems. If you have lost important data, don’t panic, use a Mac data recovery app to help you get the deleted or erased data back.
Written & Updated by Nancy
Nancy works as a tech columnist at DoYourData. She is familiar with macOS and Windows OS and writes computer solution, data recovery, disk clone, data erasure articles for DoYourData. She is a big fan of Mac products and is fond of testing utilities software (such as cleaner, recovery, eraser, NTFS for Mac, video editor, etc) on Mac.