Quick Navigation:
- Why Permanently Delete Music/Audio/Voice Files?
- Methods to Permanently Delete Music/Audio/Voice Files
- Additional Tips for Permanently Deleting Music/Audio/Voice Files
- Conclusion
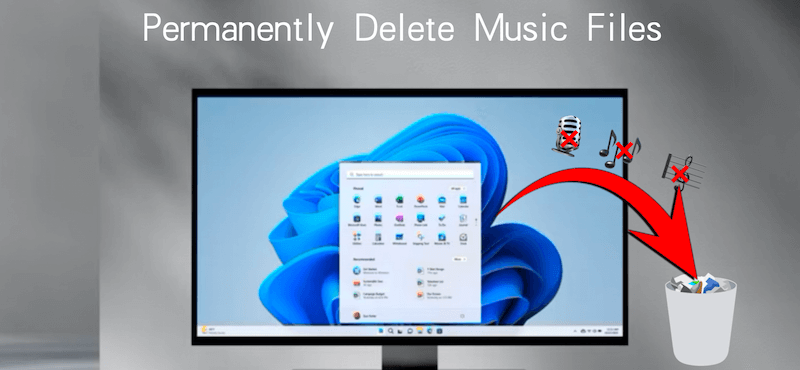
In our digital era, where storage is becoming increasingly abundant, it's easy to let files accumulate, often without a second thought. Whether you're cleaning up your digital storage or ensuring privacy, permanently deleting music, audio, and voice files can be an essential task. However, the process isn't always as straightforward as it might seem. Understanding how to ensure that your files are truly gone, and not just hidden, can help maintain an organized and secure digital space.
Why Permanently Delete Music/Audio/Voice Files?
Before diving into the "how," it's important to understand the "why." There are several reasons one might want to permanently delete music, audio, or voice files:
- Privacy Concerns: Audio files, especially voice recordings, can contain sensitive information. Permanently deleting these files ensures they can't be recovered by someone else.
- Storage Management: Audio files can take up significant space, especially high-quality music or recordings. Deleting unwanted files frees up storage for other important data.
- Decluttering: A cluttered storage space can make it difficult to find the files you actually need. Deleting unnecessary audio files helps maintain an organized system.
- Preventing Unauthorized Access: If you share your device or storage with others, permanently deleting sensitive audio files prevents unauthorized access to your personal data.
Now that the reasons are clear, let's explore the various methods to permanently delete music, audio, and voice files from different devices and platforms.
What Happens When You "Delete" a File?
A file on your device doesn't just vanish when you delete it. Rather, the operating system designates the file's space as "available" for future data. With specialist software, the file can be retrieved until fresh data overwrites this area. This is why understanding the methods for permanent deletion is crucial.
Methods to Permanently Delete Music/Audio/Voice Files
To delete music, audio or any other files on computer, there are many available methods. The operating systems offer the built-in tools that can help you remove files easily. Also, if you require more secure way, you can use a third-party data sanitation tool, such as DoYourData Super Eraser.
Permanent Deletion on Windows
Windows operating systems offer several methods to permanently delete files.
Using the Recycle Bin
When you delete a file on Windows, it typically goes to the Recycle Bin. From there, it can be restored unless you take further action:
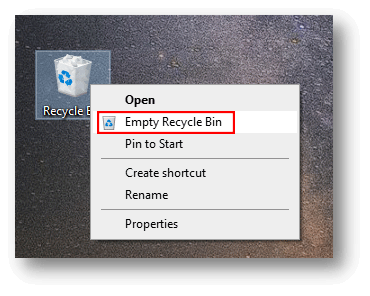
- Step 1: Right-click on the Recycle Bin and select "Empty Recycle Bin." This will delete all files currently in the Recycle Bin.
![permanently delete music files]()
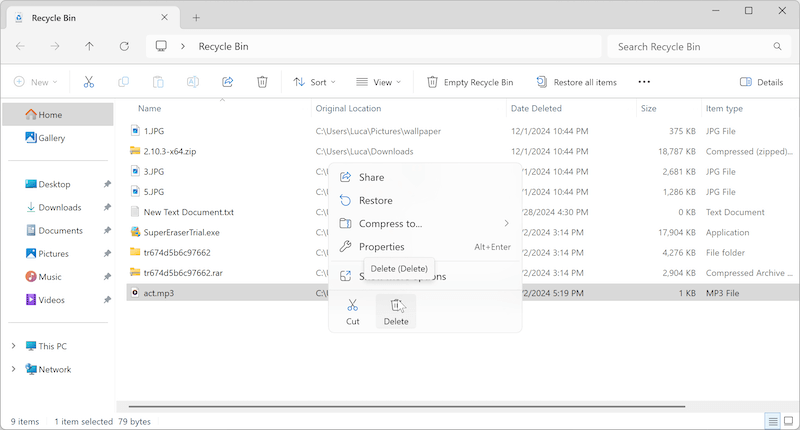
- Step 2: To permanently delete specific files, right-click the file within the Recycle Bin and choose "Delete." This action bypasses the Recycle Bin, ensuring that the file is immediately removed from the system.
![permanently delete music files]()
Shift + Delete Method
For those looking to skip the Recycle Bin altogether:
- Step 1: Select the file or files you wish to delete.
- Step 2: Press "Shift + Delete" on your keyboard. This action prompts the system to delete the files permanently without sending them to the Recycle Bin.
![permanently delete music files]()
Permanent Deletion on macOS
macOS offers similar features to Windows for file deletion, with a few variations:
Using the Trash
Files deleted on a Mac initially go to the Trash, which functions similarly to the Windows Recycle Bin:
- Step 1: Click on the Trash icon in your Dock.
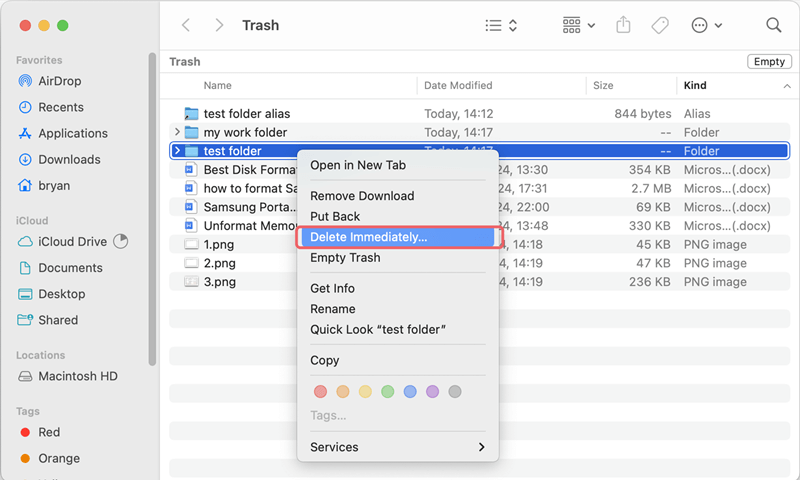
- Step 2: Right-click on the files in the Trash and select "Delete Immediately" for permanent deletion.
![permanently delete music files]()
- Step 3: Alternatively, you can empty the entire Trash by right-clicking on the Trash icon and selecting "Empty Trash."
![permanently delete music files]()
Using Secure Empty Trash
For a more secure deletion:
- Step 1: Prior to macOS Sierra, Macs offered a "Secure Empty Trash" option. This feature securely deletes files by overwriting them multiple times. You can access this by holding down the "Command" key while right-clicking on the Trash and selecting "Secure Empty Trash."
![permanently delete music files]()
- Step 2: In macOS Sierra and later, this feature was removed, but you can still use third-party software such as DoYourData Super Eraser for Mac to achieve the same effect.
Using File Shredder Software
Even after deleting files, particularly on physical drives, remnants can remain unless the storage space is overwritten. If you simple deleted the files with the above methods, it's not safe enough. By using professional data recovery software, it's able to get back the deleted files on both Windows and Mac.
To ensure that deleted files cannot be recovered, you might want to use file shredder software. These programs overwrite the deleted file's space with random data, making recovery virtually impossible.
The best data wiping software we recommend is DoYourData Super Eraser. The software is reliable and can securely delete audio files or any other type of files permanently. No recovery methods can recover these wiped data.
Do Your Data Recovery for Mac
- Most reliable data sanitation tool for both Windows and Mac.
- Securely delete files permanently and avoid data recovery.
- Shred specified files/folder, wipe deleted data or erase an entire drive.
What's more, the software is very simple and easy to handle. To help you understand and execute the wiping process smoothly, refer to the following guide to use the software:
Step 1: Download and install the reputable file shredder software DoYourData Super Eraser on your Mac.
Step 2: Open the software, choose the Eraser Files/Folders mode and select the files or folders you want to delete permanently.
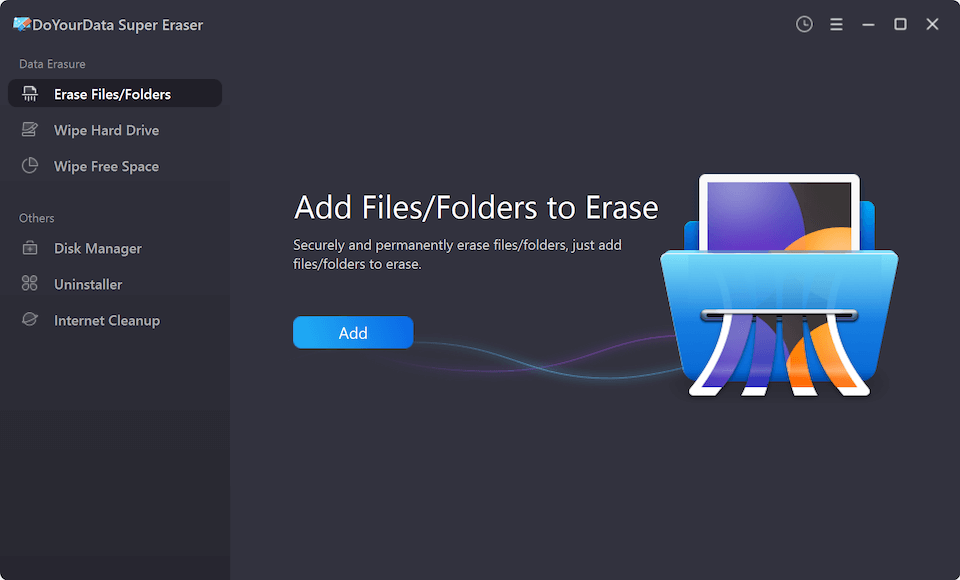
Step 3: Choose the shredding method. The software offers multiple passes of overwriting, ensuring complete erasure.
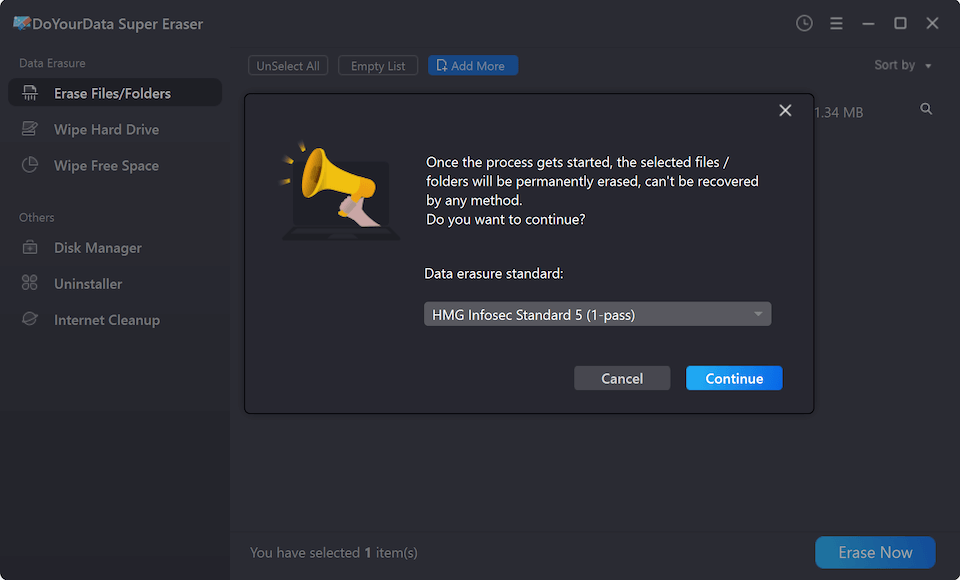
Step 4: Execute the shredding process to permanently delete your audio files.
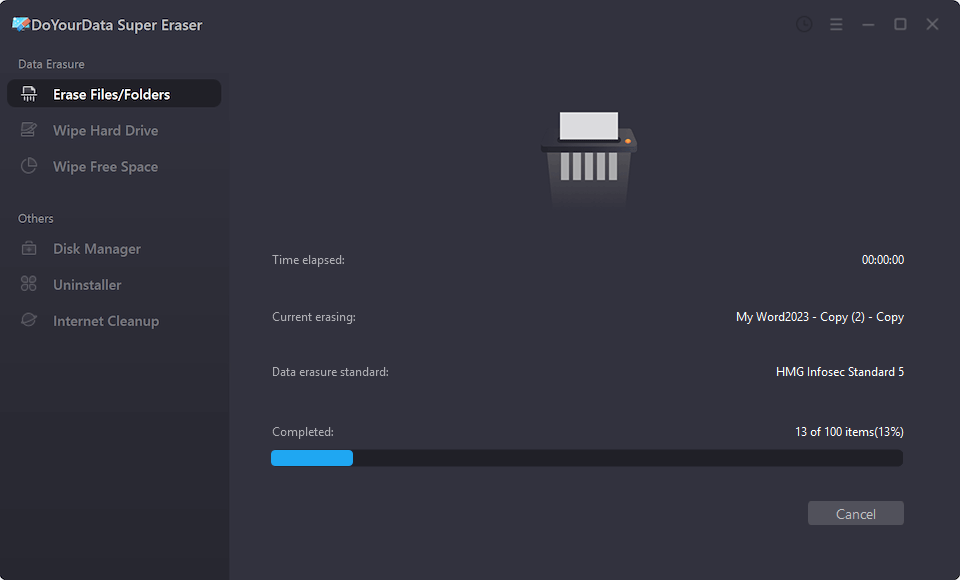
After shredding the audio files, you can even use a data recovery software to scan the device and validate if the wiped audio files are recoverable.
External storage devices like USB drives, external hard drives, and SD cards also store audio files. Deleting files from these devices requires similar steps to those for internal storage.
Additional Tips for Permanently Deleting Music/Audio/Voice Files
Besides the data wiping method, you can also try some other methods to ensure the audio or music files be deleted permanently and cannot be recovered. Also, there are some tips about how to delete files from smart phones and cloud services.
Encrypting Music/Audio/Voice Files Before Deletion
Encrypting files before deletion adds an extra layer of security, as even if remnants remain, they'll be encrypted and much harder to recover or read.
- Step 1: Use encryption software like VeraCrypt or BitLocker on Windows to encrypt files before deleting them.
- Step 2: On macOS, use FileVault to encrypt your entire disk, which includes audio files, before deletion.
Permanent Deletion on Mobile Devices
Mobile devices, such as smartphones and tablets, also store a variety of audio files, including music, voice recordings, and more. Permanently deleting these files can be just as important as on a computer.
Android Devices
- Go to your file manager or music app and locate the files you wish to delete.
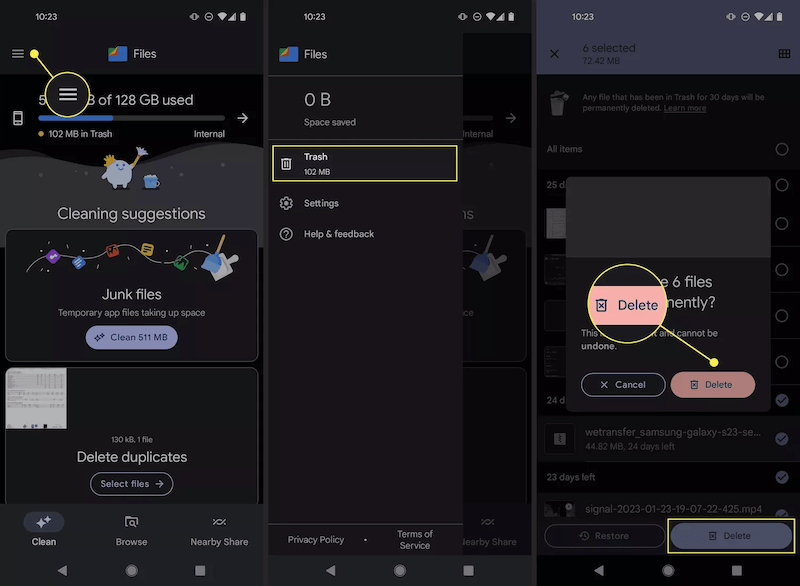
- Tap and hold on the file, then select "Delete." This will move the file to the Trash or Recently Deleted folder.
- Go to the Trash or Recently Deleted folder and select "Delete Permanently" or "Empty Trash" to ensure the file is permanently deleted.
![permanently delete music files]()
- For extra security, use a third-party file shredder app from the Google Play Store, such as Secure Eraser or iShredder.
iOS Devices
- Open the Files app or the app where your audio files are stored.
- Select the file you wish to delete and choose "Delete." The file is moved to the Recently Deleted folder.
- Navigate to the Recently Deleted folder and choose "Delete All" or select specific files to delete permanently.
![permanently delete music files]()
- For added security, use third-party apps like iShredder for iOS to permanently delete sensitive files.
Cloud Storage and Audio Files
Many users store audio files in cloud storage, such as Google Drive, iCloud, or Dropbox. It's crucial to know how to permanently delete these files from the cloud as well.
Google Drive
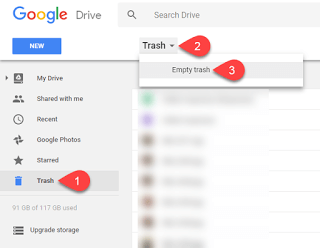
- Locate the file in Google Drive and move it to the Trash by right-clicking and selecting "Remove."
- Go to the Trash folder and select "Delete Forever" to permanently delete the file.
- Remember, files in the Trash are automatically deleted after 30 days, but selecting Empty trash (or "Delete Forever") ensures immediate removal.
![permanently delete music files]()
iCloud Drive
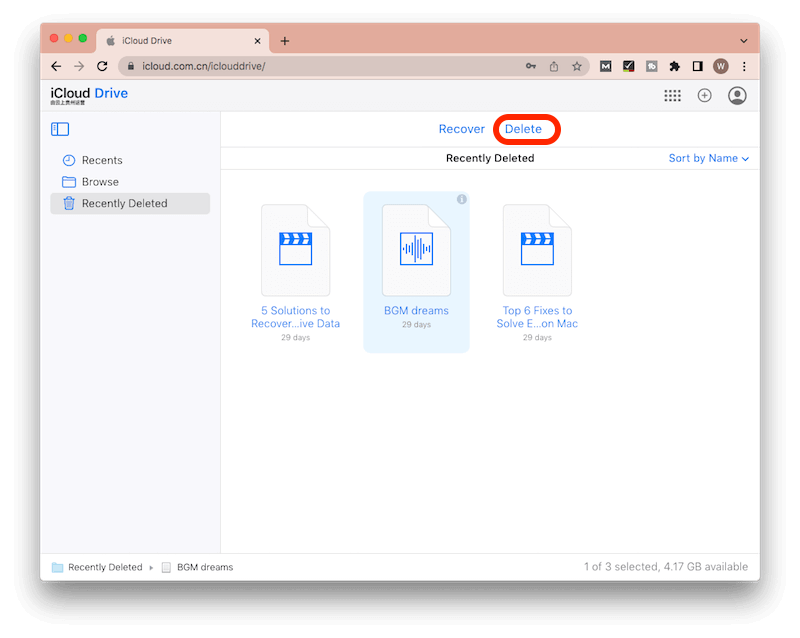
- Open iCloud Drive and find the file you want to delete.
- Move the file to the Trash.
- Go to the Recently Deleted folder and select "Delete All" or choose specific files to permanently delete.
![permanently delete music files]()
Dropbox
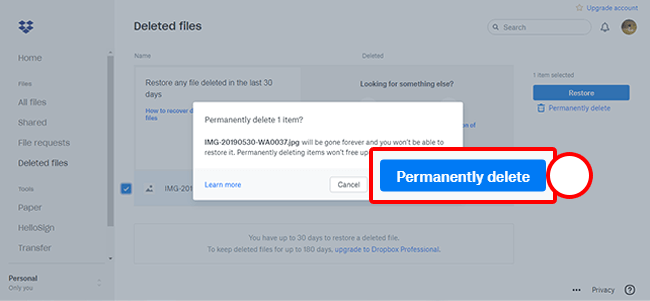
- In Dropbox, delete the file, which will move it to the Deleted Files section.
- Go to the Deleted Files section and choose "Permanently Delete" to remove the file from Dropbox permanently.
![permanently delete music files]()
Conclusion
Permanently deleting music, audio, and voice files requires more than just sending them to the Trash or Recycle Bin. To ensure complete erasure and prevent recovery, it's crucial to use methods like file shredding, overwriting free space, and encryption. Whether you're managing your device's storage, protecting your privacy, or ensuring sensitive information doesn't fall into the wrong hands, these methods provide the necessary tools to keep your digital life secure.
DoYourData Super Eraser
DoYourData Super Eraser, the award-winning data erasure software, offers certified data erasure standards including U.S. Army AR380-19, DoD 5220.22-M ECE to help you securely and permanently erase data from PC, Mac, HDD, SSD, USB drive, memory card or other device, make data be lost forever, unrecoverable!
