Quick Navigation:
- Can You Use Xbox External Hard Drive on PC?
- What to Do Before Disconnecting External Hard Drive from Xbox One?
- How to format Xbox One External hard drive?
- Recover Lost Data from Formatted Xbox One External Hard Drive
- Permanently Format and Wipe Data from Xbox One External Hard Drive
- Conclusion
- FAQs About Formatting Xbox One External Hard Drive
Xbox One, developed by Microsoft, has been getting popular fairly, citing its remarkable features. Due to its exceptional ability, it has become one of the most formidable competitors of Switch, PlayStation 4, and Nintendo's Wii.
Fortunately, you can upgrade Xbox One console's storage capacity through an external hats drive. However, the issue is that you can't plug the hard drive into your PC if you no longer need to get the extra storage or after replacing it with a bigger one. Your computer won't recognize Xbox One external hard drive directly. Luckily, we'll lead you to format Xbox One external hard drive so you can reuse it on a PC.

Can You Use Xbox External Hard Drive on PC?
You'd have presumed that since Microsoft developed Xbox One and Windows, swapping the drive between two machines would be possible. Unfortunately, the thing is the opposite here. A windows-based PC won't recognize the external hard drive once it is formatted for your Xbox One.
Surprisingly, both Windows and Xbox One use the exFAT format but still, you can't plug the Xbox hard drive into the PC as your computer won't respond when you connect the hard drive.
Xbox One drive writes all games, whether downloaded or disc-based. Moreover, modern games cover so much storage, and all the game parts tend to get stored on the hard drive. Hence, Microsoft doesn't want to give access to the Xbox One hard drive data to anyone where you had stored your game data.
Therefore, these few things make Microsoft's decision not to allow the PC to detect the Xbox hard drive a wise and much-needed one.
What to Do Before Disconnecting External Hard Drive from Xbox One?
Unless you aim to sell your Xbox One console, you'd like to store your game's data on a hard drive. Hence, if you want to transfer your data to the internal hard drive of Xbox or intend to acquire a larger hard drive, you should look to shore up your game data before you get to disconnect the external hard drive from Xbox One console.
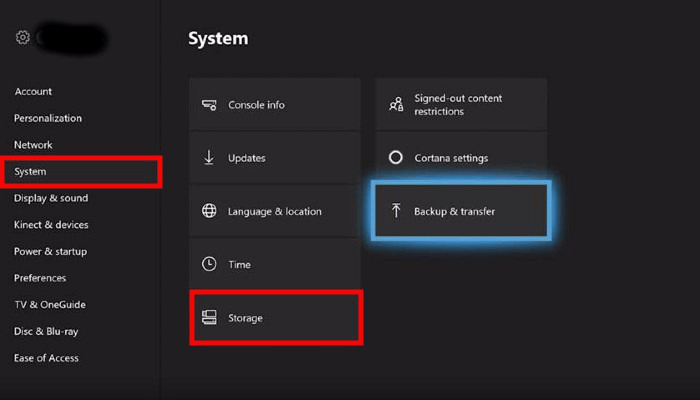
You can follow the step-by-step guide below to migrate your data.
Step 1: After pressing the Xbox button in the controller's center, you'll be able to enter the guide menu. Next, navigate to 'Profile & System' after using the right/left bumper buttons.
Step 2: The process you've performed in the previous step will take you to the Settings icon. You'll need to tap the 'Storage' icon after highlighting System.
Step 3: Once you enter your next screen, Xbox one's external and internal hard drives will appear. All you need to do is tap the A button after selecting the external hard drive.
Now, you'll only need to select 'Transfer'. Next, you can manually select the game data you'd like to send to your internal drive of Xbox One. Surprisingly, you can transfer all your data in one go by hitting the 'Select' icon.
Step 4: In this phase, you'll need to tap 'Move selected' to start transferring our game data. This process might take some time, depending upon the game data you'd have saved on an external hard drive.

How to format Xbox One External hard drive?
Since you've transferred your external hard drive data to an internal hard drive, you can plug the external hard drive into your Windows PC.
After connecting the external hard drive to the PC, you'll notice that Windows file explorer won't show the external hard drive. Interestingly, this isn't surprising, as Microsoft tends to prevent Windows from responding to Xbox One formatted drives. You can format the drive to NTFS and then use it on your Windows PC.
Here's how to do it.
Step 1: Launch Disk Management
The first thing you need to do to format an external hard drive is launch Disk Management, a utility. You can tap the Windows button to visit the 'Start Menu'.
You don't need to click on any app there. Instead, it would help if you started typing 'disk management'.
You'll see the 'Create and format hard disk partitions' option. You can click on this option to launch the 'Disk Management' window.

Step 2: Initialize your external hard drive
After opening the Disk Management, you can see two subsections there. Instead, you must ignore the top half and focus on the bottom half of your Disk Management Windows.
Here, find the external hard drive you used with Xbox One. The hard drive might be marked as an unrecognized device within the Disk Management. In addition, the hard drive will be listed with unallocated space. Next, select Initialize disk after clicking on the hard drive.
If you are a Windows 10 or 11 users, you don't need to respond to the pop-up message; these Windows use GPT default.
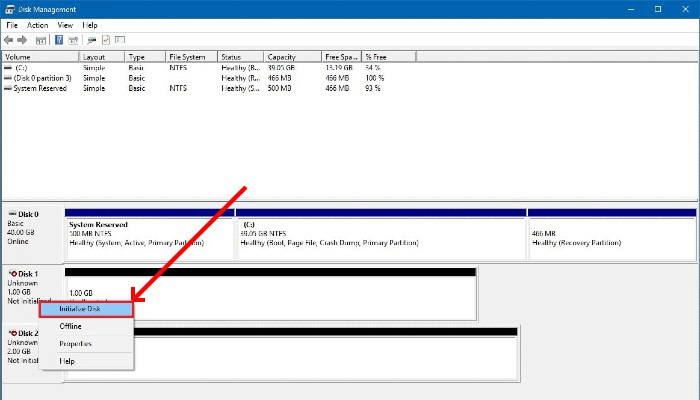
Step 3: Format the Drive after creating a Volume
Now, you'll need to create a Volume; tap on the 'Unallocated' icon. Next, select the 'New Simple Volume' icon from the menu. The process assists you in opening the New Simple Volume.
At this phase, don't waste time before allocating the space you'd like to assign to your new partition.

If you intend to split the hard drive between the Windows partition and Xbox One Partition, you can enter the Volume size you'd like to allocate to your Xbox partition. Next, proceed ahead by selecting the 'exFAT' icon.
Later, you'll need to create the 'Simple Volume' for your remaining 'Unallocated' space and select its volume size. Next, you can select NTFS as the format of the partition.
Finally, complete formatting the external hard by tapping the 'Finish' icon.

Recover Lost Data from Formatted Xbox One External Hard Drive
If your formatted an Xbox One external hard drive without backing up data, or you formatted the Xbox one external hard drive wrongly when intending to format another drive, you will lose the data on the drive. If you format an Xbox One external drive, the data is still in the drive and is recoverable.
When you want to recover formatted or lost data from Xbox external hard drive, Do Your Data Recovery can help you - it can easily and quickly get all lost files back.
First, don't reuse the drive and avoid any writing operations to the drive after formatting it, then download and install the software on your PC.
Connect the formatted Xbox One external hard drive to the PC and launch the data recover software and start to recover the lost files with the following steps.
1. Choose the formatted Xbox One external hard drive.
Once your start the software, it will show you all the drives connected on the PC. Check and choose the correct formatted drive by the drive letter, label, file system, or the size information.

2. Scan the formatted drive to search for missing files.
Double click the selected drive or click the Scan button to continue. It will start to scan the drive deeply for any possible missing files on the drive.
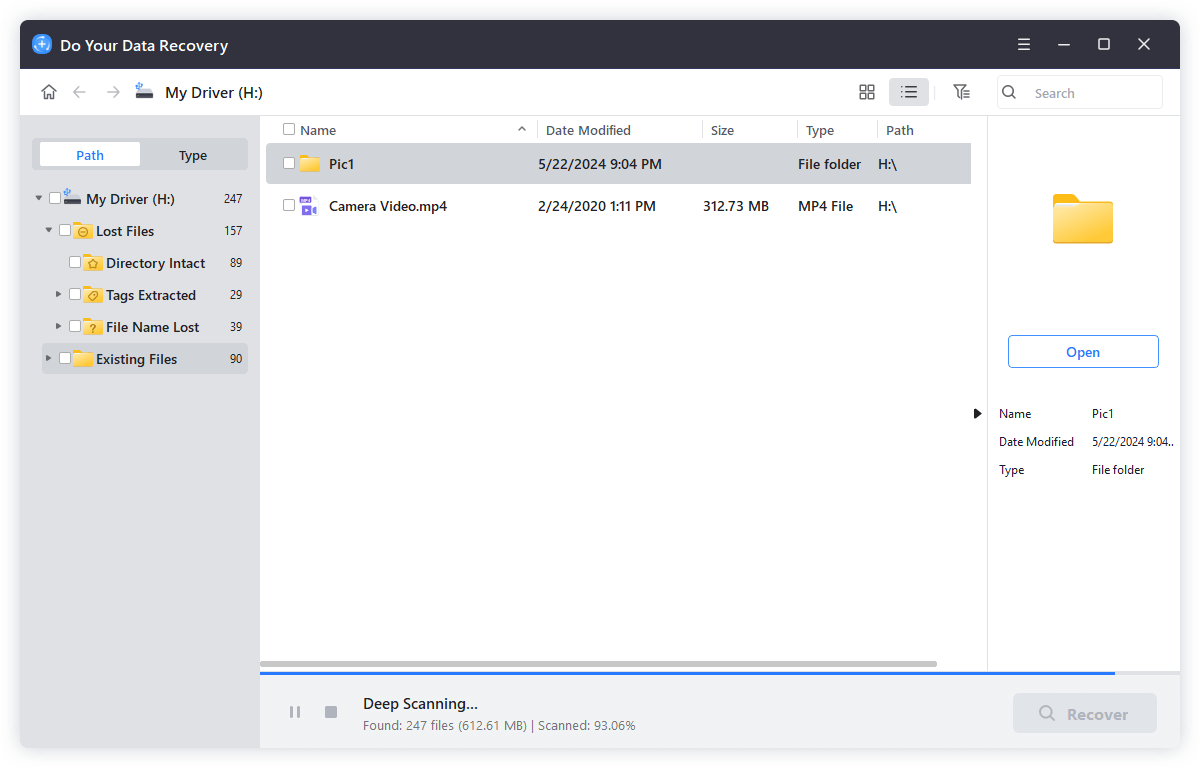
3. Recover the files and save to another drive.
It will take some time to scan and then list all the found files once the process is finished. Check and selected all the wanted files and then recover them to another hard drive.
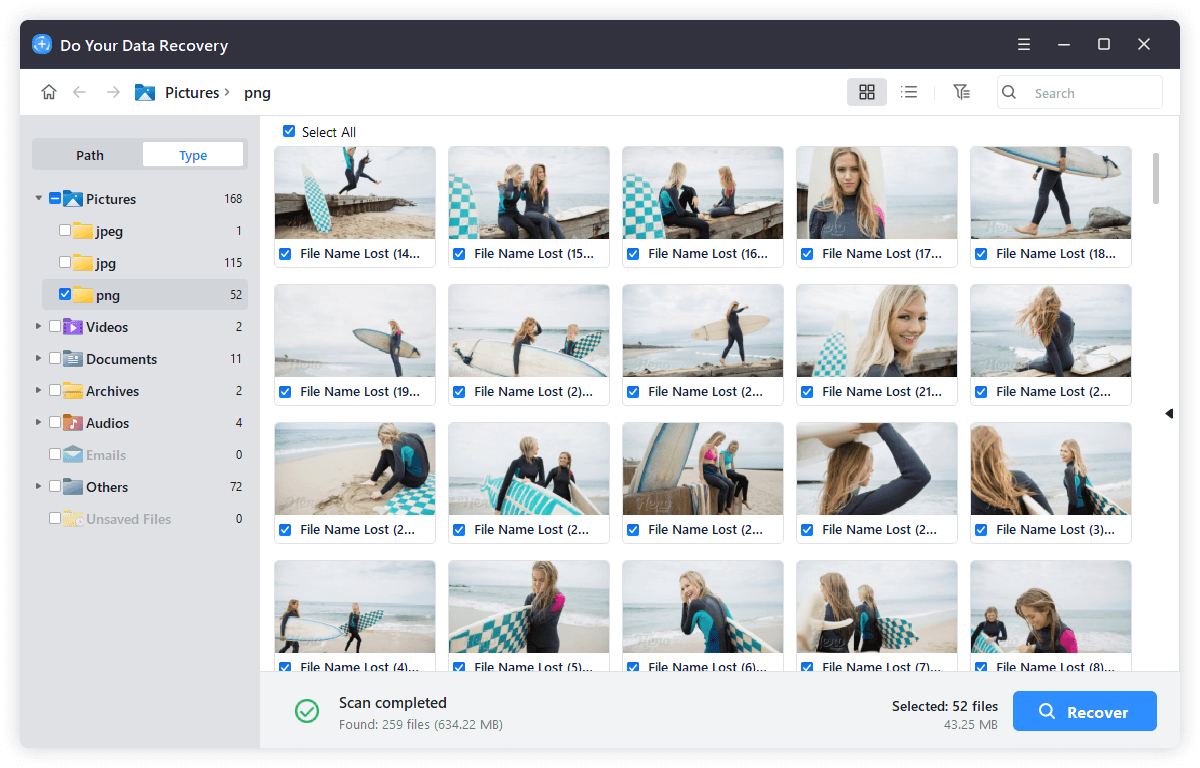
Permanently Format and Wipe Data from Xbox One External Hard Drive
If you are going to sell or dispose of an old Xbox external hard drive, just try data erasure software to help you securely and permanently wipe all data off. Then you can sell it or abandon it with worrying about data breach.
DoYourData Super Eraser is a powerful data erasure program which is able to securely and permanently erase data from hard disk drive or external storage device. It can wipe data from any hard drives, SSD, USB sticks, or memory cards with 3 flexible data wiping mode. International certified data erasure algorithms ensure to wipe the data permanently from the storage media.
DoYourData Super Eraser
- Wipe data completely from Xbox One external hard drive.
- Integrated with international certified data erasure standards.
- Full compatible with Windows 7, 8, 10 and 11.
Here are the steps of data wiping process with the software.
Note: Once your data is erased by DoYourData Super Eraser, the data will be gone forever, can’t be recovered by any data recovery software. So, ensure to back up the needed data first and ensure to select the right drive to wipe.
Step 1. Run the application and change to "Wipe Hard Drive" option and select the Xbox One external hard drive.

Step 2. Click "Wipe Now" button to continue, then you need to choose a data erasure standard to wipe the data.
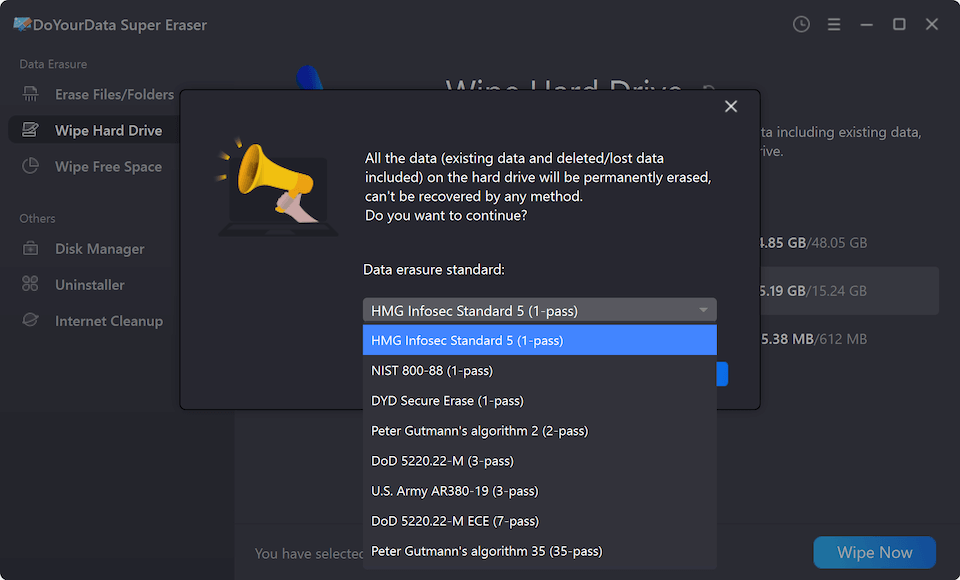
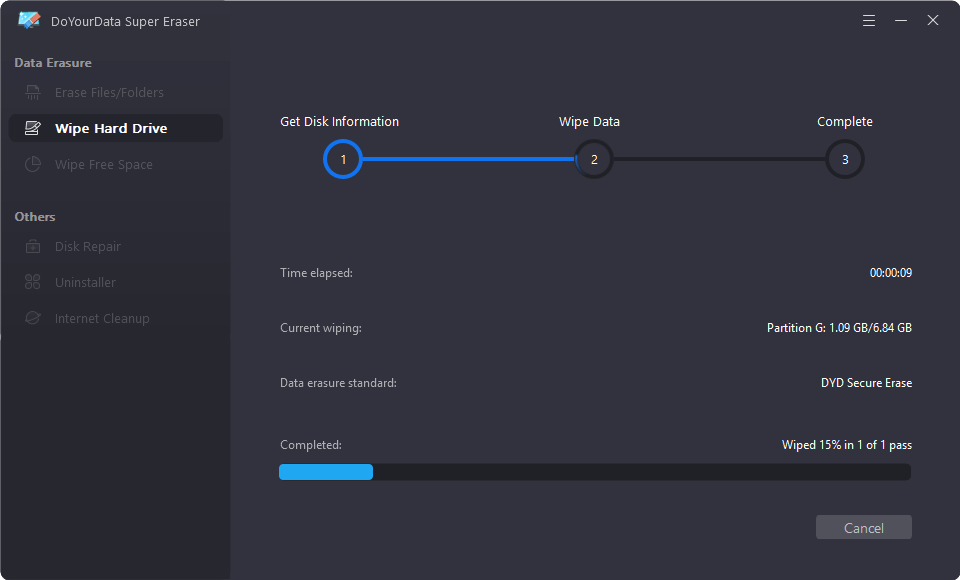
Step 3. Click the "Continue" button and the software will start to wipe all data from the external hard drive.
Conclusion
This guide will help you format the Xbox External hard drive to NTFS or other file systems, so your Windows PC will recognize the hard drive. You also can use Disk Utility or DoYourData Super Eraser to format an Xbox One external hard drive for Mac.
Please note that after formatting the Xbox One's external hard drive to NTFS or other formats on PC, you won't be able to reuse it on Xbox One.
FAQs About Formatting Xbox One External Hard Drive
1. Why the Xbox One external hard drive cannot be recognized on PC?
The Xbox One external hard drive cannot be recognized on a PC because the Xbox One formats external drives with a proprietary file system specifically designed for the device. This file system is not natively supported by PC, which is why the external drive appears as unrecognized or inaccessible when connected to a computer.
2. How to use an Xbox One external hard drive on PC?
If you want to use an Xbox One external hard drive on PC, you need to format the drive with a compatible file system on PC, like NTFS or exFAT. You can format the external drive in Disk Management.
- Right-click the Start button of system and choose Disk Management.
- Choose the Xbox One external drive and right-click it, click the option "Format…".
- Select the file system and set a volume label for the volume, then click Start button to format it.
After formatting it, then you can access the drive and write data to it on PC.
3. How to recover data from a wrongly formatted Xbox One external hard drive?
To recover lost data from a formatted Xbox One external drive, you can use the software Do Your Data Recovery and follow the 10-second tutorial:
- Download and install the software on the PC, start it and choose the formatted external drive.
- Double-click it or click the 'Scan' button to continue, the software will scan the drive deeply.
- After the scan is done, check and choose the wanted files to another hard drive.
4. Format Xbox One external hard drive and permanently wipe the data on the drive.
If you simply format the Xbox One external hard drive in Disk Management, the data will be retrievable. To prevent the data from being recovered, use the professional data wiping tool DoYourData Super Eraser.
- Download the software and install it on your PC. Connect the Xbox One external drive to the PC.
- Run the software and select the mode "Wipe Hard Drive", choose the external drive and click "Wipe Now".
- Select a data erasure standard from the list and click "Continue", then it will wipe data permanently from the drive.
DoYourData Super Eraser
DoYourData Super Eraser, the award-winning data erasure software, offers certified data erasure standards including U.S. Army AR380-19, DoD 5220.22-M ECE to help you securely and permanently erase data from PC, Mac, HDD, SSD, USB drive, memory card or other device, make data be lost forever, unrecoverable!