Windows 11 26H2 Update Deleted My Documents? Here is How to Recover Them
Personal files might be deleted or misplaced during Windows 11 26H2 update. How to get back the missing files? We will cover how to use Do Your Data Recovery to recover permanently deleted files if Windows standard tools fail.
 Updated by Justin Kenny on August 11, 2026
PAGE CONTENT:
Installing major OS feature updates usually brings exciting new features, improved security, and refined user interface tweaks. However, updating your operating system can sometimes lead to unexpected glitches. A frustrating issue reported by many users is: Windows 11 26H2 update deleted my documents. You log into your computer after the update finishes, open your Documents folder, and find it completely empty.
If your important Word files, work PDFs, tax sheets, or family photos disappeared right after upgrading to Windows 11 26H2, take a deep breath. In most cases, your personal documents are not permanently lost forever. They may simply be hidden, moved to an archive folder, or temporarily displaced due to a profile loading error.
In this comprehensive guide, we will break down why this problem happens and walk you through a few tested methods to get your personal documents back safely.
Why Windows 11 26H2 Update Delete Your Documents
Understanding why your files vanished helps you pick the quickest recovery method. Major Windows builds like 26H2 replace core system files and reconfigure user profile paths. Here are the most frequent reasons your documents disappear post-update:
- Temporary Profile Bug: Windows 11 fails to load your normal user profile after rebooting and creates a temporary profile instead. Your original documents remain safely tucked away in your original account folder.
- Relocation to Windows.old: During a major feature upgrade, Windows creates a fallback system folder called Windows.old. Sometimes your personal user directory gets archived there rather than migrating smoothly.
- OneDrive Sync Conflicts: The 26H2 update often re-enables OneDrive auto-backup, redirecting your desktop and document paths to cloud storage. Your local files might seem missing when they are actually stored online.
- Hidden File Settings Reset: System updates occasionally reset File Explorer view preferences, turning off the display of hidden or system files.
- Incomplete Installation or Disk Formatting: If the update crashed mid-way or performed an unexpected clean reset, data clusters on the hard drive may be marked as free space, making files unallocated.
2 Quick Checks Before Deep Data Recovery
Before assuming your files were completely destroyed, perform these two fast diagnostic checks:
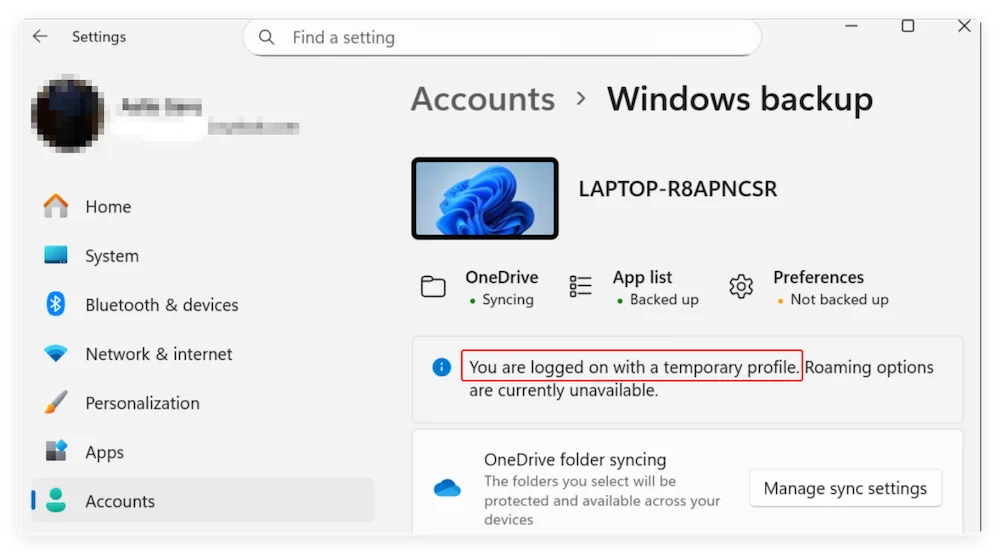
1. Check If You Are Logged Into a Temporary Profile
Click Start > Settings > Accounts > Sync your settings. If you see a notification saying 'You are logged in with a temporary profile', do NOT save new files to the desktop. Simply restart your computer 2 to 3 times. This simple reboot forces Windows to re-read your actual user profile, making your original Desktop and Documents reappear instantly.
2. Unhide Hidden Files and Folders
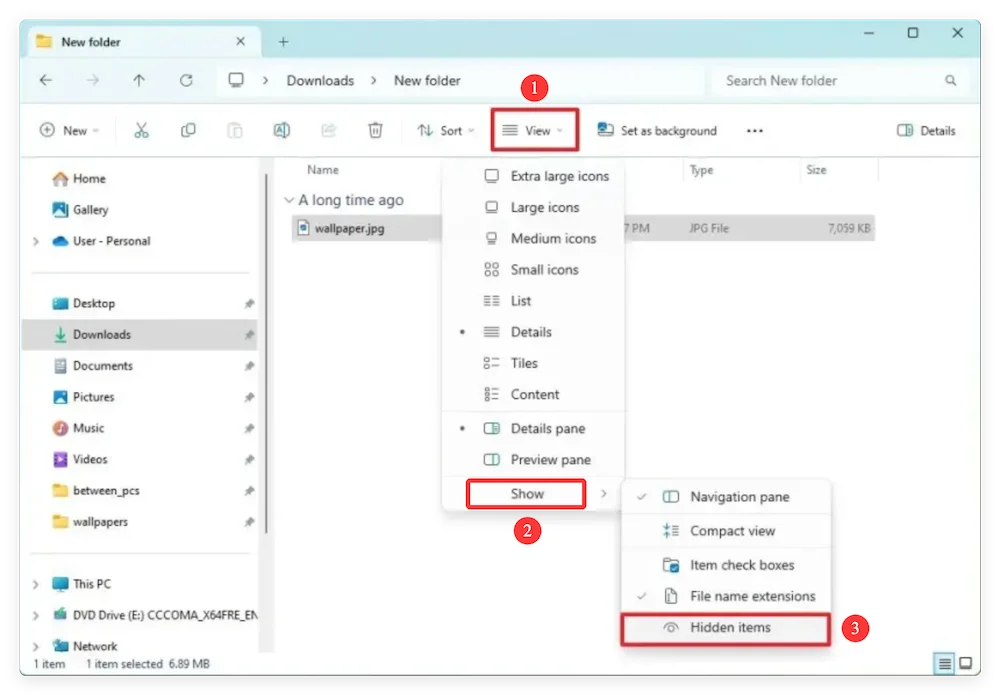
Open File Explorer (press Win + E). Click View > Show > Hidden items. Check if your documents show up. In addition, type the exact name of a missing file in the File Explorer search bar on Drive C: to see if it was moved to another folder.
How to Recover Documents Deleted by Windows 11 26H2 Update
If the initial checks did not bring your files back, work through these proven step-by-step data recovery methods in order.
Method 1: Search and Restore Files from the Windows.old Folder
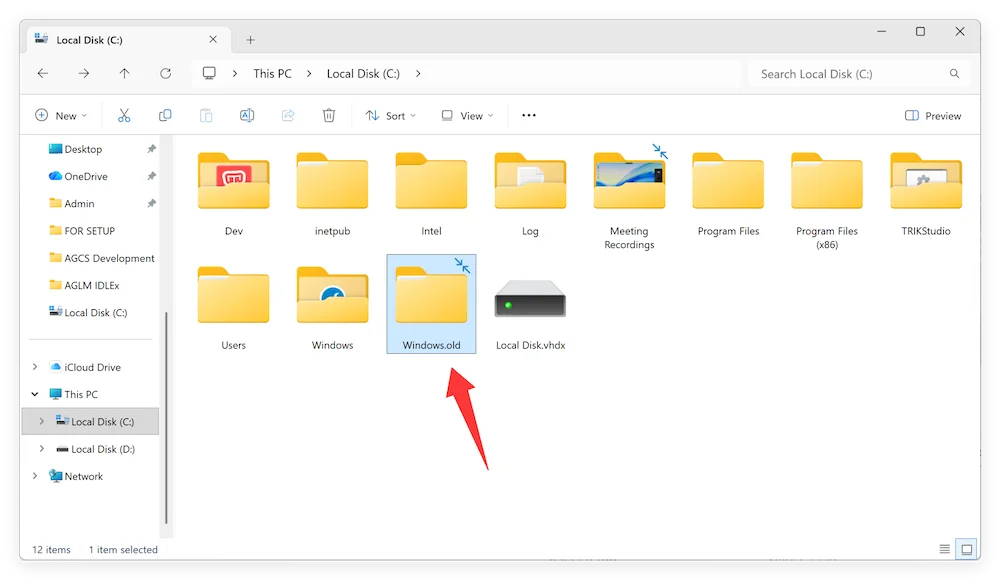
When upgrading to Windows 11 26H2, the setup process automatically creates a folder named Windows.old on your primary drive (C:). This folder contains files from your previous Windows setup for 10 days.
- Press Win + E to open File Explorer and navigate to This PC > Local Disk (C:).
- Look for the folder named Windows.old and double-click to open it.
- Open the Users folder inside Windows.old, then click your former user account name.
- Open Documents, Desktop, Downloads, or Pictures.
- Select the missing files, right-click, select Copy, and paste them into your current Documents folder outside of Windows.old.
Method 2: Use Do Your Data Recovery (Best for Permanently Deleted Files)
If your Windows.old folder is missing, empty, or if Windows 11 26H2 update permanently wiped your documents, built-in Windows options may not work. In this situation, professional file recovery software is the safest and most effective solution.
Do Your Data Recovery is a powerful, beginner-friendly data recovery program built specifically for Windows 11, 10, and older systems. It scans deeply into drive storage blocks to rescue lost Word documents, Excel spreadsheets, PDFs, photos, videos, and zip files deleted during Windows updates.
Why Choose Do Your Data Recovery?
- High Recovery Success Rate: Advanced deep-scan technology unearths fragmented and deleted files.
- Supports All File Formats: DOCX, XLSX, PDF, PPTX, JPG, PNG, ZIP, and hundreds more.
- Safe & Read-Only: Scans your disk without overwriting existing data.
- Preview Before Recovery: Inspect files and document contents before restoring them.
- Easy 3-Step Operation: Designed for all technical skill levels.
Step-by-Step Guide to Recover Documents using Do Your Data Recovery:
Step 1: Download and Install Do Your Data Recovery
Download Do Your Data Recovery. Install it on a partition other than where your lost documents were stored (e.g., install on D: drive if lost files were on C: drive) to prevent overwriting.
Do Your Data Recovery
- Most reliable data recovery for Windows 11.
- Support data recovery for different file types.
- Recover deleted, formatted or other lost data.
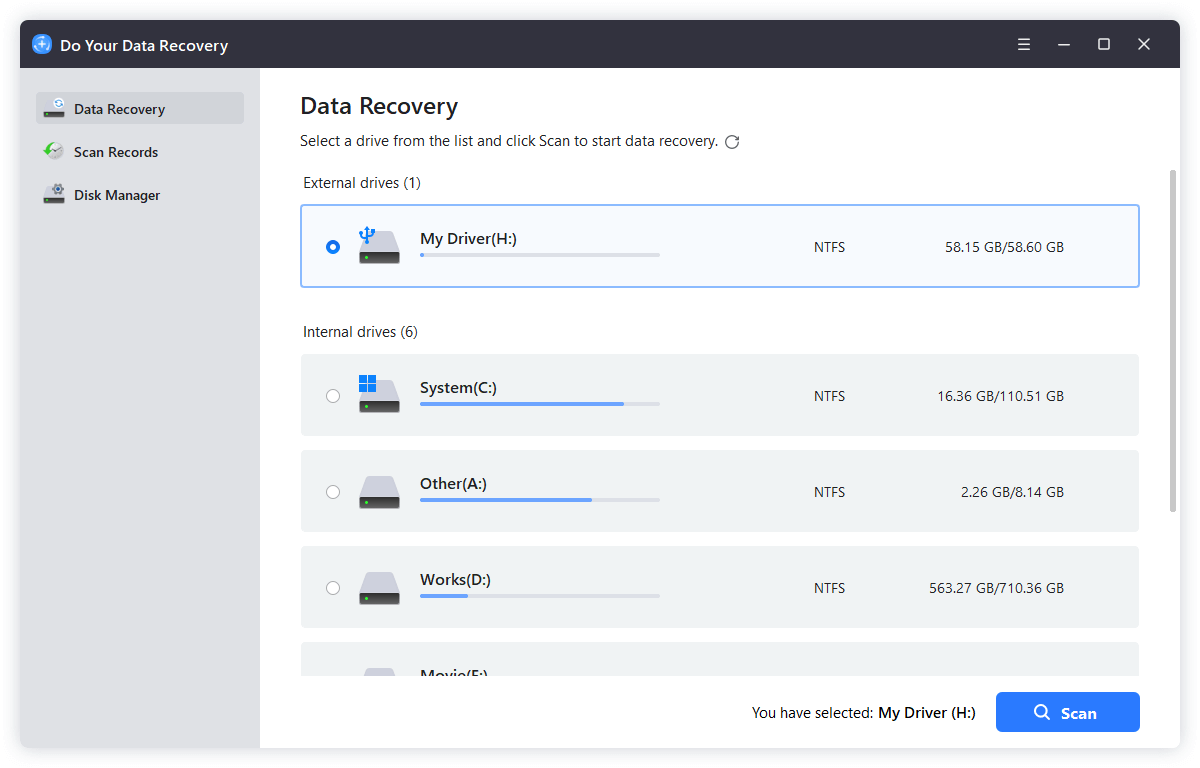
Step 2: Select the Disk Drive and Scan
Launch the software. Select the drive where your documents were located (usually C: drive or Desktop/Documents path). Click the 'Scan' button to start searching for missing files.
Step 3: Preview and Recover Your Documents
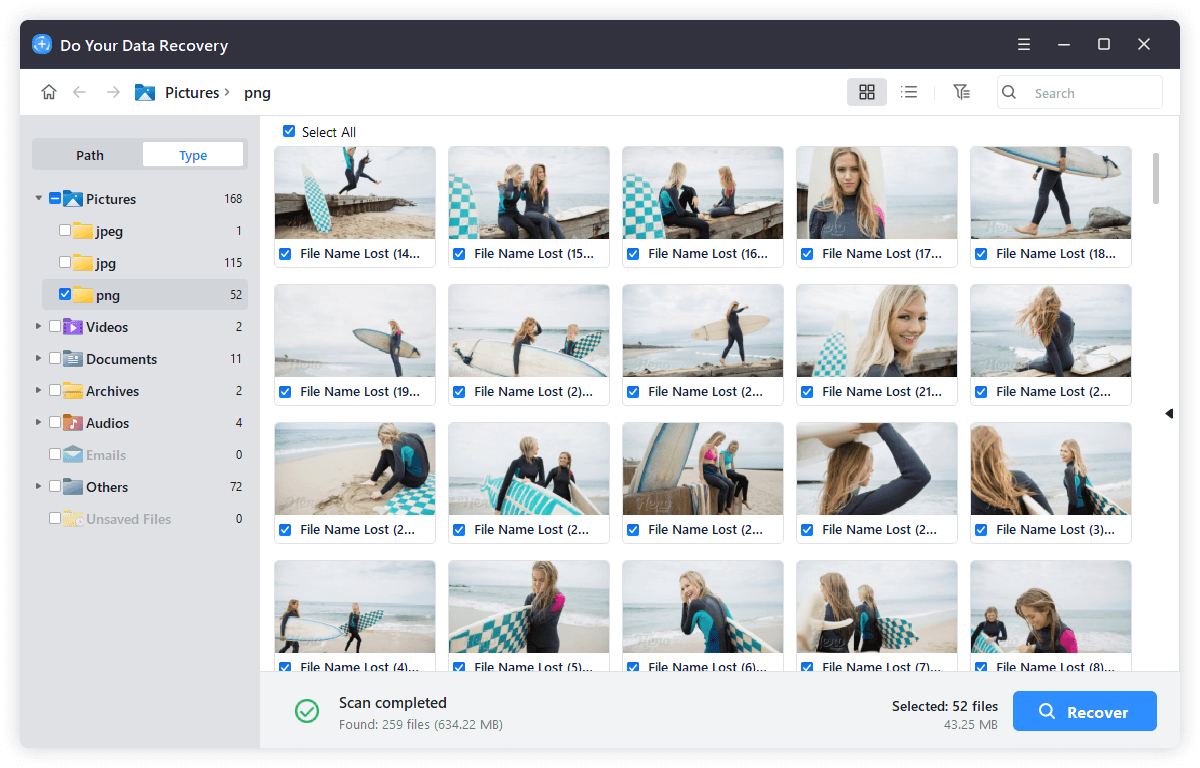
Once the scan completes, browse through the categorized file tree on the left sidebar. Filter by File Type > Documents (DOCX, PDF, etc.). Double-click any document to preview its contents. Mark the checkboxes next to the files you want to retrieve, then click the 'Recover' button and save them to a safe external disk or drive partition.
Method 3: Restore Files from File History or Windows Backup
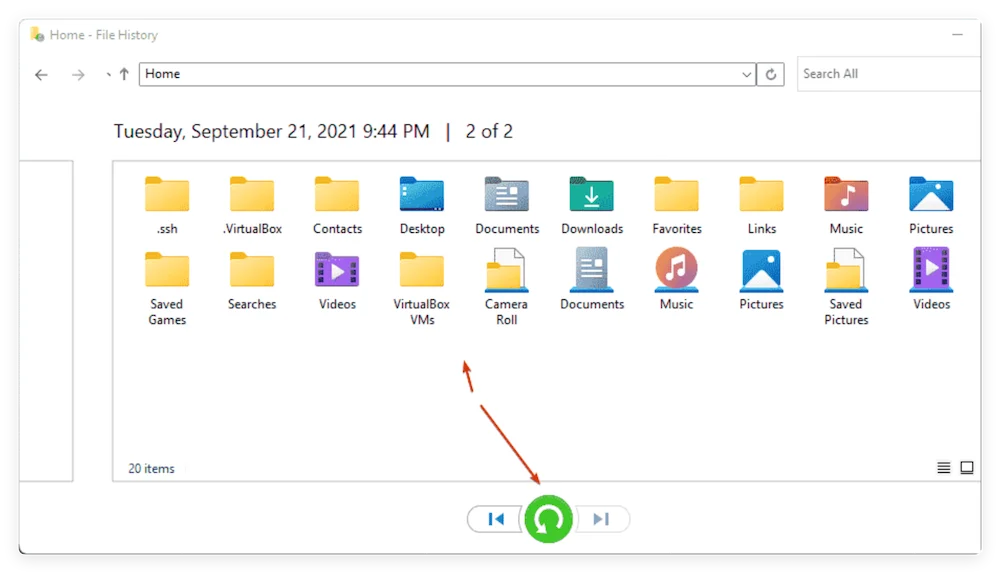
If you enabled Windows File History prior to installing the 26H2 update, you can roll back your Documents folder to an earlier snapshot:
- Press the Windows key, type Restore your files with File History, and press Enter.
- Locate your Documents folder in the backup browser.
- Use the left arrow button at the bottom to navigate back to a date prior to the 26H2 update.
- Select the missing document files and click the green Restore icon.
Method 4: Check OneDrive Cloud Storage & Recycle Bin
The Windows 11 26H2 upgrade frequently reconfigures OneDrive sync settings. Your files might have been moved to OneDrive cloud storage during setup:
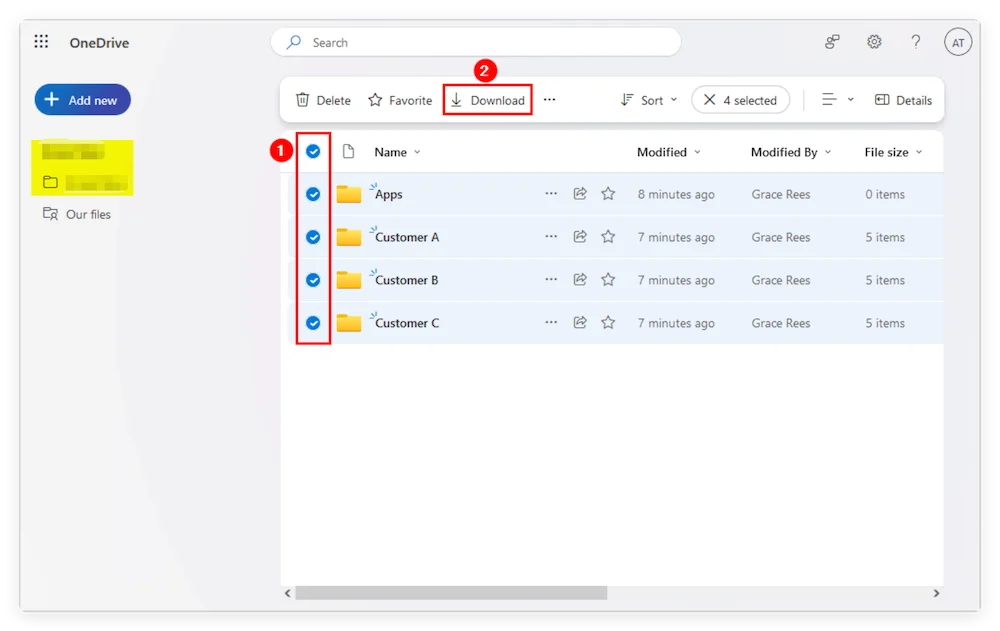
- Open a web browser and log into onedrive.live.com with your Microsoft Account.
- Check the My Files tab as well as the OneDrive Recycle Bin on the left navigation panel.
- If your personal documents appear there, select them and click Restore or Download to return them to your computer.
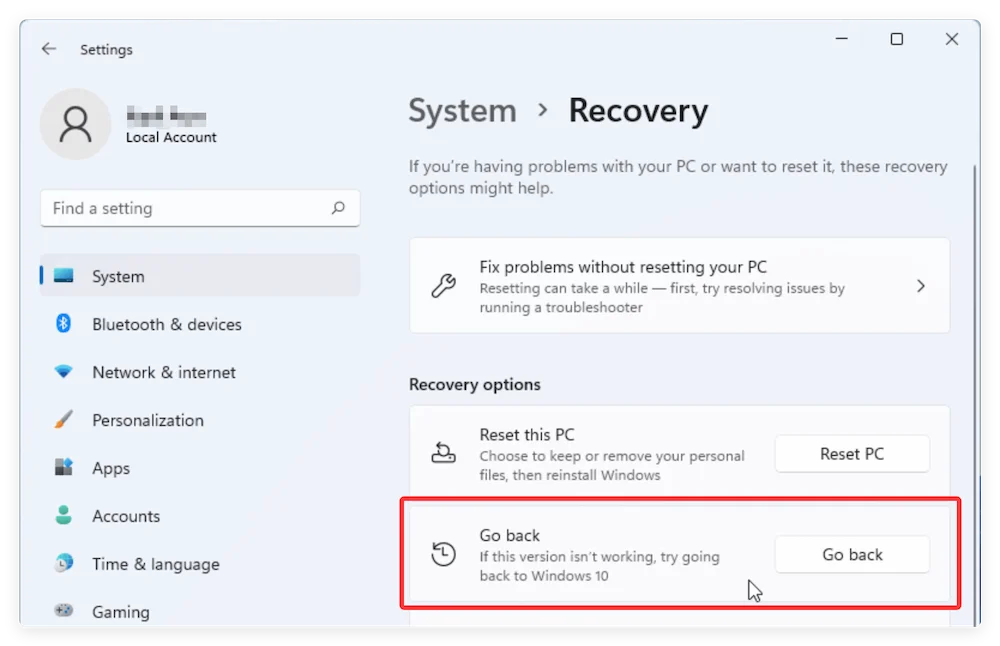
Method 5: Roll Back to the Previous Windows 11 Build
If your documents are missing because the 26H2 update corrupted user account associations, rolling back the update within 10 days can restore your previous system state:
- Open Settings (Win + I) > System > Recovery.
- Under Recovery options, find Go back and click the Go back button.
- Follow the on-screen prompt, select a reason for uninstalling, and complete the rollback process.
Comparison of Recovery Methods
|
Recovery Method |
Best Used For |
Success Rate |
Difficulty Level |
|
Windows.old Folder |
Files moved during update |
High (if within 10 days) |
Very Easy |
|
Do Your Data Recovery |
Permanently deleted / missing files |
Very High (98%+) |
Easy (3 steps) |
|
File History Backup |
Pre-existing file backup users |
High |
Easy |
|
OneDrive Cloud Sync |
Files auto-synced to cloud |
Medium-High |
Easy |
|
System Rollback |
Major profile / system glitches |
Medium |
Moderate |
How to Prevent Data Loss Before Windows 11 Updates
To protect your personal documents from future Windows 11 feature updates, follow these simple habits:
- ✔ Create an External Disk Backup: Always copy essential documents to an external hard drive, USB flash drive, or secondary SSD partition before running major updates.
- ✔ Enable File History: Turn on File History in Windows Settings so your files are continually backed up automatically.
- ✔ Ensure Adequate Disk Space: Ensure drive C: has at least 25 - 30 GB of free space before initiating major feature upgrades to avoid installation crashes.
- ✔ Avoid Using Temporary Accounts: If Windows logs you into a temp account after an update, log out immediately. Never save new files under a temporary account profile.
FAQs about Windows 11 26H2 Update Deleted Files
Conclusion:
Discovering that the Windows 11 26H2 update deleted your documents can be alarming, but you do not need to panic. By checking for temporary profile glitches, inspecting the Windows.old folder, or utilizing Do Your Data Recovery, you can quickly retrieve all your lost files, photos, and spreadsheets.
If standard Windows tools fail to find your missing files, download Do Your Data Recovery to perform a deep scan of your storage drive and restore your valuable personal documents in just 3 easy steps!
Do Your Data Recovery
The safe, powerful and easy-to-use data recovery program to help you recover deleted, formatted or lost data, recover lost data from damaged hard drive, from HDD, SSD, USB flash drive, memory card, digital camera, etc, fix damaged drive and external devices.
Written & Updated by Justin Kenny
Justin Kenny is a writer & editor of DoYourData. He joined DoYourData in 2016 and focuses on writing articles about Windows data recovery, Mac data recovery, external device data recovery, hard drive clone, data erasure, Mac cleanup, computer issue fixes, etc. He is a super fan of Apple devices and is big on testing new digital device and system utility software.