Quick Navigation:
- What is Formatting, and Why is it Important?
- Format Crucial SSD on Windows
- Format Crucial SSD on macOS
- Recover lost data from a formatted Crucial SSD
- Conclusion
Solid-state drives (SSDs) are central to high-performance data storage at Crucial. You have come to the right place if you have ever wondered about the magic of data recovery following an accidental erase or the enchantment of preparing these technological wonders to hold your digital treasures.
Imagine this: your Crucial solid-state drive (SSD), a stylish and potentially limitless digital storage device, is prepared to be a repository for organized data or a tool to recover deleted items. Sculpting, Formatting, and unformatting allow you to shape this storage masterpiece to your specifications or painstakingly return it to its original condition following a data crisis.
What is Formatting, and Why is it Important?
When you format a storage device, you're configuring its file system, which controls data storage, organization, and access. Formatting may be necessary before using a newly purchased Crucial SSD. After Formatting, the operating system can identify the drive, allocate space, and get it ready to hold files.
Importance of Formatting:
- Drive Preparation: Formatting prepares the SSD for data storage by establishing a file system structure.
- Data Organization: It lays forth the parameters for data storage, which the OS can use to manage and access files efficiently.
- Error Correction: It improves the health and dependability of drives by identifying and marking problematic sectors.
- Security: Formatting provides a fresh start by erasing all previous data and helps with data security by blocking access to leftover data.
Format Crucial SSD on Windows
Open Disk Management:
- Navigate to "Disk Management" by pressing the Win + X keyboard shortcut.
- Choose "Disk Management" from the list when right-click the Start button.
Locate Your Crucial SSD:
Locate your Crucial SSD in the list of disks under Disk Management. To prevent data loss from other drives, be sure you're choosing the right drive.
Initialize the SSD:
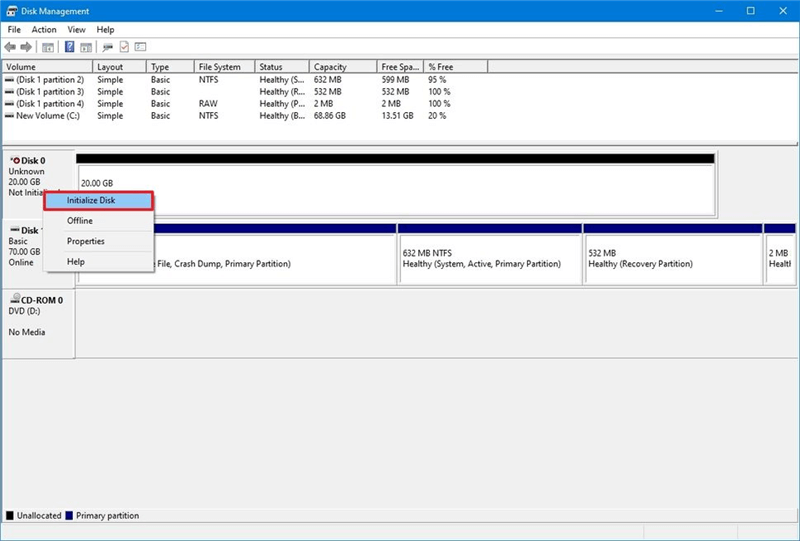
- Disk Management may ask you to initialize the SSD if it is new or hasn't been done before.
- When you right-click the solid-state drive, choose "Initialize Disk." Select the partition style you prefer, MBR or GPT, and click "OK."
Format the Crucial SSD:
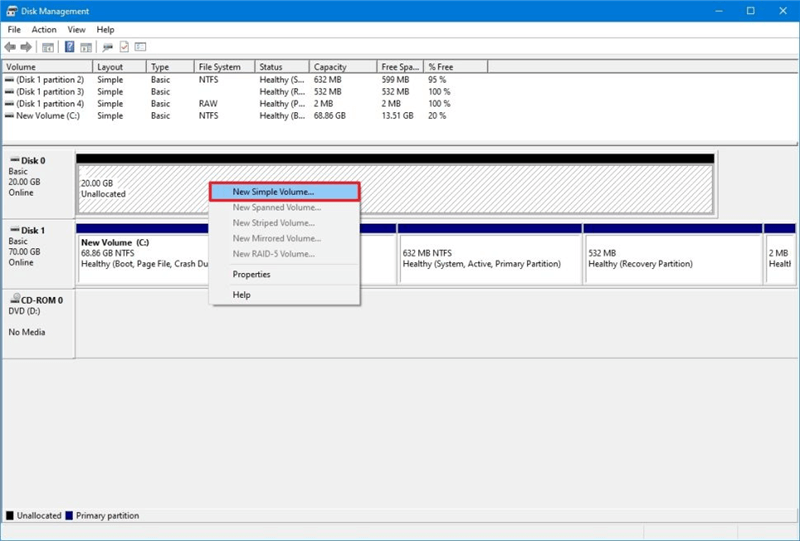
- Press and hold the right mouse button on the Crucial SSD's free space.
- Click the "New Simple Volume" button to begin creating a new simple volume.
- Follow the on-screen prompts to name the volume, assign it a drive letter, choose the file system, and set the volume size.
- Select a thorough (unchecked) format for a more comprehensive one, or choose a rapid one.
Complete the Formatting Process:
- Click "Finish" after you've reviewed your options to begin formatting the Crucial SSD.
- You can utilize your Crucial SSD immediately after the operation finishes formatting it.
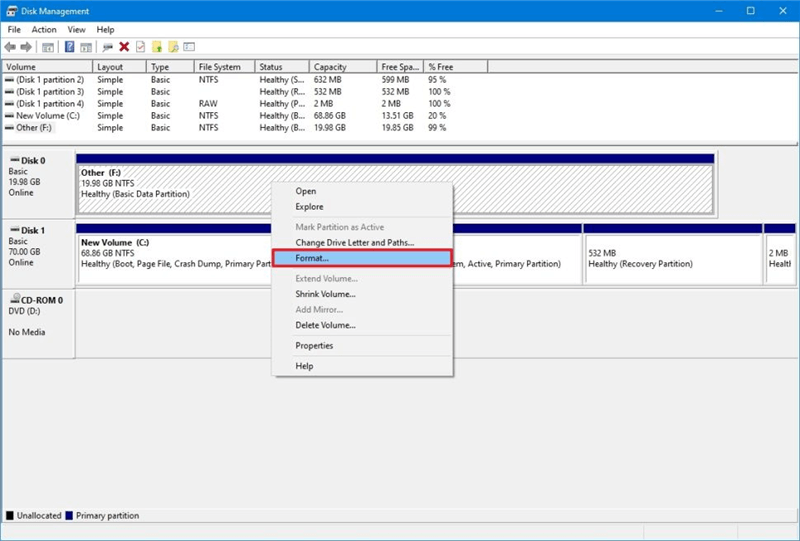
If the Crucial SSD has partitions, just right-click the Crucial SSD and choose Format.
Format Crucial SSD on macOS
Open Disk Utility:
Select "Utilities" from the Finder's Applications menu, and then open "Disk Utility."
Select Your Crucial SSD:
- The left sidebar of Disk Utility displays a list of drives.
- Finding your Crucial SSD is as easy as browsing the available disks.
Erase and Format the SSD:
- Before Formatting, choose the Crucial SSD.
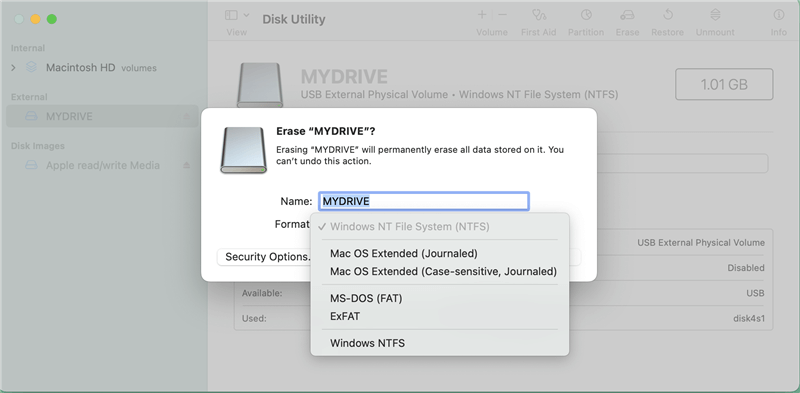
- Locate the "Erase" icon on the toolbar and click on it.
Specify Format and Name:
- Pick the format you want your solid-state drive to be stored in; "Mac OS Extended (Journaled)" and "APFS" are favorites. If you will use the Crucial SSD on both Windows PC and a Mac, just select "ExFAT".
- Give the SSD a name so you can find it quickly.
Start the Format Process:
- The Crucial SSD can be formatted by clicking the "Erase" button.
- When asked, confirm the action.
Completion:
Your Crucial SSD will be formatted by the parameters you choose in Disk Utility. You can then use your macOS system to access the formatted SSD.
If you can not erase the Crucial SSD, just click First Aid to repair the SSD.

Recover lost data from a formatted Crucial SSD
Data recovery from a formatted solid-state drive is integral to unformatting a drive. Data recovery software is typically necessary for this difficult operation. To recover data from a Crucial SSD that has been formatted by accident, follow these steps:
- Stop Using the Drive:To avoid making a recovery more difficult, you should immediately cease using the SSD.
- Use Data Recovery Software: DoYourData, Disk Drill, Donemax Data Recovery, and Recuva are trustworthy data recovery programs that provide unformatting features.
- Scan the Drive: To find recoverable files on a formatted SSD, install and execute the chosen software.
- Recover Data: You can preview the scanned files, choose which ones to recover, and then continue the recovery procedure once the scan is finished.
Now, follow the steps below to unformat a Crucial SSD with Do Your Data Recovery:
Step 1. Download and install Do Your Data Recovery on your PC or Mac. Then open it.
Do Your Data Recovery
- Recover permanently deleted files from Crucial SSD.
- Unformat Crucial SSD.
- Recover all inaccessible data from a damaged Crucial SSD.
Step 2. Connect the Crucial SSD to your computer and then select it to start data recovery.

Step 3. Click on Scan button to deeply scan the formatted Crucial SSD and find all lost files.
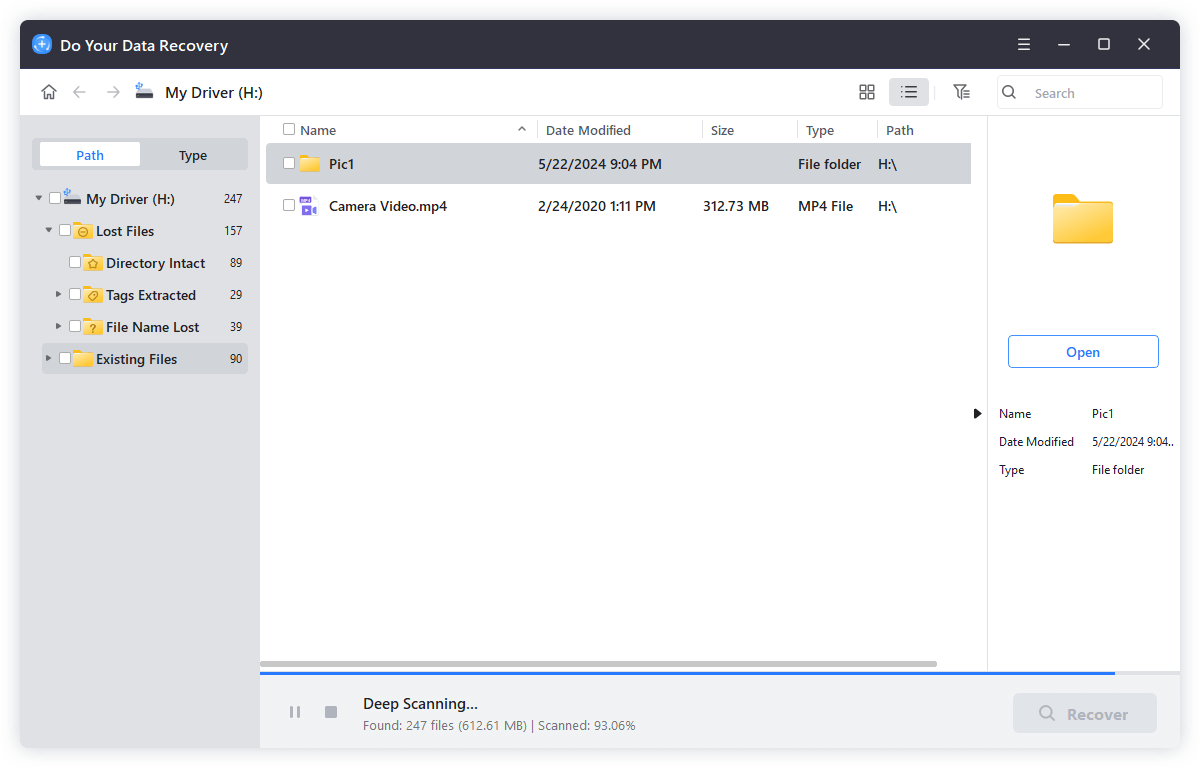
Step 4. Once the scan is completed, select all files, save them by clicking on Recover button. Don’t save the recovered files to the Crucial SSD before getting all lost files back.

Conclusion:
To efficiently manage data, optimize performance, and troubleshoot difficulties, it is essential to understand how to format and unformat a Crucial SSD. Suppose users are familiar with the processes of Formatting and unformatting. In that case, they can use their solid-state drives (SSDs) effectively and safely for various purposes, including initial preparation, fixing disk-related issues, and data organization. When dealing with SSD formatting and unformatting processes, it is vital to exercise caution, back up data, and use trustworthy tools or expert services for data recovery.