Top 5 Methods to Recover Lost Data After Upgrading to macOS Sonoma
No macOS can avoid data loss. Here are best 5 methods to help you undelete files, unformat hard drive or recover lost files after upgrading to macOS Sonoma. Data recovery software is the best way to recover deleted/lost files on macOS Sonoma. Download the reliable macOS Sonoma data recovery software.
![]() Updated by Justin Kenny on July 4, 2023
Updated by Justin Kenny on July 4, 2023
Quick Navigation:
- 1. Does Updating to macOS Sonoma Delete Everything?
- 2. Best 5 Methods to Recover Lost Files after Upgrading to macOS Sonoma
- Method 1. Restore from Mac Time Machine
- Method 2. Check all Mac files with Go To Folder
- Method 3. Recover deleted files from Trash
- Method 4. Use iCloud Backup
- Method 5. Recover lost files with data recovery software
- 3. macOS Sonoma Data Recovery FAQs
Do you want to upgrade to the latest version of macOS Sonoma but are worried about losing your files? Many individuals are in the same boat as you: they want to upgrade to macOS Sonoma but are worried about losing their files. This comprehensive instruction will teach you how to recover deleted or lost files after upgrading to macOS Sonoma.
Does Updating to macOS Sonoma Delete Everything?
A new macOS version is typically used to add new features, update Mac applications, address issues, and improve performance, and it won't normally wipe everything. While the update is running, your Mac's hard drive will not be accessed in any way. That may occur if you recently updated your Mac and wiped everything:
- Problematic or stopped macOS installation.
- Disks can be damaged by fragmentation if they are fragmented too much.
- There is insufficient room on this Mac's hard drive to save any additional files.
- Don't routinely update the system.
- Not using Time Machine or another method to back up important files.
No matter the cause, we're here to help you avoid catastrophe. The following section will show you how to restore deleted data after updating your Mac.
Best 5 Methods to Recover Lost Files after Upgrading to macOS Sonoma
Whether you delete a file and empty it from Trash, or have formatted a hard drive using Disk Utility, the files & data are not lost forever. With reliable data recovery methods, you are able to recover deleted, formatted or inaccessible data after upgrading to macOS Sonoma. Here are 5 proven methods to help you recover deleted/lost files on your Mac.
Method 1. Restore from Mac Time Machine
macOS's native backup and recovery tool is Time Machine. Time Machine should be used to back up your valuable files periodically. As noted in the section on updating your Mac, you should back up before upgrading the OS.
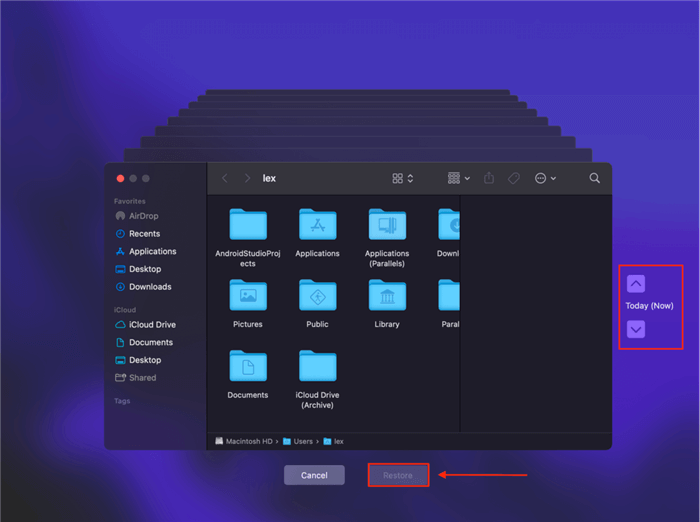
Use Time Machine to retrieve files and folders after upgrading to Sonoma.
Connect your Mac or MacBook to the Time Machine backup's external disk.
Start a Finder window in the missing files folder.
Launch Time Machine by clicking the Menu bar clock icon.
Find the items you want using Time Machine's controls.
Select the files you want to recover and preview them using the Space Bar.
To finish recovery, click Restore. Items will be returned to your Mac.
Method 2. Check all Mac files with Go To Folder
It's possible to experience the unexpected loss of all Mac desktop icons or files on your Mac's desktop. It is now recommended that all files and directories be checked before data recovery. The Finder's Go To Folder feature makes it easy to see where everything is stored.
Select "Apple Menu" from the menu bar on the top left of your screen.
Choose Go > Go To Folder from the resulting menu.
Get going on the pathname of the folder. Suggestions for path names don't care if you misspell a letter.
To open a file or folder, double-click on it.
After a failed search, data recovery procedures might be initiated.

Method 3. Recover deleted files from Trash
If you're using macOS and something goes missing, the first place you should check is the Trash. For up to 30 days, or until you empty the Trash, recently deleted things are kept in this system folder. Checking the Trash is the first step toward recovering lost data.
Click the trash can icon to access the Trash.
Look for the data that you need to restore.
To return something to its original position, right-click on it and pick Put Back from the menu that appears.

Method 4. Use iCloud Backup
If you set up iCloud backups before upgrading to macOS Sonoma, there's a chance you still have access to them.
In truth, iCloud files can be recovered using iCloud's data recovery tool. Files removed from iCloud-enabled folders can be restored using this method.
Restoring from an iCloud backup allows you to:
Go to iCloud.com on your web browser.
Click the "Data Recovery" link at the very bottom of the page.
Select the type of file you need to retrieve and click it.
Select the file when the dialogue box displays and click the Restore button.
When the restoration process is complete, your iCloud files will be restored.

Method 5. Recover lost files with data recovery software
Data recovery software is the best method to recover deleted or lost files on Mac. Do Your Data Recovery for Mac is fully compatible with the latest macOS Sonoma. It can help you recover deleted files from emptied trash, unformat hard drive, export data from inaccessible hard drive to your Mac. Download it here:
Do Your Data Recovery for Mac
- Recover permanently deleted files on macOS Sonoma.
- Recover formatted or erased data on macOS Sonoma.
- Recover inaccessible or damaged hard drive on MAC.
This macOS 14 Sonoma data recovery tool is pretty simple to use, no data recovery experience required and even the most newbie can use it recover lost data from local hard drive or external storage device.
When you realize you’ve lost important files, stop using your Mac and download Do Your Data Recovery for Mac immediately. Even you have emptied the Trash or erased the startup disk, you still can use this macOS Sonoma data recovery tool to help you quickly get the lost files back. Here is the step-by-step guide:
Step 1. Select the hard drive.
Open Do Your Data Recovery for Mac from Launchpad and it shows all hard drives and connected drives. Just select the Mac startup disk to start data recovery.

Step 2. Scan the hard drive.
Click on Scan button. This macOS 14 data recovery software will deeply scan the selected hard drive and find all existing files, erased files, formatted files and lost files.

Step 3. Preview and recover lost files.
You can easily preview the file by double-clicking it. Then select the wanted files and save them by clicking on Recover button.

FAQs About Word File Recovery on Mac
- Download and install DoYourClone for Mac.
- Connect an external hard drive to your Mac.
- Choose Clone OS mode.
- Select the external hard drive as the destination drive.
- Click on Clone Now button to clone all data from the Mac to the external hard drive.
- Do Your Data Recovery for Mac Free
- Magoshare Data Recovery
- PhotoRec
- DiskDrill
- Stellar Data Recovery
- Wondershare Recoverit
Conclusion:
The standard installation of macOS Sonoma will not delete user files on your Mac. However a clean installation or unsafe upgrade will delete some of or even all of files on your Mac. The 5 methods listed in this article can help you quickly and securely recover lost files after upgrading to macOS Sonoma. With the reliable macOS Sonoma data recovery software, you are able to recover all deleted files, formatted data and lost data. Highly recommended.
Written & Updated by Justin Kenny
Justin Kenny is a writer & editor of DoYourData. He joined DoYourData in 2016 and focuses on writing articles about Windows data recovery, Mac data recovery, external device data recovery, hard drive clone, data erasure, Mac cleanup, computer issue fixes, etc. He is a super fan of Apple devices and is big on testing new digital device and system utility software.