How to recover data from formatted SD card?
After formatting the SD card, the formatted data can still be recovered with professional data recovery tool

Quick Navigation:
In today's digital age, where almost everyone has a digital camera or a smartphone with a camera, the need to securely erase photos has become increasingly important. Whether you're selling your camera, donating it, or simply clearing out old photos to free up space, ensuring that your images are permanently deleted is crucial. Standard deletion methods often leave data recoverable, which can lead to privacy breaches or unauthorized use of your personal images. This article will guide you through the steps to permanently erase photos from your digital camera, explaining the importance of secure deletion and providing methods to ensure your data is truly gone.
To effectively erase photos, it's essential to understand how digital cameras store them. Most digital cameras use either SD cards or internal storage to save images. These storage devices use a file system to organize and manage data. When you take a photo, the camera writes the image file to the storage device using a specific file format, such as JPEG or RAW.
SD Cards and Internal Storage
SD cards are the most common form of storage in digital cameras. They are portable, easy to replace, and can store large amounts of data. Some high-end cameras also have internal storage, which serves as a backup or an additional storage option. Regardless of the type of storage, the underlying principle remains the same: data is written to the device in binary form and organized using a file system like FAT32 or exFAT.
When you delete a photo from your camera, the file isn't immediately erased. Instead, the camera simply marks the space that the file occupies as available for new data. The photo's file structure remains intact until new data overwrites it. This means that deleted photos can often be recovered using specialized software, posing a risk to your privacy if the camera or storage device falls into the wrong hands.
Failing to permanently erase photos from your digital camera can have serious consequences. In an age where data breaches and identity theft are rampant, leaving recoverable images on a storage device can lead to various risks.
1. Privacy Breaches and Data Theft: If you sell or give away your camera without securely erasing the photos, the new owner could potentially recover your deleted images. This could include personal or sensitive photos that you wouldn't want others to see. Even if you trust the person you're giving the camera to, there's always a risk that the device could be lost, stolen, or resold, putting your data in the hands of strangers.
2. Misuse of Recovered Photos: Recovered photos can be misused in numerous ways. They could be posted online without your consent, used in identity theft schemes, or even sold on the black market. In some cases, photos can be used for blackmail or other malicious purposes, particularly if they contain sensitive or compromising content.
3. Legal and Ethical Issues: Beyond the personal risks, there are legal and ethical considerations to keep in mind. Depending on where you live, there may be laws requiring you to securely erase data before disposing of electronic devices. Failing to do so could result in legal penalties, particularly if the recovered photos are used in illegal activities. Ethically, it's important to consider the potential harm that could come from leaving recoverable data on a device.
Given the risks associated with leaving recoverable data on your digital camera, it's essential to use methods that ensure your photos are permanently erased. Below are several methods you can use to achieve this.
Most digital cameras come with a built-in formatting option that allows you to erase all data on the storage device. This is often the simplest and quickest way to wipe your photos, but it's important to understand the limitations of this method.
Step-by-Step Guide to Formatting:

Limitations of Built-In Formatting
While formatting is effective for most users, it's not foolproof. In some cases, data recovery software can still retrieve files after formatting. This is because formatting doesn't overwrite the data; it simply marks the space as available for new data. If you need to ensure that your photos are completely unrecoverable, you may need to use additional methods.
How to recover data from formatted SD card?
After formatting the SD card, the formatted data can still be recovered with professional data recovery tool
For those who need a higher level of security, using specialized data erasure software on a computer is a more effective method. These programs are designed to overwrite the data multiple times, making it impossible to recover.
When choosing data erasure software, consider factors such as ease of use, compatibility with your camera, and the level of security offered. While free options can be effective, paid software often provides more features and better support.
Here we will introduce a reliable and effective data wiping tool - DoYourData Super Eraser. This software can completely shred files and destroy the data permanently. The software can ensure the wiped data unrecoverable in any way.
Step-by-Step Guide to Using Data Erasure Software
Step 1. Connect your digital camera SD card to your computer using a card reader. Transfer the photos to your computer if you want to keep a copy of the photos.
Step 2. Download and install DoYourData Super Eraser on your computer. To wipe the photos from the card, you can choose the mode Erase Files/Folder.
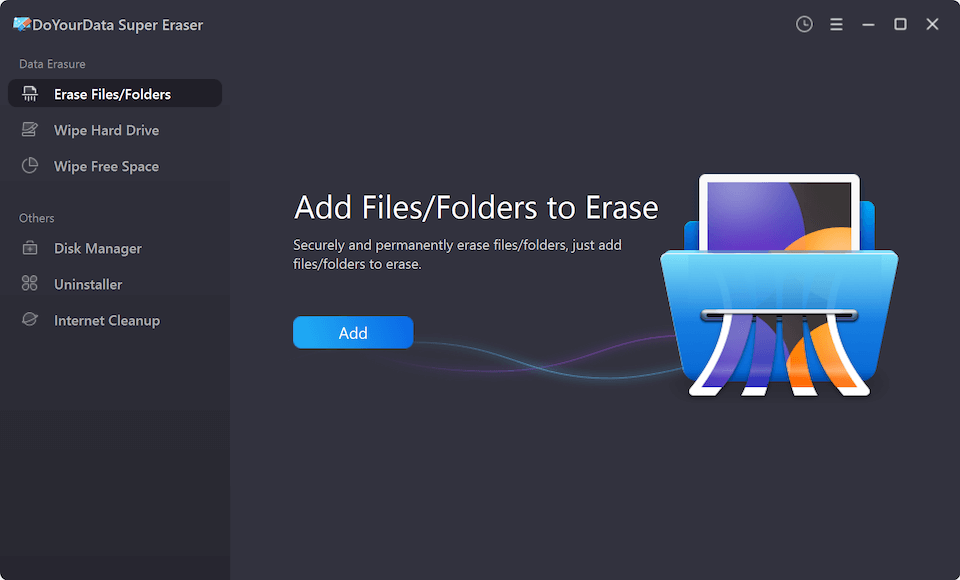
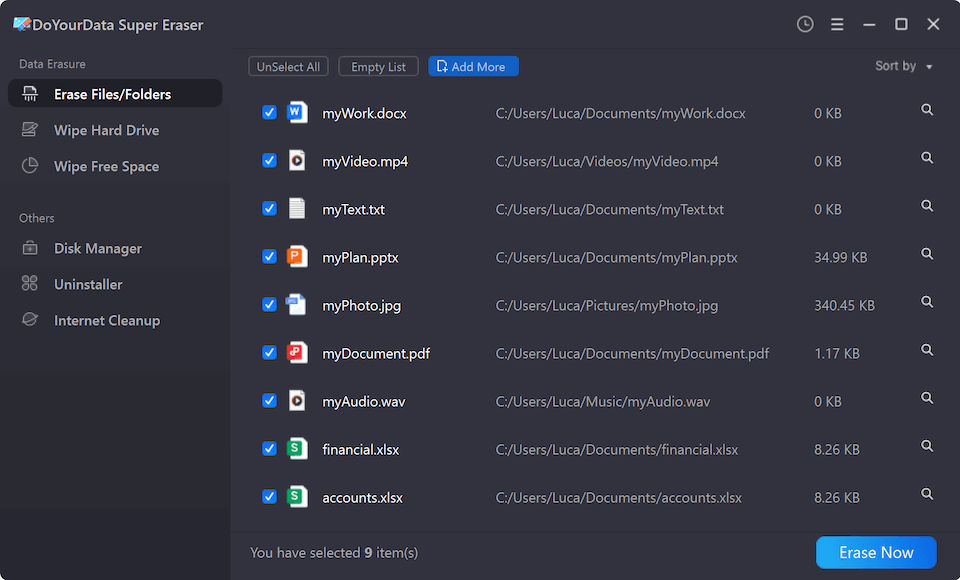
Step 3. Check and select the photos you want to erase. It will list all the selected photos before wiping. You can confirm and select or deselect the files before you go to next step.
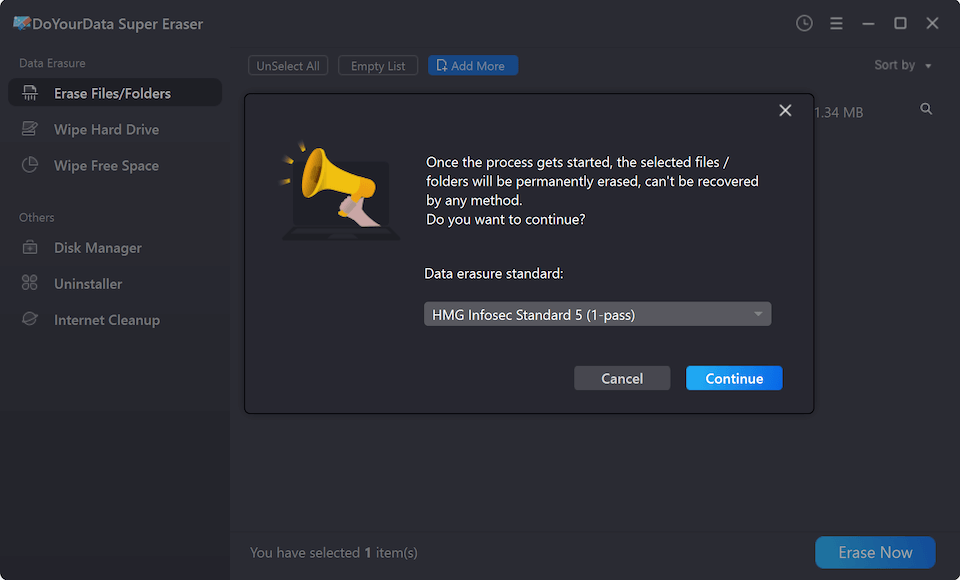
Step 4. The software offers several methods for deleting data. Choose the one that best suits your needs, keeping in mind that multiple overwrites provide the highest level of security.
Step 5. Start the erasure process and wait for the software to complete its task. Depending on the size of the data and the method chosen, this could take anywhere from a few minutes to several hours.
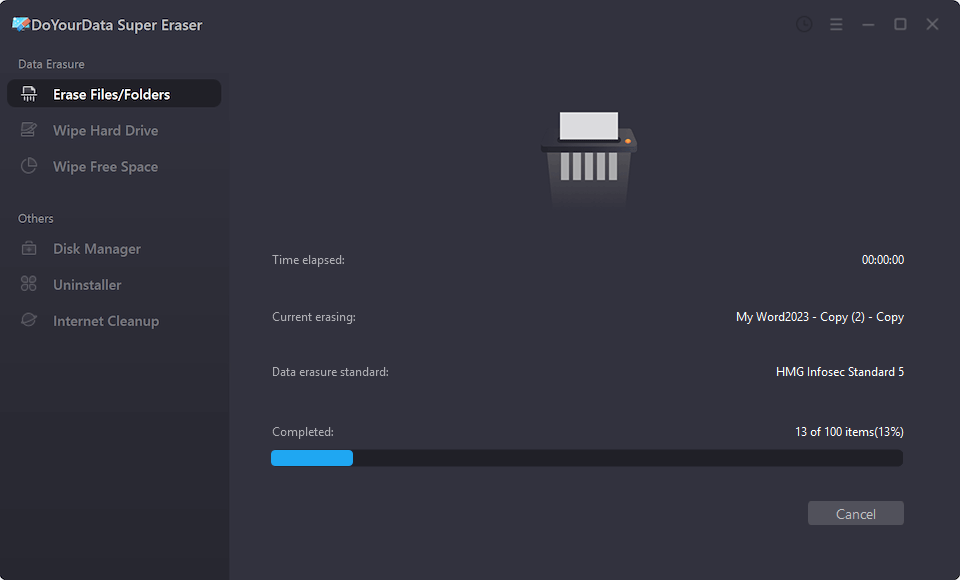
After the data wiping process is done, all the selected photos are wiped permanently from the SD card, there will be no chance to recover the photos in any way. It can protect your data from unauthorized access.
In extreme cases where data security is paramount, physically destroying the storage media may be the best option. This method is particularly useful if the camera or storage device is no longer functional, or if you're dealing with highly sensitive data.
Importance of Physical Destruction
Physical destruction is often the last resort for permanently erasing data. It's necessary when software-based methods are insufficient, or when you want to ensure that no one can ever recover the data, even with advanced tools. This method is commonly used by government agencies, businesses, and individuals with highly sensitive information.
Methods for Safely Destroying SD Cards and Internal Storage
1. Shredding: Professional data destruction companies offer shredding services for electronic devices, including SD cards. The storage media is shredded into tiny pieces, making it impossible to recover any data.
2. Drilling: If you prefer a DIY approach, drilling holes through the SD card or internal storage can effectively destroy the data. Ensure that the device is completely unusable before disposing of it.
3. Burning: Burning the storage media is another effective way to destroy data, but it should be done with caution. Use a safe, controlled environment and follow local regulations regarding the disposal of electronic waste.
4. Degaussing: This method involves using a powerful magnet to disrupt the data on the storage media. It's most effective on magnetic storage devices, such as hard drives, but can also work on certain types of flash storage.
Maintaining your privacy doesn't end with the erasure of your photos. Here are some tips to help you keep your data secure in the future:
1. Regularly Format the Camera's Storage: Make it a habit to regularly format your camera's storage after transferring photos to your computer. This ensures that old data is erased and reduces the risk of recoverable files being left behind.
2. Use Encryption on Storage Devices: Encrypting your storage devices adds an extra layer of security. Even if someone recovers the data, they won't be able to access the photos without the encryption key.
3. Set Up Automatic Secure Deletion: If your camera or software supports it, set up automatic secure deletion protocols. This ensures that photos are securely erased as soon as they're deleted, minimizing the risk of recoverable data.
In conclusion, permanently erasing photos from your digital camera is essential for protecting your privacy and ensuring that your data doesn't fall into the wrong hands. Whether you're using your camera's built-in formatting option, specialized data erasure software, or physically destroying the storage media, it's important to choose the method that best suits your needs. Always verify that your data has been permanently erased, and adopt best practices to maintain your privacy in the future. By taking these steps, you can enjoy the peace of mind that comes with knowing your photos are truly gone.

DoYourData Super Eraser
DoYourData Super Eraser, the award-winning data erasure software, offers certified data erasure standards including U.S. Army AR380-19, DoD 5220.22-M ECE to help you securely and permanently erase data from PC, Mac, HDD, SSD, USB drive, memory card or other device, make data be lost forever, unrecoverable!
